

Intro
This guide will walk you through the process of configuring a production-grade VPC on AWS.
What is a VPC?
If you were building your own data center, you would set up a physical network by configuring switches, routers, connecting everything with ethernet cables, and so on. In the AWS cloud, you can set up a virtual network (AKA a software-defined network) by configuring a Virtual Private Cloud (VPC). Each VPC defines a logical partition of your AWS account, complete with its own IP addresses, subnets, routing rules, and firewalls.
The VPC serves three primary purposes:
- Networking
-
The VPC is the basic networking and communication layer for your AWS account. Just about every AWS resource (e.g., EC2 instances, RDS databases, ELBs, etc) runs in a VPC and the VPC determines how (or if) all those resources are able to talk to each other.
- Security
-
The VPC is also the basic security layer for your AWS account. As it controls all networking and communication, it’s your first line of defense against attackers, protecting your resources from unwanted access.
- Partitioning
-
VPCs also give you a way to create separate, logical partitions within an AWS account. For example, you could have one VPC for a staging environment and a separate VPC for a production environment. You can also connect VPCs to other networks, such as connecting your VPC to your corporate intranet via a VPN connection, so that everyone in your office and all the resources in your AWS account can access the same IPs and domain names.
What you’ll learn in this guide
This guide consists of four main sections:
- Core concepts
-
An overview of the core concepts you need to understand to use VPCs, including subnets, route tables, security groups, NACLs, peering connections, and endpoints.
- Production-grade design
-
An overview of how to configure a secure, scalable, highly available VPC that you can rely on in production. To get a sense of what production-grade means, check out The production-grade infrastructure checklist.
- Deployment walkthrough
-
A step-by-step guide to deploying a production-grade VPC in AWS using code from the Gruntwork Infrastructure as Code Library.
- Next steps
-
What to do once you’ve got your VPC(s) deployed.
Feel free to read the guide from start to finish or skip around to whatever part interests you!
Core concepts
Default VPCs and custom VPCs
A quick overview of VPCs:
- Before VPCs
-
When AWS first launched, it did not support VPCs, so every resource you launched in your AWS account (e.g., every EC2 instance) was effectively in a single, large, public IP address space that could be accessed by anyone, anywhere, over the public Internet (unless you blocked it using security groups and OS-level firewalls):
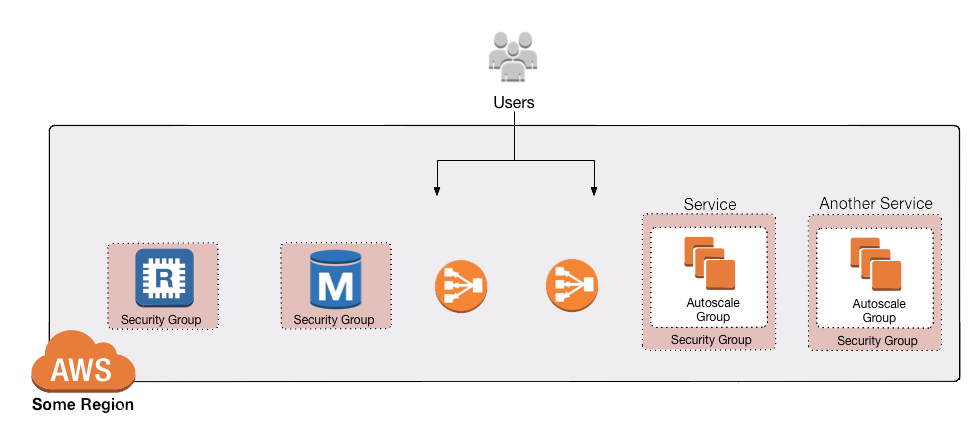 Figure 1. Before VPCs, all your AWS resources were in one global IP address space anyone could access (unless you blocked them via security groups or firewalls)
From a security standpoint, this represented a step backwards compared to traditional data centers where you could configure most of your servers so they were physically unreachable from the public Internet.
- VPCs are introduced
-
Around 2009, AWS added support for VPCs to allow you to better isolate your resources. For example, you could create one VPC for a staging environment that is completely isolated from (that is, has no way to talk to) a separate VPC for your production environment:
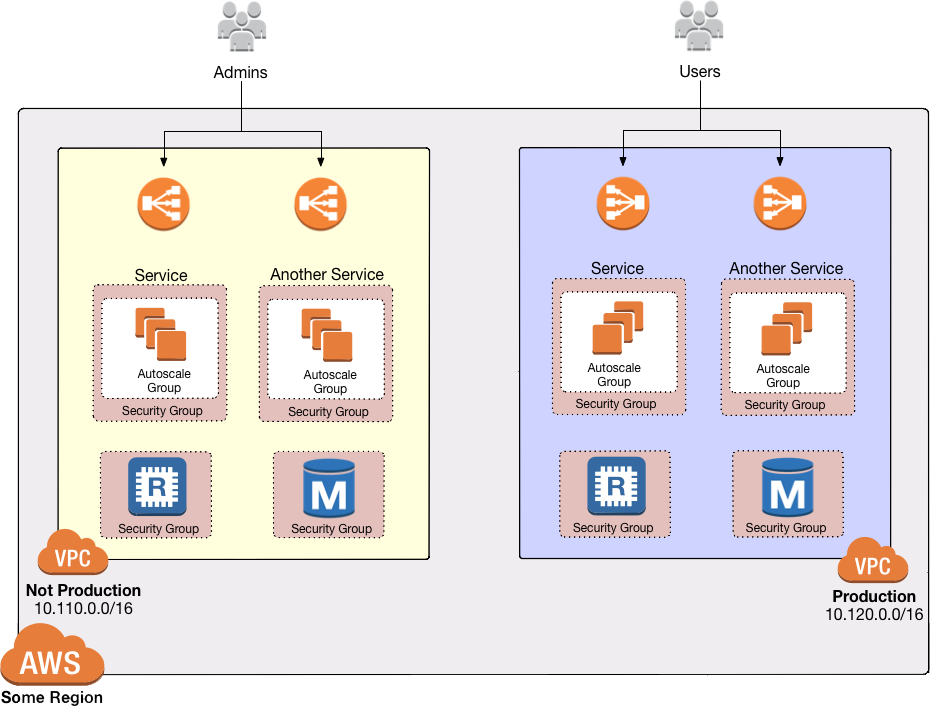 Figure 2. With VPCs, you could separate your AWS resources into completely isolated networks
You’ll see later in this guide how you can use VPCs, route tables, subnets, security groups, and NACLs to get fine-grained control over what network traffic can or can’t reach your AWS resources.
- Default VPCs
-
Every AWS account created after 2013 requires that you use a VPC for just about all resources. If you don’t specify a VPC, your resource will be deployed into the Default VPC in your AWS account. The Default VPC is great for learning and experimenting, but it is not a good choice for production use cases. That’s because the default settings in the Default VPC makes all your resources accessible on the public Internet, a bit like having no VPC at all. You can modify those settings to lock things down more, but it’s a lot of settings to change, and as nothing in the Default VPC is managed as code (it’s all automatically created for you behind the scenes by AWS), you’re typically better off creating a new, custom VPC.
- Custom VPCs
-
For any production use cases, you should create a custom VPC. In the Production-grade design section, we’ll go over how to configure a VPC with the kind of security, scalability, and high availability you need in production.
VPC IP addresses
Here’s how IP addresses work with AWS VPCs:
- Private IP addresses
-
Every VPC defines an isolated network that has its own range of private IP addresses. For example, the Default VPC in AWS is configured to use all the IP addresses between
172.31.0.0and172.31.255.255; if you create a custom VPC, you can pick a custom IP address range to use, such as10.10.0.0to10.10.255.255. These private IPs should be from the IP address ranges defined in RFC 1918 (more on this later). Private IP addresses are only accessible from within the VPC, and not from the public Internet. - Public IP addresses
-
VPCs can also optionally be configured to assign public IP addresses to your resources (as is the case with the Default VPC). Public IPs are not associated with your VPC or even your AWS account; instead, they come from a pool of IP addresses shared by AWS across all of its customers (see AWS IP Address Ranges), so the IPs you get are unpredictable, and may change (if you need consistent, predictable public IP addresses, you will need to use elastic IP addresses).
- Assigning IP addresses
-
AWS will automatically assign IP addresses to resources you launch in a VPC. For example, in the Default VPC, one EC2 instance you launch might get the private IP address
172.31.0.2and public IP address203.0.113.25, while another instance might get the private IP address172.31.5.3and the public IP address54.154.202.112.
CIDR notation
When dealing with networking, you often need to reason about ranges of IPs, such as "all IP addresses between
172.31.0.0 and 172.31.255.255" (there are 65,536 IP addresses in this range). The de facto standard for
representing IP address ranges is called
Classless Inter-Domain Routing (CIDR) notation. For
example, the same 65,536 IP addresses can be represented in CIDR notation as 172.31.0.0/16. This notation includes
the IP address (172.31.0.0) and the number of bits in the mask (/16). To understand what the notation means,
you:
-
Convert the IP address to binary: e.g.,
172.31.0.0in binary is10101100.00011111.00000000.00000000. -
The mask tells you how many bits of the binary IP address identify the network (and stay constant for everything in that network) and how many bits identify unique hosts (and therefore, can vary). For a
/16mask, the left-most 16 bits stay constant, while the right-most 16 bits are allowed to vary. -
Putting that together,
172.31.0.0/16represents all IP addresses from10101100.00011111.00000000.00000000(172.31.0.0) to10101100.00011111.11111111.11111111(172.31.255.255).
A few handy notes:
- CIDR calculators
-
You can use online CIDR calculators to quickly do the math for you.
- CIDR blocks
-
IP addresses expressed in CIDR notation are often called CIDR Blocks.
- All IPs
-
The CIDR Block
0.0.0.0/0corresponds to all IP address. - Single IPs
-
To specify a single IP address (e.g., the IP of a specific server), use the
/32mask: e.g.,4.4.4.4/32is the CIDR notation for just one IP,4.4.4.4.
Subnets
Each VPC is partitioned into one or more subnets
(sub-networks). Each subnet controls a portion of the VPC’s CIDR range. For example, a VPC with the CIDR block
10.10.0.0/16 (all IPs from 10.10.0.0 - 10.10.255.255) might be partitioned into two subnets, one with the CIDR
block 10.10.0.0/17 (all IPs from 10.10.0.0 - 10.10.127.255) and one with CIDR block 10.10.128.0/17 (all IPs
from 10.10.128.0 - 10.10.255.255). Note that subnets in the same VPC are not allowed to have overlapping CIDR
ranges.
Route tables
Every subnet must define a route table that defines how to route traffic within that subnet. A route table consists of one or more routes, where each route specifies a destination, which is the range of IP addresses (in CIDR notation) to route, and the target, which is where to send the traffic for that range of IP addresses.
Here’s an example route table:
| Destination | Target |
|---|---|
10.0.0.0/24 |
Local |
0.0.0.0/0 |
igw-12345 |
This route table sends all traffic within the subnet’s CIDR block, 10.0.0.0/24, to the Local route, which means it
will be automatically routed within the subnet by AWS. This table then adds a fallback route for all other IPs
(0.0.0.0/0) to send traffic to the an Internet Gateway with ID igw-12345. We’ll discuss Internet Gateways next.
Internet Gateways, public subnets, and private subnets
An Internet Gateway is a service managed by AWS that runs in your VPC. It allows access to and from the public Internet for resources in your subnet that have a public IP address (assuming you configure a route table entry in that subnet pointing to the Internet Gateway).
Subnets that have routes to Internet Gateways are called public subnets, as the public IP addresses in those subnets can be accessed directly from the public Internet. Subnets that do not have routes to Internet Gateways are called private subnets, as they will rely solely on routing to private IP addresses, which can only be accessed from within the VPC.
NAT Gateways
Resources in your public subnets can access the public Internet via an Internet Gateway. But what about resources in a private subnet? These resources don’t have public IP addresses, nor a route to an Internet Gateway, so what do you do?
The solution is to deploy a NAT Gateway. The NAT Gateway should run in a public subnet and have its own public IP address. It can perform network address translation, taking network requests from a resource in a private subnet, swapping in its own public IP address in those requests, sending them out to the public Internet (via the Internet Gateway in the public subnet), getting back a response, and sending the response back to the original sender in the private subnet.
In order for the NAT Gateway to work, you’ll need to add a route to the route table for your private subnets:
| Destination | Target |
|---|---|
10.10.0.0/24 |
Local |
0.0.0.0/0 |
nat-67890 |
This route table sends all traffic within the private subnet’s CIDR block, 10.10.0.0/24, to the Local route, and
the traffic for all other IPs, 0.0.0.0/0, to a NAT Gateway with ID nat-67890.
Security Groups
Most resources in AWS allow you to attach one or more security groups, which are virtual firewalls that you can use to control which ports that resources opens for inbound and outbound network traffic. By default, all ports are blocked, so to allow network communication, you can add inbound and outbound rules. Each rule in a security group specifies a port range, the IP addresses or other security groups that will be allowed to access that port range, and the protocol that will be allowed on those port range.
Here’s an example of inbound rules:
| Port range | Source | Protocol | Comment |
|---|---|---|---|
80 |
10.0.0.0/16 |
tcp |
Allow HTTP requests from within the VPC |
443 |
10.0.0.0/16 |
tcp |
Allow HTTPS requests from within the VPC |
4000 - 5000 |
sg-abcd1234 |
tcp |
Open a range of ports (e.g., for debugging) to another security group with ID |
And here’s an example of outbound rules:
| Port range | Destination | Protocol | Comment |
|---|---|---|---|
443 |
0.0.0.0/0 |
tcp |
Allow all outbound requests over HTTPS so you can talk to the public Internet |
Note that every VPC has a Default Security Group that will be used if you don’t specify any other security group for your resources. We recommend always attaching a custom security group with rules that exactly match your use case, rather than relying on this default, global one.
Network ACLs
In addition to security groups, which act as firewalls on individual resources (e.g., on an EC2 instance), you can also create network access control lists (NACLs), which act as firewalls for an entire subnet. Just as with security groups, NACLs have inbound and outbound rules that specify a port range, the IP addresses that can talk to that port range, and the protocol that will be allowed on that port range.
However, there are two main differences with NACLs:
- Allow/Deny
-
Each NACL rule can either
ALLOWorDENYthe traffic defined in that rule. - Stateful/Stateless
-
Security groups are stateful, so if a security group has a rule that allows an inbound connection on, say, port 80, the security group will automatically also open up an outbound port for that specific connection so it can respond. With a NACL, if you have a rule that allows an inbound connection on port 80, that connection will not be able to respond unless you also manually add another rule that allows outbound connections for the response. You normally don’t know exactly which port will be used to respond: these are called ephemeral ports, and the rules depend on the operating system.
For example, the networking stack on Linux usually picks any available port from the range 32768-61000, where as Windows Server 2003 uses 1025-5000, NAT Gateways use 1024-65535, and so on. Therefore, in practice, you typically have to open ephemeral ports 1024-65535 in your NACL, both for inbound and outbound (as when you establish outbound connections, anyone responding will likely do so on an ephemeral port), making them primarily useful for locking down the low-numbered ports (< 1024) used for standard protocols (e.g., HTTP uses port 80), and locking down source/destination IP addresses.
VPC Peering
Normally, you use VPCs to create isolated networks, so the resources in one VPC have no way to access the resources in another VPC. VPC Peering is a networking connection between two VPCs that gives you a way to allow limited, controlled cross-VPC communication. For example, you might have a management VPC where you run DevOps tooling (e.g., Jenkins), and you may want to allow that VPC to have limited access to your staging and production VPCs so that DevOps tooling can carry out maintenance tasks.
To support this use case, you can create a VPC peering connection between the management and staging VPCs, and another one between the management and production VPCs, plus route table entries that allow certain traffic to be routed between those VPCs (e.g., allow specific subnets in the management VPC to talk to specific subnets in the staging and production VPCs). Note that peering connections are not transitive, so while the management VPC will get limited access to staging and production, staging and production will not have any access to each other (this is why it makes sense to put the DevOps tooling in its own VPC, rather than shoving it directly into the staging or production VPCs).
|
Note
|
If you have a large number of VPCs to interconnect, setting up a peering connection between each pair (n2 connections total) can quickly become impractical. In this case, you should look into using the AWS Transit Gateway or Shared VPCs. |
VPC Endpoints
Something that catches many AWS users off guard is that if you have some code running in AWS, and that code makes an
API call to AWS (e.g., you’re writing data to S3 or deploying an EC2 instance), that request will be routed outside of
your AWS account and through the public Internet, before finally making its way back to AWS. That’s because, under the
hood, AWS API calls are HTTPS requests to a domain like <API>.<REGION>.amazonaws.com (e.g.,
s3.us-east-1.amazonaws.com), which, by default, will be resolved and routed via public DNS and Internet
infrastructure just like all other requests, even if you’re making that request from within an AWS account. These
API calls are encrypted with TLS, so attackers shouldn’t be able to read them, but having potentially sensitive data
traverse the public Internet completely unnecessarily is not optimal from a security perspective.
To keep your traffic completely within your own AWS account, you can use
VPC Endpoints. Endpoints are virtual devices
that can route traffic to specific AWS services without that traffic ever having to leave your AWS account. When you
create an endpoint, you can have AWS configure private DNS entries within your VPC so that requests to the various AWS
domain names (e.g., s3.us-east-1.amazonaws.com) automatically route to these endpoints instead of the public Internet.
There are two types of endpoints, each of which support different AWS services:
- Gateway endpoints
-
This is an older type of endpoint that is free, but only support S3 and DynamoDB.
- Interface endpoints
-
This is a new type of endpoint that is backed by PrivateLink, which is a paid service, and includes support for CloudTrail, Secrets Manager, EC2, SNS, and many other services (full list).
Regions and availability zones
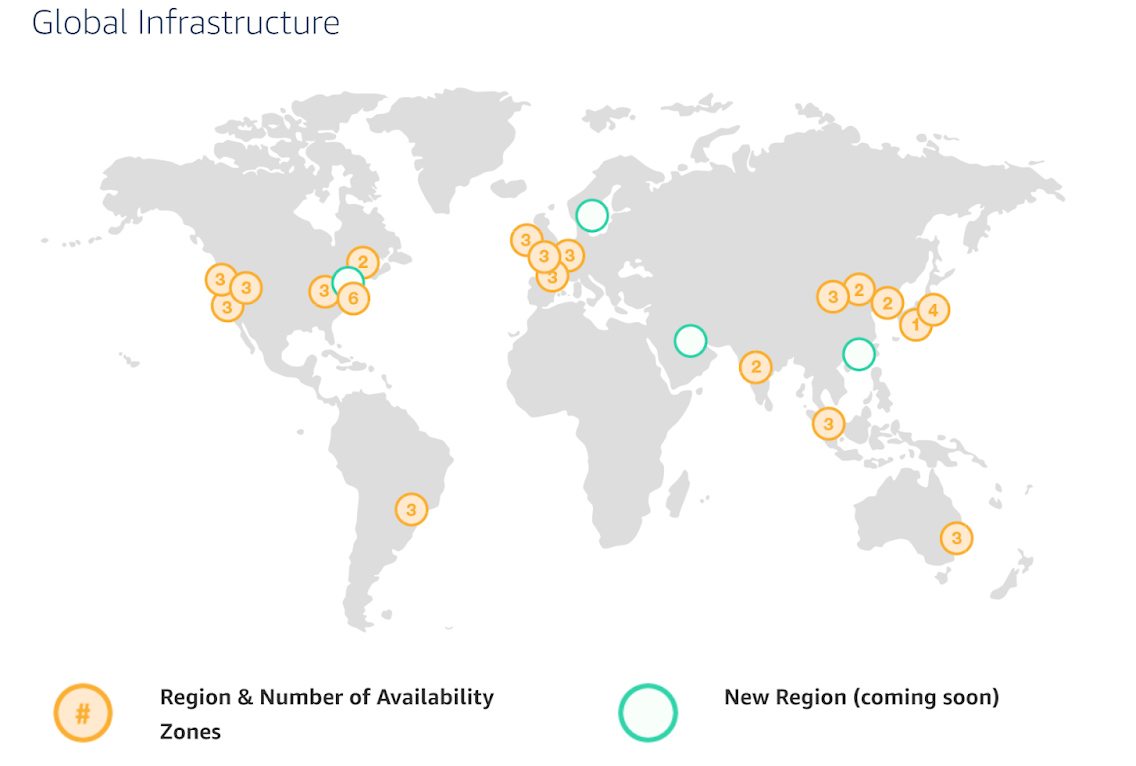
AWS has data centers all over the world, grouped into regions and availability zones. An AWS region is a separate
geographic area, such as us-east-2 (Ohio), eu-west-1 (Ireland), and ap-southeast-2 (Sydney). Within each region,
there are multiple data centers known as availability zones, such as us-east-2a, us-east-2b, and so on.
Each availability zone in the same region is isolated, but connected via low-latency links, so AWS makes it easy to
deploy your infrastructure across multiple availability zones as if it was all in one big data center, such as running
a cluster of EC2 instances, with the instances distributed across us-east-2a, us-east-2b, and us-east-2c. This
makes your infrastructure resilient to the outage of an entire data center.
If you want to be resilient to the outage of an entire region (e.g., all data centers in us-east-2 going down), you
can deploy your infrastructure across multiple regions, but this tends to be more difficult. Latency between regions
is significantly higher, and as AWS treats regions completely independently, there isn’t much tooling for multi-region
deployments built-in. You’ll need to replicate your infrastructure and data and solve multi-region latency and eventual
consistency issues: check out
Architecting Multi-Region SaaS Solutions on AWS and
How to build a multi-region active-active architecture on AWS
as starting points.
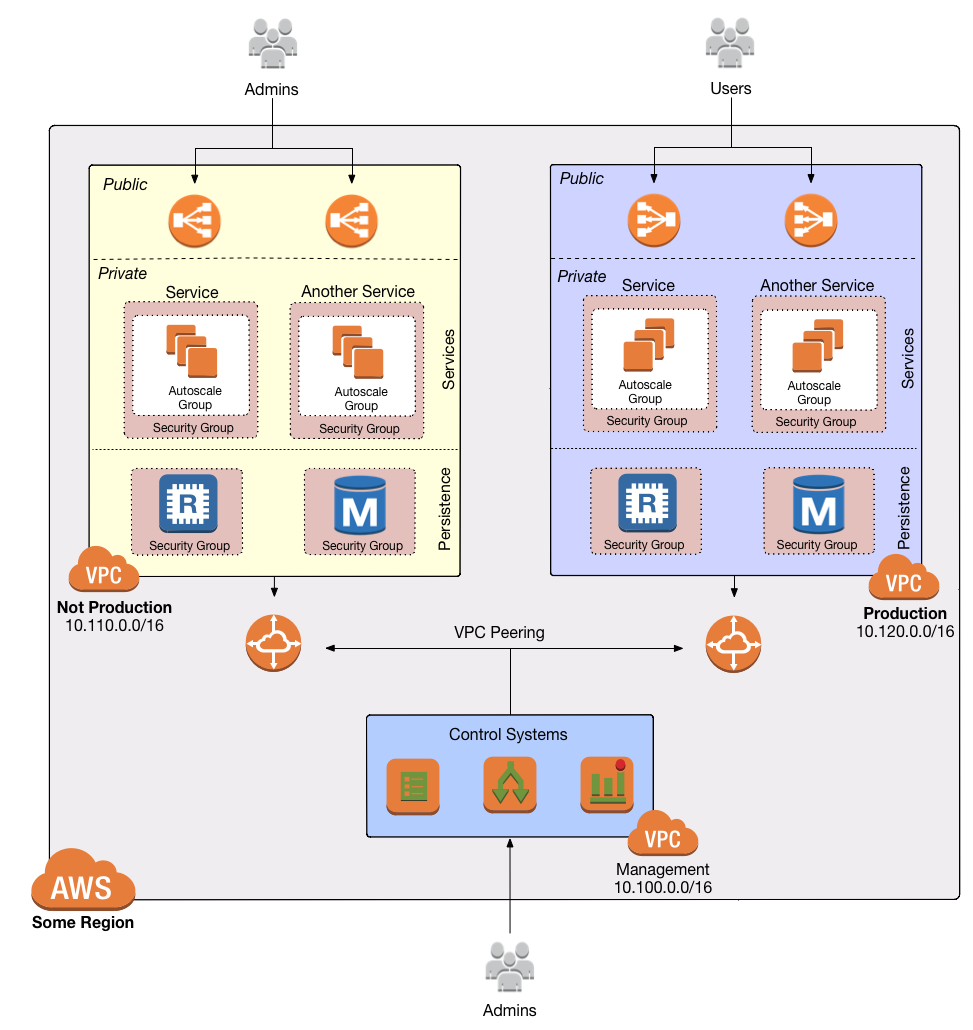
Production-grade design
With all the core concepts out of the way, let’s now discuss how to configure a production-grade VPC that looks something like this:
Defense in depth

People make mistakes all the time: forgetting to remove accounts, keeping ports open, including test credentials in production code, etc. Rather than living in an idealized model where you assume people won’t make mistakes, you can employ a Defense in Depth strategy of setting up multiple layers of protection so that a failure in any single layer doesn’t immediately lead to disaster. You never want to be one typo away from a security incident.
In the middle ages, castles were built with multiple layers of defense to ward off attackers: moat, outer wall, inner wall, keep, defenders on the walls, and so on. Similarly, a production-grade VPC infrastructure will include multiple layers of defense against attackers, including multiple VPCs, subnet tiers, security groups, NACLs, and so on, as described in the next few sections.
Multiple AWS accounts
The first layer of defense is to define each environment (e.g., dev, stage, prod) in a completely separate AWS account. The reason you want separate AWS accounts is that isolating resources within a single account leads to a nightmare of complicated IAM policies as you try to allow users within that account access to some resources, but not others. It is very difficult, for example, to grant minimal IAM privileges in a single AWS account such that you can create IAM roles and permissions for a particular environment but not another environment. It’s all too easy to get the permissions wrong, which increases your exposure to attackers (e.g., an attacker who gets access to a pre-prod environment may find it easier to get access to prod) and to accidental error (e.g., a developer may accidentally change something in prod rather than pre-prod).
Therefore, your best bet is to put pre-production environments and production environments in completely separate AWS accounts. This makes it easy to, for example, grant relatively lax permissions in pre-prod environments, but very strict permissions in production. Check out the Production Grade AWS Account Structure guide for instructions.
Multiple VPCs
The second layer of defense is to use separate, isolated VPCs:
- Application VPCs
-
Each of the environments where you deploy applications (e.g.,dev, stage, prod) should live in a separate VPC. In fact, as mentioned in the previous section, the gold standard is that each of these environments and their associated VPCs live in completely separate AWS accounts. We’ll call each of these VPCs your application VPCs.
- Management VPC
-
You will also want a separate VPC for DevOps tooling such as a CI server (e.g., Jenkins) and a bastion host (discussed later in this guide). We’ll call this the management VPC. You can connect the management VPC to each of your application VPCs using VPC peering. This (a) gives you more fine grained control over which of your DevOps tooling can talk to the application VPCs and (b) allows you to use a single management VPC with multiple application VPCs without allowing connections between the application VPCs themselves.
- Remove Default VPCs
-
Note that all of the above are custom VPCs. To ensure that you always use these (secure) custom VPCs and never accidentally fallback to the less secure defaults, you should delete the Default VPC and remove all the rules from your Default Security Group, at least in your production accounts.
- VPC sizing
-
AWS VPCs allow masks between
/16(65,536 IPs) and/28(16 IPs). For most use cases, we recommend using/16, as that gives you a large, contiguous block of IPs that you’re unlikely to exhaust. - IP addresses
-
The Internet Assigned Numbers Authority (IANA) has three blocks of the IP addresses reserved for use as private IPs (RFC 1918). Your VPCs should all use CIDR blocks that fall into one of these IP address ranges:
10.0.0.0    - 10.255.255.255
172.16.0.0  - 172.31.255.255
192.168.0.0 - 192.168.255.255
- Unique CIDR blocks
-
Every VPC you have should have a unique, non-overlapping CIDR block: e.g., dev could be
10.0.0.0/16, production could be10.10.0.0/16, management could be10.20.0.0/16, and so on. Overlapping CIDR blocks should be avoided as they will prevent you from being able to peer VPCs together and from connecting your VPCs to other data centers or your corporate intranet via site-to-site VPN connections.
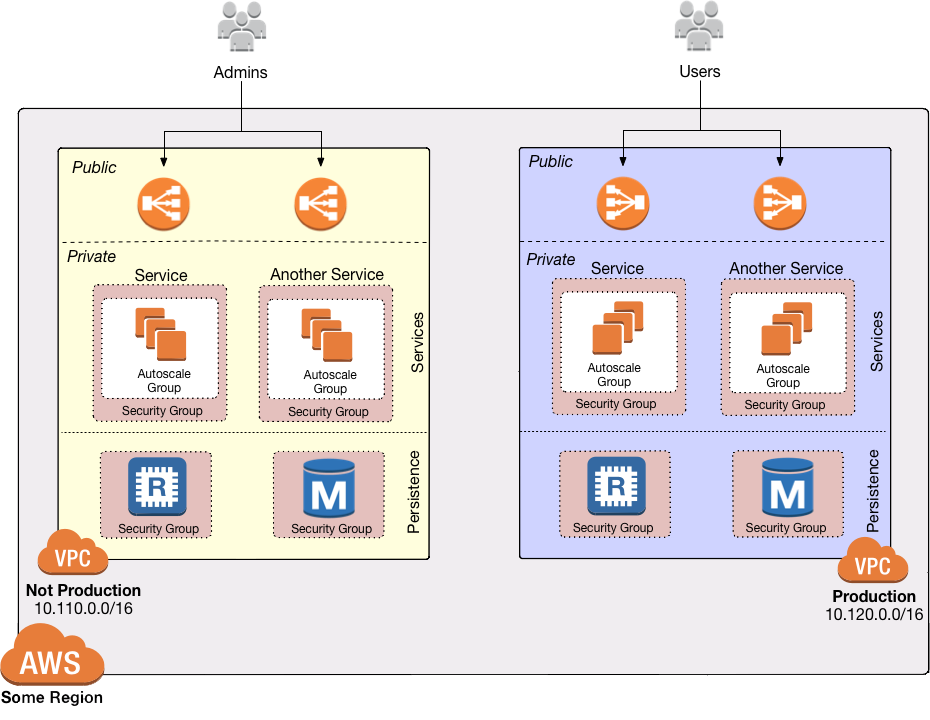
Multiple subnet tiers
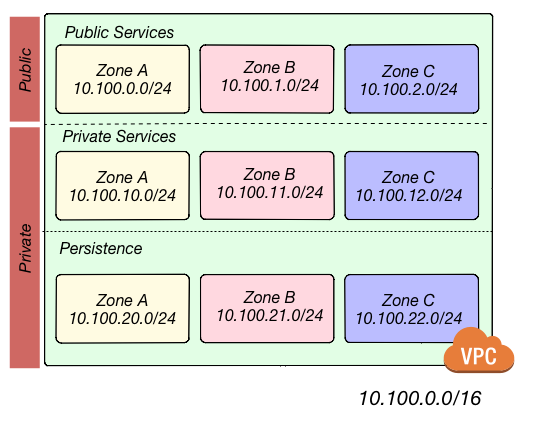
The third layer of defense is to use separate subnet tiers, where each tier contains multiple subnets configured in the same way. We recommend the following three theirs for most use cases:
- Public tier
-
This tier contains public subnets, so any resources in this tier will be directly addressable from the public Internet. The only things you should run in this tier are highly locked down services that must be exposed directly to the public, including load balancers and the bastion host.
- Private application tier
-
This tier contains private subnets, so any resources in tier will not be directly addressable from the public Internet. This tier should be used for all of your applications: e.g., EC2 instances, Docker containers, and so on.
- Private persistence tier
-
This tier also contains private subnets, so any resources in tier will not be directly addressable from the public Internet. This tier should be used for all of your data stores: e.g., relational databases, caches, NoSQL stores, and so on. This allows you to add additional additional layers of defense for your data, as described in the next section. If you have no data stores (e.g., in a management VPC), this tier can be omitted.
Each tier should contain one subnet per availability zone in your chosen AWS region so that resources in that tier can
take advantage of all availability zones. So, if you picked the us-east-2 region, which has three availability zones
(us-east-2a, us-east-2b, and us-east-2c), you’d have three subnets in each tier, for a total of 9 subnets. The
subnets should each use non-overlapping CIDR blocks, typically with a mask of /21 (2,048 IPs).
The reason to have separate tiers is that it allows you to configure fine-grained security rules for each tier, as discussed in the next section.
Security groups and NACLs
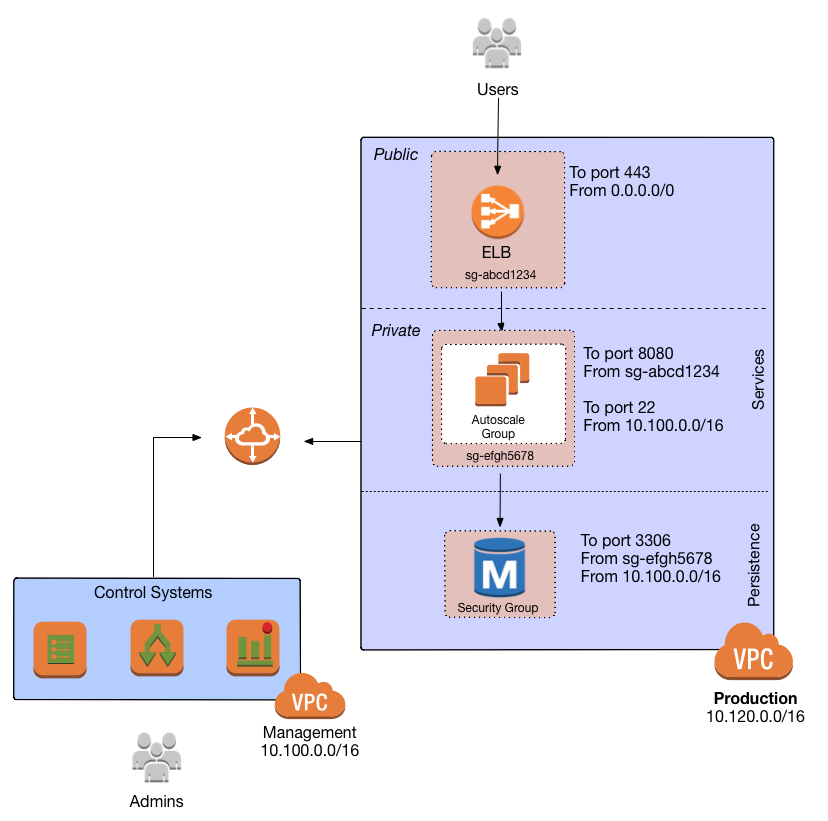
Use security groups and NACLs to configure the following rules for each subnet tier:
- Public tier
-
The public tier should allow all requests.
- Private application tier
-
The private application tier should only allow requests to/from the public tier, private application tier, private persistence tier, and the management VPC. Requests from all other subnets and the public Internet are not allowed.
- Private persistence tier
-
The private persistence tier should only allow requests to/from the private application tier, private persistence tier, and optionally the management VPC (e.g., if you need to run schema migrations during a CI build). Requests from all other subnets—including the public subnet tier—and the public Internet are not allowed. This provides an extra layer of defense for your data, which is the most valuable, irreplaceable, and sought-after resource at most companies.
This is a defense-in-depth strategy in action: attackers outside your VPC have no direct access to any of your applications or data stores, only to the resources in your public subnets, such as load balancers, which should be thoroughly locked down. Moreover, even if the attackers break into the public subnet in one environment, they still don’t have direct access to the data in the persistence tier of that environment, nor to anything in any other environment.
Internet Gateways and NAT Gateways
If the resources in your VPC need to be able to reach the outside world, you’ll need to deploy an Internet Gateway and NAT Gateway:
- Internet Gateway
-
Deploy an Internet Gateway and configure a fallback route (i.e.,
0.0.0.0/0) in your public subnets to send traffic to this Gateway. You only need one Internet Gateway per VPC, as AWS will handle auto scaling and auto healing for this managed service completely automatically. - NAT Gateways
-
If you have resources in your private application or private persistence subnets that need to make outbound calls to the public Internet (e.g., to call a 3rd party API), you’ll need to deploy one or more NAT Gateways in your public subnets. In pre-prod environments, a single NAT Gateway is probably enough, but to get high availability in production, you may want to deploy multiple NAT Gateways, each one in a different availability zone.
Each NAT Gateway should get an Elastic IP Address so that it has a consistent IP address you (and your customers/partners) can use in firewalls. In each of your private subnets, you’ll need to configure a fallback route (i.e.,
0.0.0.0/0) to point to one of your NAT Gateway (if using multiple NAT Gateways, point to the one in the same availability zone as the subnet itself).
Bastion host
Since all of your application servers and data stores are in private subnets, they are not accessible from the public Internet. So what do you do if you need to access them? For example, you might need to SSH to an application server to troubleshoot something, or connect to a database to run queries, or access an internal URL for testing.
One solution is to deploy a bastion host, which is a single, highly locked-down server that you expose to the public
Internet. You could then connect to the bastion host over SSH or VPN, and once connected, you would be "in the network"
and able to access other resources within your VPC. It’s easier to secure and harden a single server than a whole
fleet of them: for example, you could configure the bastion host to run a CIS-hardened Linux distro, install file
integrity monitoring and intrusion prevention software, disallow any new software to be installed, log all activity on
the server, lock down all ports (except SSH and/or VPN), rebuild and redeploy the server daily, and so on. Check out
the How to deploy a production-grade bastion host on AWS guide (coming soon!) for full details on bastion hosts.
Other solutions that can work with resources in private subnets include EC2 Instance Connect, which can allow you to SSH to EC2 Instances via a browser-based SSH client in the Amazon EC2 Console, and AWS Systems Manager Sessions, which allow you to manage and connect to EC2 Instances via a custom protocol managed by AWS.
Deployment walkthrough
Let’s now walk through how to deploy a production-grade VPC, fully defined and managed as code, using the Gruntwork Infrastructure as Code Library.
Pre-requisites
This walkthrough has the following pre-requisites:
- Gruntwork Infrastructure as Code Library
-
This guide uses code from the Gruntwork Infrastructure as Code Library, as it implements most of the production-grade design for you out of the box. Make sure to read How to use the Gruntwork Infrastructure as Code Library.
ImportantYou must be a Gruntwork subscriber to access the Gruntwork Infrastructure as Code Library. - Terraform
-
This guide uses Terraform to define and manage all the infrastructure as code. If you’re not familiar with Terraform, check out A Comprehensive Guide to Terraform, A Crash Course on Terraform, and How to Use the Gruntwork Infrastructure as Code Library
- AWS accounts
-
This guide deploys infrastructure into one or more AWS accounts. Check out the Production Grade AWS Account Structure guide for instructions. You will also need to be able to authenticate to these accounts on the CLI: check out A Comprehensive Guide to Authenticating to AWS on the Command Line for instructions.
Deploy a management VPC
The first step is to deploy a management VPC for DevOps tooling, such as a CI server or a bastion host. To do this, you can use the vpc-mgmt module from the Gruntwork Infrastructure as Code Library.
|
Important
|
You must be a Gruntwork subscriber to access module-vpc.
|
This module assumes you do not run any data stores in the management VPC, so it solely contains two tiers of subnets, public and private-app. If you will be deploying data stores in the management VPC (e.g., a relational database for SonarQube), then use vpc-app instead, which has a third private-persistence subnet tier.
Create a wrapper module
To deploy the vpc-mgmt module, create a wrapper module called vpc-mgmt in your infrastructure-modules repo:
infrastructure-modules
  └ networking
    └ vpc-mgmt
      └ main.tf
      └ outputs.tf
      └ variables.tf
Inside of main.tf, configure your AWS provider and Terraform settings:
provider "aws" {
  # The AWS region in which all resources will be created
  region = var.aws_region

  # Require a 2.x version of the AWS provider
  version = "~> 2.6"

  # Only these AWS Account IDs may be operated on by this template
  allowed_account_ids = [var.aws_account_id]
}

terraform {
  # The configuration for this backend will be filled in by Terragrunt or via a backend.hcl file. See
  # https://www.terraform.io/docs/backends/config.html#partial-configuration
  backend "s3" {}

  # Only allow this Terraform version. Note that if you upgrade to a newer version, Terraform won't allow you to use an
  # older version, so when you upgrade, you should upgrade everyone on your team and your CI servers all at once.
  required_version = "= 0.12.6"
}
Next, use the vpc-mgmt module from the Gruntwork Infrastructure as Code Library, making sure to replace the <VERSION> placeholder
with the latest version from the releases page:
module "vpc" {
  # Make sure to replace <VERSION> in this URL with the latest module-vpc release
  source = "git@github.com:gruntwork-io/module-vpc.git//modules/vpc-mgmt?ref=<VERSION>"

  vpc_name         = var.vpc_name
  aws_region       = var.aws_region
  cidr_block       = var.cidr_block
  num_nat_gateways = var.num_nat_gateways
}
Note that all of the parameters should be exposed as input variables in variables.tf; see this
variables.tf
file for reference. This will allow you to set those variables to different values in different environments or AWS
accounts.
You’ll also want to configure the NACLs for this VPC using the vpc-mgmt-network-acls module from the Gruntwork
Infrastructure as Code Library:
module "vpc_network_acls" {
  # Make sure to replace <VERSION> in this URL with the latest module-vpc release
  source = "git@github.com:gruntwork-io/module-vpc.git//modules/vpc-mgmt-network-acls?ref=<VERSION>"

  vpc_id      = module.vpc.vpc_id
  vpc_name    = module.vpc.vpc_name
  vpc_ready   = module.vpc.vpc_ready
  num_subnets = module.vpc.num_availability_zones

  public_subnet_ids  = module.vpc.public_subnet_ids
  private_subnet_ids = module.vpc.private_subnet_ids

  public_subnet_cidr_blocks  = module.vpc.public_subnet_cidr_blocks
  private_subnet_cidr_blocks = module.vpc.private_subnet_cidr_blocks
}
Finally, expose all of the vpc-mgmt module outputs as outputs of your vpc-mgmt wrapper module. There are a large
number of outputs, so see this
outputs.tf
file for reference.
Test your wrapper module
At this point, you’ll want to test your code. See Manual tests for Terraform code and Automated tests for Terraform code for instructions.
Merge and release your wrapper module
Once the module is working the way you want, submit a pull request, get your changes merged into the master branch,
and create a new versioned release by using a Git tag. For example, to create a v0.3.0 release:
git tag -a "v0.3.0" -m "Created vpc-mgmt module"
git push --follow-tags
Pick the deployment environments
The next step is to deploy your wrapper vpc-mgmt module. You can either deploy it in one AWS account or multiple:
- One management VPC
-
You could deploy a single management VPC and then peer it to all of your application VPCs. This is the simplest approach, but using the same management VPC for pre-production and production environments carries some risk: first, most companies are more lax with security for pre-production, but if an attacker can leverage that to get access to this single management VPC, they will also have access to prod; second, having this single management VPC makes it more likely that someone on your team will accidentally affect production while they think they are working on pre-production (e.g., delete a database table in the wrong environment!).
- Multiple management VPCs
-
An alternative is to run multiple management VPCs: typically, you have one that is peered to all of your pre-production environments and one that is peered to all your production environments; alternatively, you could have one management VPC for each of your environments. This way, you can keep production and non-production environments completely separate, reducing the risk from both external attackers and mistakes made by internal employees. The drawback to this approach is that you have more infrastructure to manage: more VPCs, more peering connections, more route table entries, more bastion hosts, and more credentials.
Configure the wrapper module for each environment
|
Note
|
This guide will use Terragrunt and its associated file and folder structure to deploy Terraform modules. Please note that Terragrunt is NOT required for using Terraform modules from the Gruntwork Infrastructure as Code Library. Check out How to Use the Gruntwork Infrastructure as Code Library for instructions on alternative options, such as how to deploy using plain terraform. |
In each account where you want to deploy a management VPC, you will need to:
-
Prepare the module. Create a
terragrunt.hclfile ininfrastructure-liveunder the file path<ACCOUNT>/<REGION>/<ENVIRONMENT>/networking/vpc-mgmt. For example, if you are deploying this VPC in your "production" account, in theus-east-2region, and this is your "prod" environment, the file path would look like this:infrastructure-live └ production └ us-east-2 └ prod └ networking └ vpc-mgmt └ terragrunt.hclPoint the
sourceURL in yourterragrunt.hclfile to yourvpc-mgmtwrapper module in theinfrastructure-modulesrepo, setting therefparam to the version you released earlier:infrastructure-live/production/us-east-2/prod/networking/vpc-mgmt/terragrunt.hclterraform { source = "git@github.com/<YOUR_ORG>/infrastructure-modules.git//networking/vpc-mgmt?ref=v0.3.0" } -
Set the variables for the VPC in that environment. Namely, set a unique VPC name and CIDR block for each VPC, and set the number of gateways based on your availability needs in that environment (typically, 1 NAT Gateway for pre-production environments and 2-3 NAT Gateways for production environments). You can set these values in the
inputs = { … }block ofterragrunt.hcl. Example:infrastructure-live/production/us-east-2/prod/networking/vpc-mgmt/terragrunt.hclinputs = { aws_region = "us-east-2" aws_account_id = "111122223333" vpc_name = "mgmt-prod" cidr_block = "10.0.0.0/16" num_nat_gateways = 3 } -
Configure the Terraform backend. Pull in the backend configuration from a root
terragrunt.hclfile that youincludein each childterragrunt.hcl:infrastructure-live/production/us-east-2/prod/networking/vpc-mgmt/terragrunt.hclinclude { path = find_in_parent_folders() }
Deploy the wrapper module for each environment
Deploy the VPC by running terragrunt apply:
cd infrastructure-live/production/us-east-2/prod/networking/vpc-mgmt
terragrunt apply
Deploy application VPCs
Now that you have your management VPC(s) deployed, the next step is to deploy application VPCs to run all of your services, data stores, and production infrastructure. The process is very similar to deploying the management VPC, except this time, you’ll be using the vpc-app module from the Gruntwork Infrastructure as Code Library.
|
Important
|
You must be a Gruntwork subscriber to access module-vpc.
|
Create a wrapper module
To deploy the vpc-app module, create a wrapper module called vpc-app in your infrastructure-modules repo:
infrastructure-modules
  └ networking
    └ vpc-mgmt
    └ vpc-app
      └ main.tf
      └ outputs.tf
      └ variables.tf
Inside of main.tf, configure your AWS provider and Terraform settings:
provider "aws" {
  # The AWS region in which all resources will be created
  region = var.aws_region

  # Require a 2.x version of the AWS provider
  version = "~> 2.6"

  # Only these AWS Account IDs may be operated on by this template
  allowed_account_ids = [var.aws_account_id]
}

terraform {
  # The configuration for this backend will be filled in by Terragrunt or via a backend.hcl file. See
  # https://www.terraform.io/docs/backends/config.html#partial-configuration
  backend "s3" {}

  # Only allow this Terraform version. Note that if you upgrade to a newer version, Terraform won't allow you to use an
  # older version, so when you upgrade, you should upgrade everyone on your team and your CI servers all at once.
  required_version = "= 0.12.6"
}
Next, use the vpc-app module from the Gruntwork Infrastructure as Code Library, making sure to replace the <VERSION> placeholder
with the latest version from the releases page:
module "vpc" {
  # Make sure to replace <VERSION> in this URL with the latest module-vpc release
  source = "git@github.com:gruntwork-io/module-vpc.git//modules/vpc-app?ref=<VERSION>"

  vpc_name         = var.vpc_name
  aws_region       = var.aws_region
  cidr_block       = var.cidr_block
  num_nat_gateways = var.num_nat_gateways
}
Note that all of the parameters should be exposed as input variables in variables.tf; see this
variables.tf
file for reference. This will allow you to set those variables to different values in different environments or AWS
accounts.
You’ll also want to configure the NACLs for this VPC using the vpc-app-network-acls module from the Gruntwork
Infrastructure as Code Library:
module "vpc_network_acls" {
  source = "git@github.com:gruntwork-io/module-vpc.git//modules/vpc-app-network-acls?ref=<VERSION>"

  vpc_id      = module.vpc.vpc_id
  vpc_name    = module.vpc.vpc_name
  vpc_ready   = module.vpc.vpc_ready
  num_subnets = module.vpc.num_availability_zones

  public_subnet_ids              = module.vpc.public_subnet_ids
  private_app_subnet_ids         = module.vpc.private_app_subnet_ids
  private_persistence_subnet_ids = module.vpc.private_persistence_subnet_ids

  public_subnet_cidr_blocks              = module.vpc.public_subnet_cidr_blocks
  private_app_subnet_cidr_blocks         = module.vpc.private_app_subnet_cidr_blocks
  private_persistence_subnet_cidr_blocks = module.vpc.private_persistence_subnet_cidr_blocks
}
If you wish to peer this VPC to your management VPC, you first need to get all the management VPC details, such as the VPC ID and CIDR block. Instead of hard-coding these, you can retrieve them using a data source such as aws_vpc or, to read the data straight from the Terraform state of the management VPC, you can use the terraform_remote_state data source:
data "terraform_remote_state" "mgmt_vpc" {
  backend = "s3"

  config {
    region = var.terraform_state_aws_region
    bucket = var.terraform_state_s3_bucket
    key    = "${var.aws_region}/mgmt/vpc/terraform.tfstate"
  }
}
You can then use the vpc-peering module to create a VPC peering connection and all the necessary route table entries between the application and management VPCs:
module "mgmt_vpc_peering_connection" {
  source = "git@github.com:gruntwork-io/module-vpc.git//modules/vpc-peering?ref=v0.6.0"

  # Assume the first listed AWS Account Id is the one that should own the peering connection
  aws_account_id = var.aws_account_id

  origin_vpc_id              = data.terraform_remote_state.mgmt_vpc.outputs.vpc_id
  origin_vpc_name            = data.terraform_remote_state.mgmt_vpc.outputs.vpc_name
  origin_vpc_cidr_block      = data.terraform_remote_state.mgmt_vpc.outputs.vpc_cidr_block
  origin_vpc_route_table_ids = concat(
    data.terraform_remote_state.mgmt_vpc.outputs.private_subnet_route_table_ids,
    [data.terraform_remote_state.mgmt_vpc.outputs.public_subnet_route_table_id]
  )

  # We should be able to compute these numbers automatically, but can't due to a Terraform bug:
  # https://github.com/hashicorp/terraform/issues/3888. Therefore, we make some assumptions: there is one
  # route table per availability zone in private subnets and just one route table in public subnets.
  num_origin_vpc_route_tables = module.vpc.num_availability_zones + 1

  destination_vpc_id              = module.vpc.vpc_id
  destination_vpc_name            = module.vpc.vpc_name
  destination_vpc_cidr_block      = module.vpc.vpc_cidr_block
  destination_vpc_route_table_ids = concat(
    [module.vpc.public_subnet_route_table_id],
    module.vpc.private_app_subnet_route_table_ids,
    module.vpc.private_persistence_route_table_ids,
  )

  # We should be able to compute these numbers automatically, but can't due to a Terraform bug:
  # https://github.com/hashicorp/terraform/issues/3888. Therefore, we make some assumptions: there is one
  # route table per availability zone in private subnets and just one route table in public subnets.
  num_destination_vpc_route_tables = (module.vpc.num_availability_zones * 2) + 1
}
You’ll also need to update the NACLs to allow access from the management VPC:
module "vpc_network_acls" {
  source = "git@github.com:gruntwork-io/module-vpc.git//modules/vpc-app-network-acls?ref=<VERSION>"

  # ... (other params omitted) ...

  allow_access_from_mgmt_vpc = true
  mgmt_vpc_cidr_block        = data.terraform_remote_state.mgmt_vpc.vpc_cidr_block
}
Finally, expose all of the vpc-app module outputs as outputs of your vpc-app wrapper module. There are a large
number of outputs, so see this
outputs.tf
file for reference.
Test your wrapper module
At this point, you’ll want to test your code. See Manual tests for Terraform code and Automated tests for Terraform code for instructions.
Merge and release your wrapper module
Once the module is working the way you want, submit a pull request, get your changes merged into the master branch,
and create a new versioned release by using a Git tag. For example, to create a v0.4.0 release:
git tag -a "v0.4.0" -m "Created vpc-app module"
git push --follow-tags
Configure the wrapper module for each environment
In each account where you want to deploy an application VPC, you will need to:
-
Prepare the module. Create a
terragrunt.hclfile ininfrastructure-liveunder the file path<ACCOUNT>/<REGION>/<ENVIRONMENT>/networking/vpc-app. For example, if you are deploying this VPC in your "production" account, in theus-east-2region, and this is your "prod" environment, the file path would look like this:infrastructure-live └ production └ us-east-2 └ prod └ networking └ vpc-app └ terragrunt.hclPoint the
sourceURL in yourterragrunt.hclfile to yourvpc-appwrapper module in theinfrastructure-modulesrepo, setting therefparam to the version you released earlier:infrastructure-live/production/us-east-2/prod/networking/vpc-app/terragrunt.hclterraform { source = "git@github.com/<YOUR_ORG>/infrastructure-modules.git//networking/vpc-app?ref=v0.4.0" } -
Set the variables for the VPC in that environment. Namely, set a unique VPC name and CIDR block for each VPC, and set the number of gateways based on your availability needs in that environment (typically, 1 NAT Gateway for pre-production environments and 2-3 NAT Gateways for production environments). You can set these values in the
inputs = { … }block ofterragrunt.hcl. Example:infrastructure-live/production/us-east-2/prod/networking/vpc-app/terragrunt.hclinputs = { aws_region = "us-east-2" aws_account_id = "111122223333" vpc_name = "app-prod" cidr_block = "10.10.0.0/16" num_nat_gateways = 3 } -
Configure the Terraform backend.:
infrastructure-live/production/us-east-2/prod/networking/vpc-app/terragrunt.hclinclude { path = find_in_parent_folders() }
Deploy the wrapper module for each environment
Deploy the VPC by running terragrunt apply:
cd infrastructure-live/production/us-east-2/prod/networking/vpc-app
terragrunt apply
Deploy a bastion host
Check out the How to deploy a production-grade bastion host on AWS guide (coming soon!) for instructions.
Clean up Default VPCs and Security Groups
In each of your production accounts, use cloud-nuke to remove the Default VPC and Default Security Group rules:
cloud-nuke defaults-awsNext steps
Now that you have your management and application VPCs deployed, you can start building the rest of your infrastructure on top of them! Typically, the best next step is to deploy a cluster of servers for running your applications by using one of the following guides:
-
How to deploy a production grade ECS cluster on AWS(coming soon!) -
How to deploy a production grade Nomad cluster on AWS(coming soon!) -
How to deploy a production grade Auto Scaling Group on AWS(coming soon!)
If you’re not sure which of these options to use, check out the Server Cluster Comparison guide (coming soon!).

Comments