

Intro
This guide will walk you through the process of configuring a production-grade Kubernetes cluster on AWS.
What is Kubernetes?
Kubernetes (K8S) is an open-source system for managing containerized applications, including:
- Scheduling
-
Deploy containers across a cluster of servers, using the available resources (data centers, servers, CPU, memory, ports, etc.) as efficiently as possible.
- Deployments
-
Roll out updates to containers using a variety of deployment strategies, such as rolling deployment, blue-green deployment, and canary deployment, and automatically roll back if there’s an error.
- Auto healing
-
Monitor the health of your containers and servers and automatically replace unhealthy ones.
- Auto scaling
-
Scale the number of containers and servers up or down in response to load.
- Load balancing
-
Make your containers accessible to the outside world and distribute traffic across your containers.
- Service discovery
-
Allow containers to find and communicate with each other over the network, automatically routing requests to the proper destination.
- Configuration and secrets
-
Provide containers with environment-specific configuration data and secrets.
What you’ll learn in this guide
This guide consists of four main sections:
- Core concepts
-
An overview of the core concepts you need to understand to use Kubernetes, including why you may want to use Kubernetes, Kubernetes architecture, the control plane, worker nodes, different ways to run Kubernetes, services, deployments, auto scaling, auto healing, RBAC, and more.
- Production-grade design
-
An overview of how to configure a secure, scalable, highly available Kubernetes cluster that you can rely on in production. To get a sense of what production-grade means, check out The production-grade infrastructure checklist.
- Deployment walkthrough
-
A step-by-step guide to deploying a production-grade Kubernetes cluster in AWS using code from the Gruntwork Infrastructure as Code Library.
- Next steps
-
What to do once you’ve got your Kubernetes cluster deployed.
Feel free to read the guide from start to finish or skip around to whatever part interests you!
Core concepts
Why Kubernetes
Kubernetes has become the de facto choice for container orchestration. Here’s why:
- Massive feature set
-
Kubernetes offers a huge range of functionality for managing containers, including auto scaling, auto healing, rolling deployments, service discovery, secrets management, configuration management, bin packing, storage orchestration, batch execution, access controls, log aggregation, SSH access, batch processing, and much more.
- Massive community
-
Kubernetes has the biggest community of any orchestration tool, with more than 50,000 stars and 2,500 contributors on GitHub, thousands of blog posts, numerous books, hundreds of meetup groups, several dedicated conferences, and a huge ecosystem of frameworks, tools, plugins, integrations, and service providers.
- Run anywhere
-
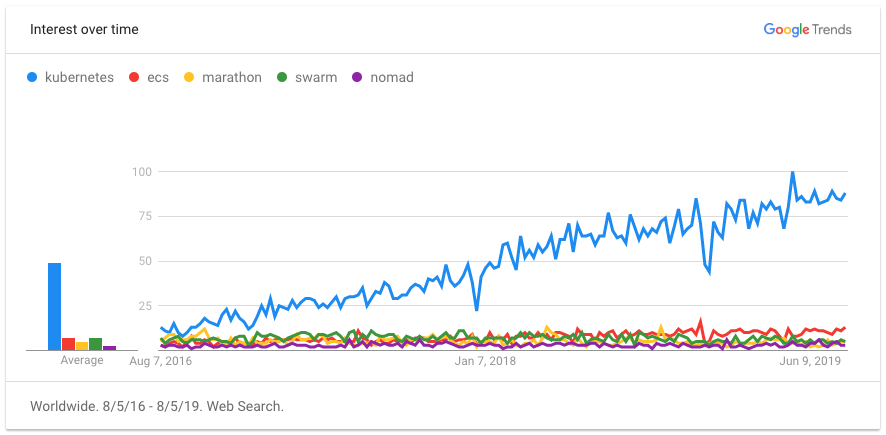
You can run Kubernetes on-premise, in the cloud (with 1st class support from the cloud provider, e.g.,: AWS offers EKS, Google Cloud offers GKE, Azure offers AKS), and on your own computer (it’s built directly into the Docker desktop app). This reduces lock-in and makes multi-cloud and hybrid-cloud more manageable, as both the containers themselves and the way you manage them are portable.
- Proven technology
-
Kubernetes was originally designed by Google, based on years of experience with their internal container management systems (Borg and Omega), and is now maintained by the Cloud Native Computing Foundation. It’s designed for massive scale and resiliency (Google runs billions of containers per week) and with a huge community behind it, it’s continuously getting better.
Kubernetes architecture
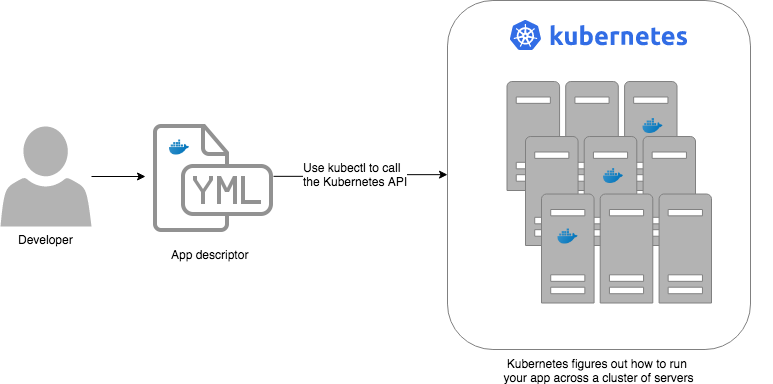
Let’s start by looking at Kubernetes from a very high level, and then gradually zoom in. When starting at this high level, a simple way to think about Kubernetes is as an operating system for your data center.
- Operating system for a single computer
-
On a single computer, the operating system (e.g., Windows, Linux, macOS) abstracts away all the low-level hardware details so that as a developer, you can build apps against a high-level, consistent, safe API (the Kernel API), without having to worry too much about the differences between many types of hardware (i.e., the many types of CPU, RAM, hard drive, etc) or about managing any of the applications running on that hardware (i.e., the OS handles device drivers, time sharing, memory management, process isolation, etc).
- Operating system for a data center
-
In a data center, an orchestration tool like Kubernetes also abstracts away all the hardware details, but it does it for multiple computers (multiple servers), so that as a developer, you can deploy your applications using a high-level, consistent, safe API (the Kubernetes API), without having to worry too much about the differences between the servers or about managing any of the applications running on those servers (i.e., the orchestration tool handles deploying applications, restarting them if they fail, allowing them to communicate over the network, etc.).
To use the Kernel API, your application makes system calls. To use the Kubernetes API, you make HTTPS calls, typically
by using the official command-line utility for Kubernetes,
kubectl. When working with the Kubernetes API, you express
what you want to deploy—i.e., which Docker containers, how many of them, what CPU, memory, and ports they need,
etc—in a YAML file, use kubectl to send that YAML file to Kubernetes via an API call, and Kubernetes will
figure out how to make that happen, including picking the best servers to handle the requirements in your YAML file,
deploying the containers on those servers, monitoring and restarting the containers if they crash, scaling the number
of containers up and down with load, and so on.
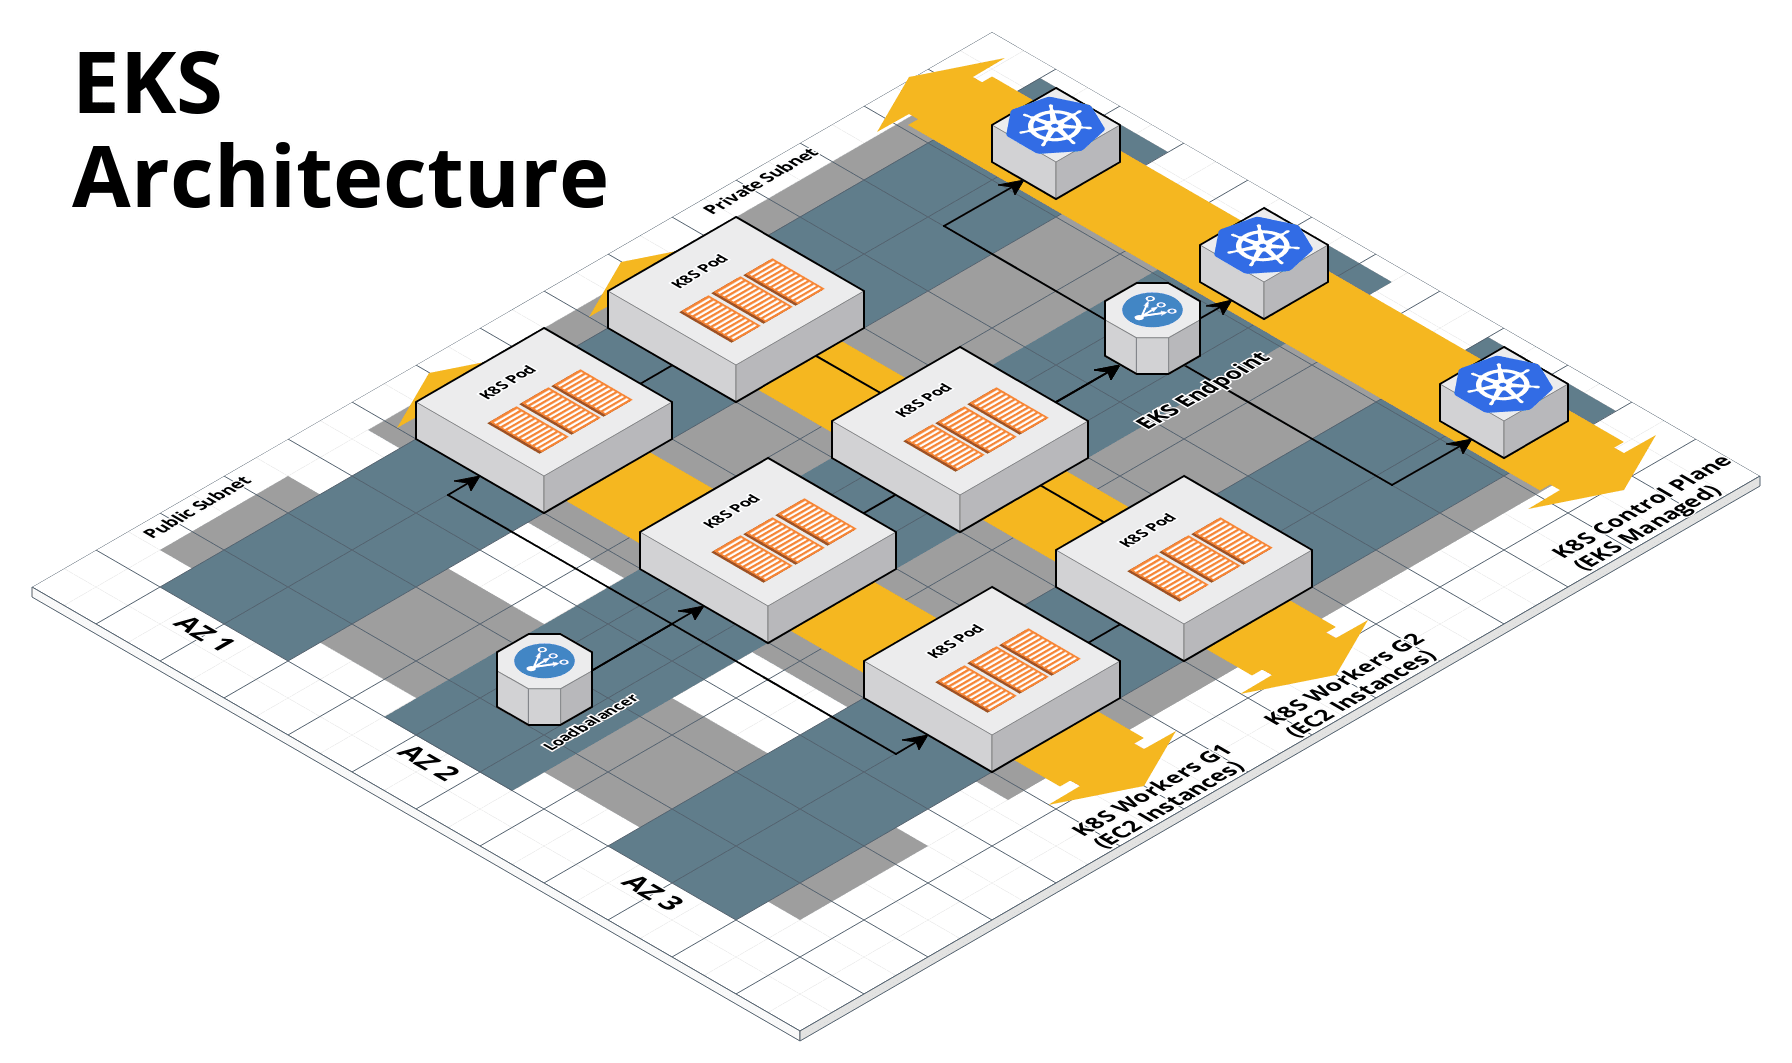
If you zoom in a bit further on the Kubernetes architecture, it looks something like this:
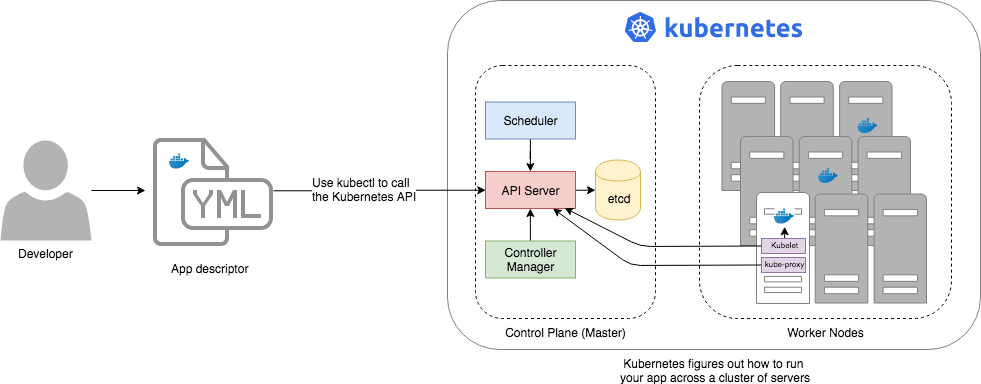
Kubernetes consists of two main pieces: the control plane and worker nodes. Each of these will be discussed next.
Control plane
The control plane is responsible for managing the entire cluster. It consists of one or more master nodes (typically 3 master nodes for high availability), where each master node runs several components:
- Kubernetes API Server
-
The Kubernetes API Server is the endpoint you’re talking to when you use the Kubernetes API (e.g., via
kubectl). - Scheduler
-
The scheduler is responsible for figuring out which of the worker nodes to use to run your container(s). It tries to pick the "best" worker node based on a number of factors, such as high availability (try to run copies of the same container on different nodes so a failure in one node doesn’t take them all down), resource utilization (try to run the container on the least utilized node), container requirements (try to find nodes that meet the container’s requirements in terms of CPU, memory, port numbers, etc), and so on.
- Controller Manager
-
The controller manager runs all the controllers, each of which is a control loop that continuously watches the state of the cluster and makes changes to move the cluster towards the desired state (you define the desired state via API calls). For example, the node controller watches worker nodes and tries to ensure the requested number of Nodes is always running and the replication controller watches containers and tries to ensure the requested number of containers is always running.
- etcd
-
etcd is a distributed key-value store that the master nodes use as a persistent way to store the cluster configuration.
Worker nodes
The worker nodes (or just nodes, for short) are the servers that run your containers. Each worker node runs several components:
- Kubelet
-
The kubelet is the primary agent that you run on each worker node. It is responsible for talking to the Kubernetes API Server, figuring out the containers that are supposed to be on its worker node, and deploying those containers, monitoring them, and restarting any containers that are unhealthy.
- kube-proxy
-
The Kubernetes Service Proxy (kube-proxy) also runs on each worker node. It is responsible for talking to the Kubernetes API Server, figuring out which containers live at which IPs, and proxying requests from containers on the same worker node to those IPs. This is used for Service Discovery within Kubernetes, a topic we’ll discuss later.
Kubernetes access control
To access your Kubernetes cluster, you have to understand Kubernetes authentication and authorization.
Kubernetes authentication
Kubernetes uses authentication plugins to authenticate API requests. Depending on the plugins you’re using, there are a number of supported authentication strategies, including X509 client certs, static token files, bootstrap tokens, static password files, service account tokens, OpenID connect tokens, and more.
When you authenticate, you authenticate as one of two types of accounts:
- User accounts
-
User accounts are used by humans or other services outside of the Kubernetes cluster. For example, an admin at your company may distribute X509 certificates to your team members, or if you’re using a Kubernetes service managed by AWS (i.e, EKS), the user accounts may be the IAM user accounts you have in AWS.
- Service accounts
-
Service accounts are managed and used by resources within the Kubernetes cluster itself, such as your pods. Kubernetes creates some service accounts automatically; you can create others using the Kubernetes API. The credentials for service accounts are stored as secrets in Kubernetes and mounted into the pods that should have access to those service accounts.
Kubernetes authorization
Once you’ve authenticated and the Kubernetes API Server knows who you are, depending on the plugins you’re using,
it will use one of several supported
authorization modes to
determine what you can do. The standard authorization mode is
role-based access control (RBAC), where you create
roles with access to specific Kubernetes APIs (e.g., the ability to call GET on the secrets API in a specific
namespace), and associate those roles with the specific user and service accounts that should have those permissions.
Interacting with Kubernetes
Once you have a Kubernetes cluster up and running, there are a number of ways to interact with it. This section will
go through a few of the most common ones, including the API, kubectl, the Web UI, and Terraform.
API
Under the hood, any Kubernetes tool you use will be talking to the Kubernetes API. However, it’s relatively rare for you to have to make API calls directly (if you do have to, see the API client libraries), so let’s quickly move on to the other tools that build on top of the API.
kubectl
kubectl is the official command-line interface (CLI) for working with Kubernetes. For example, to deploy the training/webapp Docker container (a simple "Hello, World" webapp) and have it listen on port 5000, you could run:
kubectl run webapp \
  --image=training/webapp:latest \
  --port 5000 \
  --generator=run-pod/v1
And to see the pods running in your cluster, you could run:
kubectl get podsTo be able to authenticate to different EKS clusters or as different users, you can create one or more kubectl
configuration files, which are typically called kubeconfig files (note, the files do not actually need to be called
kubeconfig). In a kubeconfig file, you can define one or more contexts, where each context specifies a cluster to
connect to and a user to use for authentication. You can then use the kubectl config use-context command to quickly
switch between contexts—and therefore, different clusters and users.
Web UI (Dashboard)
The Kubernetes Dashboard is a web-based interface you can use to manage your Kubernetes cluster. The dashboard is not enabled by default in most Kubernetes distributions. Check out Deploying the Dashboard UI and Accessing the Dashboard UI for instructions.
Terraform
Terraform has a Kubernetes provider that allows you to write Terraform code that, under the hood, calls the Kubernetes API. This allows you to manage all your infrastructure—including your VPCs, databases, Kubernetes clusters, and Kubernetes services—using the same language and workflow. The downside is that the Terraform Kubernetes provider seems to lag behind considerably, and is missing some of the features you need for effectively working with Kubernetes, which often requires you to go outside of Terraform code anyway (e.g., execute a script).
Kubernetes resources
Using one of the previously mentioned tools, you can create one or more resources within your Kubernetes cluster, such as pods, controllers, namespaces, services, and configuration.
Pods
With Kubernetes, you don’t run containers directly. Instead, the basic building block in Kubernetes is a pod, which is a group of one or more related containers that are always deployed together. For example, you could have a pod with just a single container, such as a container that runs a Node.js app, or a pod with several related containers, such as one container that runs a Node.js app, another container that runs a logs and metrics agent for the Node.js app, and a third container that runs nginx as a reverse proxy for the Node.js app.
Here are the key ideas to keep in mind when thinking about pods:
- How pods are deployed
-
Whenever you tell Kubernetes to deploy a pod (e.g., using
kubectl, which we’ll discuss below), the scheduler will pick a worker node for that pod, and the kubelet on that worker node will deploy all the containers for that pod together. - A pod is like a logical machine
-
All the containers in a pod run in the same Linux namespace and can talk to each other over localhost (note: this implies the containers in a pod must all listen on different ports), so it can be helpful to think of each pod as a logical machine, with its own IP address and processes that are separate from all other pods.
- Sidecars
-
Pods offer a nice format for combining and composing multiple processes together, even if the processes are built with totally different technologies, as each process can be encapsulated in its own container. For example, a common pattern is to define pods with one main container (e.g., a web service you wrote with Node.js/Javascript) and one or more sidecars: that is, containers that provide supporting functionality, such as a proxy sidecar (e.g., Envoy proxy, which is written in Go) and a log aggregation sidecar (e.g., Fluentd, which is written in Ruby).
- Pods are ephemeral
-
Pods (and for that matter, containers) are relatively ephemeral: that is, they can be shut down and replaced at any time. This might happen because a node crashes or because you’re deploying a new version of the pod or a number of other reasons. This is a critical idea to keep in mind as you design your system, especially when thinking about fault tolerance, replication, and state.
Controllers
Pods are the basic building blocks of Kubernetes, but you typically don’t deploy them directly either. A single pod on a single worker node is a single point of failure: the kubelet on that node can restart the pod if it crashes, but if the entire node crashes, or if you want to run multiple pods for high availability and scalability, you need a higher level construct. This is where controllers come in. Controllers allow you to manage multiple pods across multiple nodes.
The most common controller you’re likely to use is the Deployment, which allows you to specify:
-
What pod to deploy.
-
How many replicas (copies) of that pod you want running.
-
How to roll out updates to the replicas whenever you make a change.
The Deployment will deploy your replicas, constantly monitor them, and automatically replace any replicas that fail. When you apply a change to your Deployment—e.g., change the Docker image tag—the Deployment will automatically roll that change out using one of several built-in strategies, such as rolling deployment and canary deployment.
Namespaces
Namespaces allow you to logically
partition your Kubernetes cluster into multiple virtual clusters. Every command you issue to the Kubernetes API Server
(e.g., via kubectl) and almost every resource you create in Kubernetes (e.g., every pod) runs within a namespace; if
you don’t specify a namespace, the default namespace is used. By granting users access only to specific namespaces
and by configuring your cluster to only allow connectivity between resources in the same namespace, you can use
namespaces as a lightweight way to group applications and provide some isolation between them.
Services and Service Discovery
Every pod in Kubernetes gets an IP address, but this IP could change every time the pod is redeployed. Moreover, you typically don’t want the IP of a single pod, but some way to talk to all the related pods that make up a logical service: e.g., if you have 3 replicas of your Node.js pod, what you really want is some way to have requests load balanced across all of these pods, even as the IPs of the individual pods or the number of pods changes.
To do this, you can create a Kubernetes service,
which can provide a single endpoint in front of a set of pods, and automatically load balance and route traffic to the
right destinations, even as the underlying pods change and move around. Your apps can then discover other services
(service discovery) by getting the endpoint IP from an environment variable and/or via DNS (the latter is typically
provided by a Kubernetes cluster add-on). For example, if your Node.js pods need to talk to some pods running a Java
backend, you could configure a service called backend in front of the Java pods, and the Node.js apps will be able to
talk to the backend by sending requests to backend.<NAMESPACE>.svc.cluster.local, where <NAMESPACE> is the name of
your Kubernetes namespace.
Configuration and secrets
To allow you to use the same container in different environments with different settings (e.g., dev, stage, prod), you can use a ConfigMap, which is a map of key/value pairs where the values can be strings or even entire files. Kubernetes stores ConfigMaps in etcd and can expose specific key/value pairs or the contents of the entire ConfigMap to your containers as either environment variables or files mounted in a volume.
If you need to pass sensitive information to your containers (e.g., credentials or API keys), you can instead use a Kubernetes Secret. Secrets work more or less the same way as ConfigMaps—i.e., they contain key/value pairs and can be exposed to containers as environment variables or files—with the main difference being that:
-
When exposing a secret to your containers, Kubernetes ensures the secret is only ever stored in memory. If you’re exposing the secret as a file mounted in a volume, Kubernetes will use a volume backed by tmpfs, a RAM-backed filesystem, to ensure the secret is never written to disk.
-
Kubernetes stores Secrets in an encrypted form in etcd.
Noteetcd encryption is only available as of Kubernetes 1.13 and not available out of the box on all Kubernetes platforms (older versions of Kubernetes stored secrets unencrypted!).
Options for running Kubernetes in AWS
There are a number of different options for running Kubernetes in AWS:
- Deploy it yourself
-
You could try to follow the Kubernetes documentation and Kubernetes the hard way to create a Kubernetes cluster from scratch on top of EC2 instances. This gives you full control over every aspect of your Kubernetes cluster, but it is a considerable amount of work (3-6 months to get something production-grade, minimum) and puts the full burden of maintenance, scalability, high availability, disaster recovery, and updates on you.
- Kubernetes deployment tools
-
There are a number of Kubernetes tools that can automatically spin up a cluster for you, including eksctl (the official tool from AWS), kops, kubespray, and kubeadm. These tools allow you to get a reasonable cluster up and running in a few commands, significantly reducing the amount of work compared to doing it from scratch. However, it’s typically hard to customize and manage those clusters, as you don’t have the infrastructure defined as code (note:
kopscan generate Terraform code, but it’s probably not the way you’d write the code yourself and if you modify that code, it’s not clear if you can still usekops), and most importantly, these tools put the full burden of maintenance, scalability, high availability, disaster recovery, and updates on you (excepteksctl, which spins up an EKS cluster). - Amazon Elastic Kubernetes Service
-
Amazon EKS is a managed service in AWS for using Kubernetes. It runs the entire control plane for you, with first-class integration with other AWS services (e.g., VPCs, IAM, etc). That means you can get EKS running quickly, manage everything as code, and benefit from AWS handling all the maintenance, scalability, high availability, disaster recovery, and updates of the control plane for you. The main drawbacks is that EKS is still fairly new, so some functionality is missing or more complicated to use than it should be.
Production-grade design
With all the core concepts out of the way, let’s now discuss how to configure a production-grade Kubernetes cluster that looks something like this:
Use EKS
We recommend using Amazon EKS to run Kubernetes in AWS. It manages the control plane for you, which significantly reduces your operational burden; it has good integration with other AWS services; you can manage it entirely as code; and while EKS still has some gaps in terms of features, and is more complicated to use than it should be, AWS seems to be heavily investing into the service, so any small benefits you get from using other solutions will most likely be eclipsed very quickly by future EKS releases.
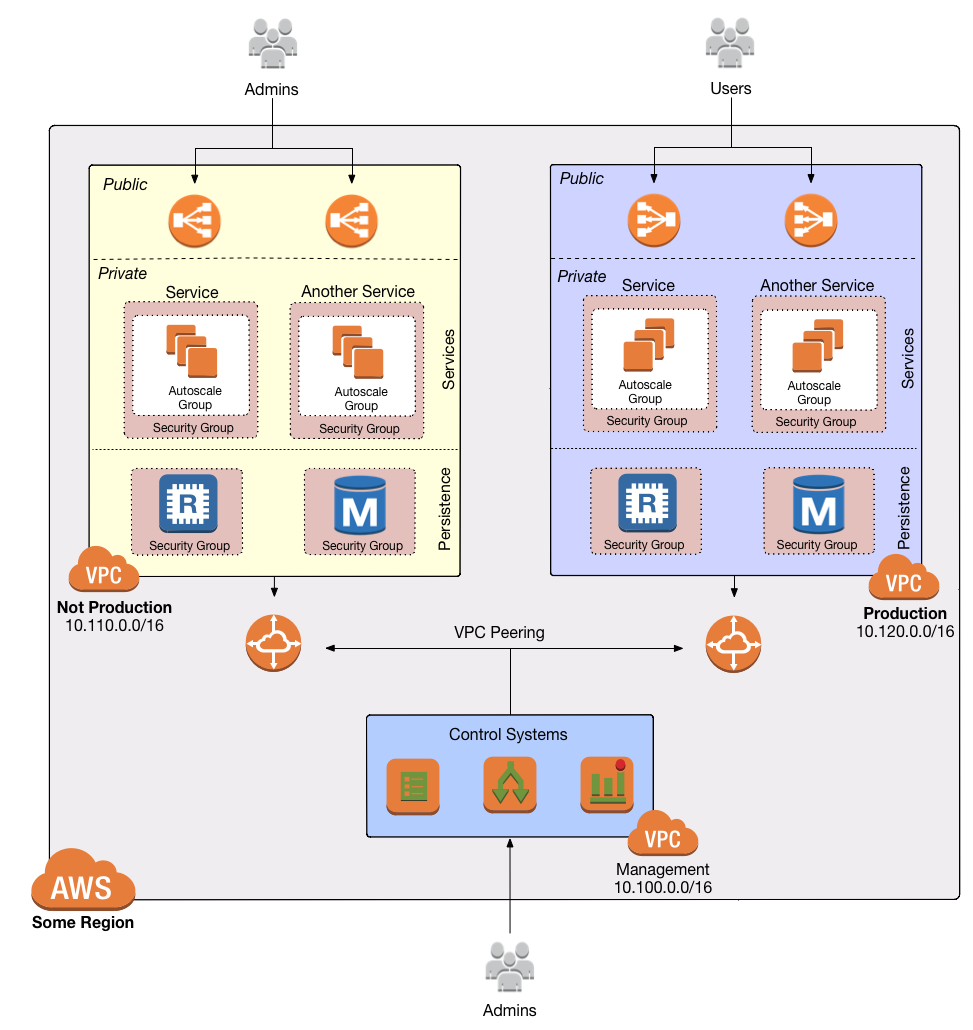
VPC configuration
EKS relies on a Virtual Private Cloud (VPC) to provide the basic network topology and to manage communication across the nodes (see How to deploy a production-grade VPC on AWS for more information on VPCs). Here are the key VPC considerations for your EKS cluster:
- Add tags to the VPC and subnets
-
EKS relies on special tags on the VPC and subnets to know which VPC resources to use for deploying infrastructure. For example, EKS uses tags to figure out which subnets to use for the load balancers associated with a Service resource. See Cluster VPC Considerations for more information.
- Configure DNS forwarding
-
EKS supports private API endpoints so that the Kubernetes API Server can only be accessed within the VPC. The hostname for this internal endpoint lives in a Route 53 private hosted zone, which works fine if you’re trying to access it from within the VPC, but does not work (by default) if you try to access it over a VPC peering connection. For example, if you had Kubernetes in an application VPC, and DevOps tooling (e.g., and OpenVPN server or a Jenkins server) in a peered management VPC, by default, that management tooling would not be able to talk to this private endpoint. To fix this issue, configure DNS forwarding by creating a Route 53 Resolver and make sure that remote VPC DNS resolution is enabled on both accepter and requester side of the connection peering.
Control plane
To have EKS manage the control plane for you, you need to create an EKS cluster. When you create an EKS cluster, behind the scenes, AWS fires up several master nodes in a highly available configuration, complete with the Kubernetes API Server, scheduler, controller manager, and etcd. Here are the key considerations for your EKS cluster:
- Kubernetes version
-
When creating your EKS cluster, you can pick which version of Kubernetes to use. For each version of Kubernetes, EKS may have one or more platform versions that are compatible with it. For example, Kubernetes 1.12.6 had platform versions
eks.1andeks.2. AWS automatically updates the control plane to use the latest platform version compatible with your chosen Kubernetes minor version. - Subnets
-
Your EKS cluster will run in the subnets you specify. We strongly recommend running solely in private subnets that are NOT directly accessible from the public Internet. See How to deploy a production-grade VPC on AWS for more info.
- Endpoint access
-
You can configure whether the API endpoint for your EKS cluster is accessible from (a) within the same VPC and/or (b) from the public Internet. We recommend allowing access from within the VPC, but not from the public Internet. If you need to talk to your Kubernetes cluster from your own computer (e.g., to issue commands via
kubectl), use a bastion host or VPN server. See How to deploy a production-grade VPC on AWS for more info. - Cluster IAM Role
-
To be able to make API calls to other AWS services, your EKS cluster must have an IAM role with the following managed IAM policies:
AmazonEKSServicePolicyandAmazonEKSClusterPolicy. - Security group
-
You should define a security group that controls what traffic can go in and out of the control plane. The worker nodes must be able to talk to the control plane and vice versa: see Cluster Security Group Considerations for the ports you should open up between them.
- Logging
-
We recommend enabling control plane logging so that the logs from the Kubernetes API server, controller manager, scheduler, and other components are sent to CloudWatch.
Worker nodes
While EKS will run the control plane for you, it’s up to you to create the worker nodes. Here are the key considerations:
- Auto Scaling Group
-
We recommend using an Auto Scaling Group to run your worker nodes. This way, failed nodes will be automatically replaced, and you can use auto scaling policies to automatically scale the number of nodes up and down in response to load.
- Tags
-
EKS requires that all worker node EC2 instances have a tag with the key
kubernetes.io/cluster/<CLUSTER_NAME>and valueowned. - Subnets
-
We strongly recommend running the Auto Scaling Group for your worker nodes in private subnets that are NOT directly accessible from the public Internet. See How to deploy a production-grade VPC on AWS for more info.
- AMI
-
Each worker node will need Docker, kubelet, AWS IAM Authenticator, and a bootstrap script installed. We recommend using the Amazon EKS-Optimized AMI or one of the EKS partner AMIs (e.g., there is an Ubuntu AMI), as these already have all the necessary software installed.
- User Data
-
Each worker node must register itself to the Kubernetes API. This can be done using a bootstrap script that is bundled with the EKS optimized AMI. We recommend running this bootstrap script as part of User Data so that it executes when the EC2 instance is booting.
- IAM role
-
In order for the kubelet on each worker node to be able to make API calls, each worker node must have an IAM role with the following managed IAM policies:
AmazonEKSWorkerNodePolicy,AmazonEKS_CNI_Policy,AmazonEC2ContainerRegistryReadOnly. - Security group
-
You should define a security group that controls what traffic can go in and out of each worker node. The worker nodes must be able to talk to the control plane and vice versa: see Cluster Security Group Considerations for the ports you should open up between them.
- Server hardening
-
There are a number of server-hardening techniques that you should apply to each worker node. This includes a secure base image (e.g., CIS hardened images), intrusion prevention (e.g.,
fail2ban), file integrity monitoring (e.g., Tripwire), anti-virus (e.g., Sophos), automatically installing critical security updates (e.g.,unattended-upgradesfor Ubuntu), locking down EC2 metadata (e.g.,ip-lockdown), and so on.
Authenticate
EKS manages authentication via AWS IAM, which is not an authentication method natively supported by most Kubernetes
tooling, including kubectl. Therefore, before using kubectl, you have to use one of the following utilities to
authenticate:
- AWS CLI
-
AWS now has first-class support for authenticating to EKS built directly into the
awsCLI (minimum version:1.16.232). See Installing the AWS CLI for setup instructions. To use it, you fist run theupdate-kubeconfigcommand:aws eks update-kubeconfig --region <AWS_REGION> --name <EKS_CLUSTER_NAME>This will update your kubeconfig so that
kubectlwill automatically callaws eks get-tokenfor authentication; theaws eks get-tokencommand will, in turn, use the standard AWS CLI mechanisms to authenticate to AWS: i.e., the credentials file at~/.aws/credentials, environment variables, etc. - eksctl
-
eksctlis the official CLI tool for EKS. It’s primary purpose is to deploy and manage the EKS cluster itself, but you can also use it to authenticate to a cluster. To installeksctl, check out these instructions. To authenticate witheksctl, you run theeksctl utils write-kubeconfigcommand:eksctl utils write-kubeconfig --region <AWS_REGION> --name=<EKS_CLUSTER_NAME>This will update your kubeconfig so that
kubectlwill automatically call either the AWS CLI or AWS IAM Authenticator for authentication. - kubergrunt
-
A CLI tool maintained by Gruntwork that supports authentication to EKS, as well as several other important utilities, such as tools for doing zero-downtime rolling deployments of EKS worker nodes and managing TLS certificates in Kubernetes. The easiest way to install it is to use one of the pre-built binaries from the kubergrunt releases page. To authenticate with
kubergrunt, you runkubergrunt eks configure:kubergrunt eks configure --eks-cluster-arn <EKS_CLUSTER_ARN>This will update your kubeconfig to use
kubergrunt eks tokenfor authentication. - AWS IAM Authenticator for Kubernetes
-
A CLI tool maintained by the Heptio and Amazon EKS teams. This was the main tool AWS recommended for authenticating to EKS until first-class support was added directly to the AWS CLI. At this point, there is no reason to install this tool separately, so we are just recording this here for historical reasons.
IAM role mapping and RBAC
You’ve seen that to determine who the user is (authentication), EKS uses IAM. The next step is to determine what the user can do (authorization). Kubernetes uses its own roles and RBAC for authorization, so the question is, how does EKS know which IAM entities (that is, IAM users or roles) are associated with which Kubernetes roles?
The answer is that EKS expects you to define a ConfigMap called aws-auth that defines the mapping from IAM entities
to Kubernetes roles. When you first provision an EKS cluster, the IAM user or role that you used to authenticate is
automatically granted admin level permissions (the system:master role). You can use this role to add additional role
mappings in the aws-auth ConfigMap.
Here’s an example aws-auth ConfigMap:
apiVersion: v1
kind: ConfigMap
metadata:
  name: aws-auth
  namespace: kube-system
data:
  mapRoles: |
    - rolearn: arn:aws:iam::11122223333:role/example-role
      username: system:node:{{EC2PrivateDNSName}}
      groups:
        - system:bootstrappers
        - system:nodes
  mapUsers: |
    - userarn: arn:aws:iam::11122223333:user/example-user
      username: example-user
      groups:
        - system:masters
This ConfigMap tells EKS that anyone who authenticates as the IAM role called example-role should automatically get
the permissions in the system:bootstrappers and system:nodes Kubernetes roles, and anyone who authenticates with as
the IAM user example-user should automatically get the permissions in the system:masters Kubernetes role. Note that
when users authenticate using an IAM role or IAM user, they are mapped to a Kubernetes user with the username you
specify in the aws-auth ConfigMap (i.e., that’s the username that will show up in the Kubernetes audit log).
Note that, as of September, 2019, the aws-auth ConfigMap supports mapping IAM roles and IAM users, but not IAM groups
(see Managing Users or IAM Roles for your EKS Cluster).
Mapping every individual user in your organization is most likely difficult to manage, so we instead recommend creating
IAM roles, mapping those IAM roles to Kubernetes roles in aws-auth, and allowing IAM users in specific IAM groups to
assume those roles.
Logging
We recommend enabling the following logging to help with debugging and troubleshooting:
- Control plane logging
-
We recommend enabling control plane logging in EKS, at least for the API server logs, audit logs, and authenticator logs, as these are critical for debugging and auditing. You may wish to enable controller manager and scheduler logs too.
- Worker node logging
-
We recommend installing fluentd-cloudwatch in the EKS cluster. This will run fluentd on each worker node and configure it to send all the logs from the worker nodes (including all the pods on them) to CloudWatch.
Protecting pods
There are several policies you may want to enable to protect the pods in your cluster:
- PodSecurityPolicy
-
You can use a PodSecurityPolicy to define what security-related features users can or can’t use in their pods. For example, you can specify if pods can run
privilegedcontainers, which ports a container can bind to, which kernel capabilities can be added to a container, what user IDs a container can run as, and so on. Follow the principle of least privilege and provide pods with as few permissions as possible. You can also use RBAC to assign a different PodSecurityPolicy to different users or roles (e.g., give admins a less restrictive PodSecurityPolicy than other users). - NetworkPolicy
-
You can use a NetworkPolicy to define the inbound and outbound networking rules for your pods. We recommend adding a default NetworkPolicy that denies all inbound and outbound traffic (again, principle of least privilege) and then adding a NetworkPolicy for each pod that gives it permissions to talk solely to the other pods it should be able to access.
Deployment walkthrough
Let’s now walk through how to deploy a production-grade Kubernetes cluster in AWS, fully defined and managed as code, using the Gruntwork Infrastructure as Code Library.
Pre-requisites
This walkthrough has the following pre-requisites:
- Gruntwork Infrastructure as Code Library
-
This guide uses code from the Gruntwork Infrastructure as Code Library, as it implements most of the production-grade design for you out of the box. Make sure to read How to use the Gruntwork Infrastructure as Code Library.
ImportantYou must be a Gruntwork subscriber to access the Gruntwork Infrastructure as Code Library. - Terraform
-
This guide uses Terraform to define and manage all the infrastructure as code. If you’re not familiar with Terraform, check out A Comprehensive Guide to Terraform, A Crash Course on Terraform, and How to Use the Gruntwork Infrastructure as Code Library.
- Python and Kubergrunt
-
Some of the Terraform modules used in this guide call out to Python code and/or kubergrunt to fill in missing features in Terraform. Make sure you have Python and
kubergruntinstalled on any computer where you will be running Terraform. - Docker and Packer
-
This guide assumes you are deploying a Kubernetes cluster for use with Docker. The guide also uses Packer to build VM images. If you’re not familiar with Docker or Packer, check out A Crash Course on Docker and Packer and How to Use the Gruntwork Infrastructure as Code Library.
- AWS accounts
-
This guide deploys infrastructure into one or more AWS accounts. Check out the How to configure a production-grade AWS account structure guide for instructions. You will also need to be able to authenticate to these accounts on the CLI: check out A Comprehensive Guide to Authenticating to AWS on the Command Line for instructions.
Deploy the VPC
The first step is to deploy a VPC. Follow the instructions in
How to deploy a production-grade VPC on AWS to use
module-vpc to create a VPC setup that looks like this:
After following this guide, you should have vpc-app wrapper module in your infrastructure-modules repo:
infrastructure-modules
  └ networking
    └ vpc-mgmt
    └ vpc-app
      └ main.tf
      └ outputs.tf
      └ variables.tf
Here’s a snippet of what the code in the vpc-app wrapper module looks like:
module "vpc" {
  # Make sure to replace <VERSION> in this URL with the latest module-vpc release
  source = "git@github.com:gruntwork-io/module-vpc.git//modules/vpc-app?ref=<VERSION>"

  vpc_name         = var.vpc_name
  aws_region       = var.aws_region
  cidr_block       = var.cidr_block
  num_nat_gateways = var.num_nat_gateways
}

# ... (the rest of the code is omitted) ...
Update this module to use the
eks-vpc-tags module from the
terraform-aws-eks repo to add the tags required by EKS:
|
Important
|
You must be a Gruntwork subscriber to access terraform-aws-eks.
|
module "vpc" {
  # Make sure to replace <VERSION> in this URL with the latest module-vpc release
  source = "git@github.com:gruntwork-io/module-vpc.git//modules/vpc-app?ref=<VERSION>"

  vpc_name         = var.vpc_name
  aws_region       = var.aws_region
  cidr_block       = var.cidr_block
  num_nat_gateways = var.num_nat_gateways

  custom_tags                            = module.vpc_tags.vpc_eks_tags
  public_subnet_custom_tags              = module.vpc_tags.vpc_public_subnet_eks_tags
  private_app_subnet_custom_tags         = module.vpc_tags.vpc_private_app_subnet_eks_tags
  private_persistence_subnet_custom_tags = module.vpc_tags.vpc_private_persistence_subnet_eks_tags
}

module "vpc_tags" {
  # Make sure to replace <VERSION> in this URL with the latest terraform-aws-eks release
  source = "git::git@github.com:gruntwork-io/terraform-aws-eks.git//modules/eks-vpc-tags?ref=<VERSION>"

  eks_cluster_name = var.eks_cluster_name
}

# ... (the rest of the code is omitted) ...
Add a new input variable that you can use to specify the name of the EKS cluster:
variable "eks_cluster_name" {
  description = "The EKS cluster that will be deployed into the VPC."
  type        = string
}
Next, configure DNS forwarding rules using the
vpc-dns-forwarder module in
module-vpc:
|
Important
|
You must be a Gruntwork subscriber to access module-vpc.
|
module "dns_mgmt_to_app" {
  # Make sure to replace <VERSION> in this URL with the latest module-vpc release
  source = "git::git@github.com:gruntwork-io/module-vpc.git//modules/vpc-dns-forwarder?ref=<VERSION>"

  origin_vpc_id                                   = data.terraform_remote_state.mgmt_vpc.outputs.vpc_id
  origin_vpc_name                                 = data.terraform_remote_state.mgmt_vpc.outputs.vpc_name
  origin_vpc_route53_resolver_primary_subnet_id   = element(data.terraform_remote_state.mgmt_vpc.outputs.public_subnet_ids, 0)
  origin_vpc_route53_resolver_secondary_subnet_id = element(data.terraform_remote_state.mgmt_vpc.outputs.public_subnet_ids, 1)

  destination_vpc_id                                   = module.vpc.vpc_id
  destination_vpc_name                                 = module.vpc.vpc_name
  destination_vpc_route53_resolver_primary_subnet_id   = element(module.vpc.public_subnet_ids, 0)
  destination_vpc_route53_resolver_secondary_subnet_id = element(module.vpc.public_subnet_ids, 1)
}
At this point, you’ll want to test your code. See Manual tests for Terraform code and Automated tests for Terraform code for instructions.
Once your updated vpc-app wrapper module is working the way you want, submit a pull request, get your changes merged
into the master branch, and create a new versioned release by using a Git tag. For example, to create a v0.5.0
release:
git tag -a "v0.5.0" -m "Added tagging and DNS forwarding for EKS"
git push --follow-tags|
Note
|
This guide will use Terragrunt and its associated file and folder structure to deploy Terraform modules. Please note that Terragrunt is NOT required for using Terraform modules from the Gruntwork Infrastructure as Code Library. Check out How to Use the Gruntwork Infrastructure as Code Library for instructions on alternative options, such as how to Deploy using plain Terraform. |
Head over to your infrastructure-live repo and update the terragrunt.hcl file to deploy this new version:
terraform {
  source = "git@github.com/<YOUR_ORG>/infrastructure-modules.git//networking/vpc-app?ref=v0.5.0"
}
And run terragrunt apply to deploy the changes:
cd infrastructure-live/production/us-east-2/stage/networking/vpc-app
terragrunt apply
Configure the control plane
Now that you have the VPC ready, it’s time to configure the EKS control plane using the
eks-cluster-control-plane module
in terraform-aws-eks. Create a new module called eks-cluster in `infrastructure-modules:
infrastructure-modules
  └ networking
    └ vpc-mgmt
    └ vpc-app
  └ services
    └ eks-cluster
      └ main.tf
      └ dependencies.tf
      └ outputs.tf
      └ variables.tf
Inside of main.tf, configure your AWS provider and Terraform settings:
provider "aws" {
  # The AWS region in which all resources will be created
  region = var.aws_region

  # Require a 2.x version of the AWS provider
  version = "~> 2.6"

  # Only these AWS Account IDs may be operated on by this template
  allowed_account_ids = [var.aws_account_id]
}

terraform {
  # The configuration for this backend will be filled in by Terragrunt or via a backend.hcl file. See
  # https://www.terraform.io/docs/backends/config.html#partial-configuration
  backend "s3" {}

  # Only allow this Terraform version. Note that if you upgrade to a newer version, Terraform won't allow you to use an
  # older version, so when you upgrade, you should upgrade everyone on your team and your CI servers all at once.
  required_version = "= 0.12.6"
}
Next, use the eks-cluster-control-plane module to configure the EKS control plane:
module "eks_cluster" {
  # Make sure to replace <VERSION> in this URL with the latest terraform-aws-eks release
  source = "git::git@github.com:gruntwork-io/terraform-aws-eks.git//modules/eks-cluster-control-plane?ref=<VERSION>"

  cluster_name = var.cluster_name

  vpc_id                = data.terraform_remote_state.vpc.outputs.vpc_id
  vpc_master_subnet_ids = data.terraform_remote_state.vpc.outputs.private_app_subnet_ids

  enabled_cluster_log_types = ["api", "audit", "authenticator"]
  kubernetes_version        = 1.13
  endpoint_public_access    = false
}
The code above does the following:
-
Fetch information about the app VPC you just deployed using the terraform_remote_state data source. You’ll see the code for this shortly.
-
Configure the control plane to run in the private app subnets of that VPC.
-
Configure the API server logs, audit logs, and authenticator logs for the control plane to be sent to CloudWatch.
-
Set the Kubernetes version to 1.13.
-
Disable public access so that the Kubernetes API server is only accessible from within the VPC.
NoteThis means you MUST be in the VPC network—e.g., connected via a VPN—to access your EKS cluster.
Add the terraform_remote_state data source to fetch the app VPC info to dependencies.tf:
data "terraform_remote_state" "vpc" {
  backend = "s3"
  config = {
    region = var.terraform_state_aws_region
    bucket = var.terraform_state_s3_bucket
    key    = "${var.aws_region}/${var.vpc_name}/vpc/terraform.tfstate"
  }
}
And add the corresponding input variables for this code to variables.tf:
variable "aws_region" {
  description = "The AWS region in which all resources will be created"
  type        = string
}

variable "aws_account_id" {
  description = "The ID of the AWS Account in which to create resources."
  type        = string
}

variable "cluster_name" {
  description = "The name of the EKS cluster"
  type        = string
}

variable "vpc_name" {
  description = "The name of the VPC in which to run the EKS cluster (e.g. stage, prod)"
  type        = string
}

variable "terraform_state_aws_region" {
  description = "The AWS region of the S3 bucket used to store Terraform remote state"
  type        = string
}

variable "terraform_state_s3_bucket" {
  description = "The name of the S3 bucket used to store Terraform remote state"
  type        = string
}
Configure the worker nodes
The next step is to configure the worker nodes in the eks-cluster module. You can use an Auto Scaling Group to run
the worker nodes using the
eks-cluster-workers module
in terraform-aws-eks:
module "eks_workers" {
  # Make sure to replace <VERSION> in this URL with the latest terraform-aws-eks release
  source = "git::git@github.com:gruntwork-io/terraform-aws-eks.git//modules/eks-cluster-workers?ref=<VERSION>"

  name_prefix  = "app-workers-"
  cluster_name = var.cluster_name

  vpc_id                = data.terraform_remote_state.vpc.outputs.vpc_id
  vpc_worker_subnet_ids = data.terraform_remote_state.vpc.outputs.private_app_subnet_ids

  eks_master_security_group_id = module.eks_cluster.eks_master_security_group_id

  cluster_min_size = var.cluster_min_size
  cluster_max_size = var.cluster_max_size

  cluster_instance_ami          = var.cluster_instance_ami
  cluster_instance_type         = var.cluster_instance_type
  cluster_instance_keypair_name = var.cluster_instance_keypair_name
  cluster_instance_user_data    = data.template_file.user_data.rendered
}
The code above does the following:
-
Deploy the worker nodes into the same private app subnets as the EKS cluster.
-
Pass in the EKS control plane security group ID to the
eks_master_security_group_id. Theeks-cluster-workersmodule will use this to open up the proper ports in the control plane and worker node security groups so they can talk to each other. -
Use variables for most of the other worker node settings: e.g., min number of nodes, max number of nodes, AMI to run, instance type to run, and so on. This allows you to use different settings for the worker nodes in different environments.
-
Sets the worker nodes to run a User Data script rendered from a
template_filedata source. You’ll see what thistemplate_filedata source looks like a little later.
Add the corresponding input variables to variables.tf:
variable "cluster_min_size" {
  description = "The minimum number of instances to run in the EKS cluster"
  type        = number
}

variable "cluster_max_size" {
  description = "The maximum number of instances to run in the EKS cluster"
  type        = number
}

variable "cluster_instance_type" {
  description = "The type of instances to run in the EKS cluster (e.g. t2.medium)"
  type        = string
}

variable "cluster_instance_ami" {
  description = "The AMI to run on each instance in the EKS cluster. You can build the AMI using the Packer template under packer/build.json."
  type        = string
}

variable "cluster_instance_keypair_name" {
  description = "The name of the Key Pair that can be used to SSH to each instance in the EKS cluster"
  type        = string
}
Create the worker node AMI
The next step is to create the Amazon Machine Image (AMI) that will run on each worker node. We recommend using the Amazon EKS-Optimized AMI as the base and installing other tooling you need (e.g., server-hardening, monitoring, log aggregation, etc.) on top of it.
Create a Packer template in called eks-node.json in your infrastructure-modules repo:
infrastructure-modules
  └ networking
    └ vpc-mgmt
    └ vpc-app
  └ services
    └ eks-cluster
      └ packer
        └ eks-node.json
      └ main.tf
      └ dependencies.tf
      └ outputs.tf
      └ variables.tf
Here’s what eks-node.json should look like:
{
  "variables": {
    "aws_region": "us-east-2",
    "github_auth_token": "{{env `GITHUB_OAUTH_TOKEN`}}",
    "kubernetes_version": "1.13"
  },
  "builders": [{
    "ami_name": "eks-cluster-instance-{{isotime | clean_ami_name}}",
    "ami_description": "An Amazon EKS-optimized AMI that is meant to be run as part of an EKS cluster.",
    "instance_type": "t2.micro",
    "region": "{{user `aws_region`}}",
    "type": "amazon-ebs",
    "source_ami_filter": {
      "filters": {
        "virtualization-type": "hvm",
        "architecture": "x86_64",
        "name": "amazon-eks-node-{{user `kubernetes_version`}}-v*",
        "root-device-type": "ebs"
      },
      "owners": ["602401143452"],
      "most_recent": true
    },
    "ssh_username": "ec2-user",
    "encrypt_boot": false
  }],
  "provisioners": [{
    "type": "shell",
    "inline": [
      "echo 'Sleeping for 30 seconds to give the AMIs enough time to initialize (otherwise, packages may fail to install).'",
      "sleep 30",
      "echo 'Installing AWS CLI'",
      "sudo yum update -y && sudo yum install -y aws-cli unzip perl-Digest-SHA jq"
    ]
  },{
    "type": "shell",
    "inline": "curl -Ls https://raw.githubusercontent.com/gruntwork-io/gruntwork-installer/master/bootstrap-gruntwork-installer.sh | bash /dev/stdin --version v0.0.22"
  },{
    "type": "shell",
    "inline": [
      "gruntwork-install --module-name 'bash-commons' --repo 'https://github.com/gruntwork-io/bash-commons' --tag 'v0.1.2'",
      "gruntwork-install --module-name 'eks-scripts' --repo 'https://github.com/gruntwork-io/terraform-aws-eks' --tag 'v0.6.0'",
      "gruntwork-install --module-name 'metrics/cloudwatch-memory-disk-metrics-scripts' --repo https://github.com/gruntwork-io/module-aws-monitoring --tag 'v0.13.2'",
      "gruntwork-install --module-name 'logs/syslog' --repo https://github.com/gruntwork-io/module-aws-monitoring --tag 'v0.13.2'",
      "gruntwork-install --module-name 'auto-update' --repo https://github.com/gruntwork-io/module-security --tag 'v0.18.1'",
      "gruntwork-install --module-name 'fail2ban' --repo https://github.com/gruntwork-io/module-security --tag 'v0.18.1'",
      "gruntwork-install --module-name 'ntp' --repo https://github.com/gruntwork-io/module-security --tag 'v0.18.1'",
      "gruntwork-install --module-name 'ip-lockdown' --repo https://github.com/gruntwork-io/module-security --tag 'v0.18.1'",
      "gruntwork-install --binary-name 'ssh-grunt' --repo https://github.com/gruntwork-io/module-security --tag 'v0.18.1'",
      "sudo /usr/local/bin/ssh-grunt iam install --iam-group ssh-grunt-users --iam-group-sudo ssh-grunt-sudo-users --role-arn arn:aws:iam::111122223333:role/allow-ssh-grunt-access-from-other-accounts"
    ],
    "environment_vars": [
      "GITHUB_OAUTH_TOKEN={{user `github_auth_token`}}"
    ]
  }]
}|
Important
|
You must be a Gruntwork subscriber to access the terraform-aws-eks,
module-aws-monitoring, and module-security repos used in the Packer template above.
|
This Packer template installs the following on top of the EKS-optimized AMI base image:
-
bash-commons: A collection of reusable Bash functions for handling common tasks such as logging, assertions, string manipulation, and more. It’s used by some of the other tooling below.
-
eks-scripts: A script that takes the labels on a worker node EC2 instance and converts them to a format that can be passed to the EKS bootstrap script so that those tags show up as labels in Kubernetes.
-
cloudwatch-memory-disk-metrics-scripts: Send memory and disk usage metrics for your EC2 Instances to CloudWatch. These metrics are not available by default as they are only visible from inside a VM.
-
syslog: Configure log rotation and rate limiting for syslog.
-
auto-update: Configure a Linux server to automatically install critical security updates on a nightly basis.
-
fail2ban: Configure a Linux server to automatically ban malicious ip addresses from connecting to the server via SSH.
-
ntp: Install and configure NTP on a Linux server to prevent clock drift.
-
ip-lockdown: Lock down specified IP addresses so only certain OS users can access them. Primarily used to lock down the EC2 instance metadata endpoint (and therefore, the IAM role attached to the EC2 instance) so that it can only be accessed by specific users (e.g., only
root). -
ssh-grunt: Allow managing SSH access to EC2 instances using IAM. Developers you add to specific IAM groups will be able to SSH to specific servers using their own username and SSH key.
To build an AMI from this Packer template, you run:
packer build eks-node.jsonPacker will output the ID of the AMI at the end of the build. Copy this AMI down so you can deploy it later in this guide.
Configure the worker node User Data script
Now that you know what will be installed on each worker node AMI, you can fill in the User Data script that each worker
node will run on boot. Create user-data.sh in your infrastructure-modules repo:
infrastructure-modules
  └ networking
    └ vpc-mgmt
    └ vpc-app
  └ services
    └ eks-cluster
      └ packer
        └ eks-node.json
      └ user-data
        └ user-data.sh
      └ main.tf
      └ dependencies.tf
      └ outputs.tf
      └ variables.tf
Here’s what user-data.sh should look like:
#!/bin/bash

set -e

# Send the log output from this script to user-data.log, syslog, and the console
# From: https://alestic.com/2010/12/ec2-user-data-output/
exec > >(tee /var/log/user-data.log|logger -t user-data -s 2>/dev/console) 2>&1

function start_fail2ban {
  echo "Starting fail2ban"
  /etc/user-data/configure-fail2ban-cloudwatch/configure-fail2ban-cloudwatch.sh --cloudwatch-namespace Fail2Ban
}

function start_cloudwatch_logs_agent {
  local -r vpc_name="$1"
  local -r log_group_name="$2"

  echo "Starting CloudWatch Logs Agent in VPC $vpc_name"
  /etc/user-data/cloudwatch-log-aggregation/run-cloudwatch-logs-agent.sh \
    --vpc-name "$vpc_name" \
    --log-group-name "$log_group_name"
}

function configure_eks_instance {
  local -r aws_region="$1"
  local -r eks_cluster_name="$2"
  local -r eks_endpoint="$3"
  local -r eks_certificate_authority="$4"
  local -r vpc_name="$5"
  local -r log_group_name="$6"

  start_cloudwatch_logs_agent "$vpc_name" "$log_group_name"
  start_fail2ban

  echo "Running eks bootstrap script to register instance to cluster"
  local -r node_labels="$(map-ec2-tags-to-node-labels)"
  /etc/eks/bootstrap.sh \
    --apiserver-endpoint "$eks_endpoint" \
    --b64-cluster-ca "$eks_certificate_authority" \
    --kubelet-extra-args "--node-labels=\"$node_labels\"" \
    "$eks_cluster_name"

  echo "Locking down the EC2 metadata endpoint so only the root and default users can access it"
  /usr/local/bin/ip-lockdown 169.254.169.254 root ec2-user
}

# These variables are set by Terraform interpolation
configure_eks_instance "${aws_region}" "${eks_cluster_name}" "${eks_endpoint}" "${eks_certificate_authority}" "${vpc_name}" "${log_group_name}"
The User Data script above does the following:
-
Starts the CloudWatch Logs Agent so that logs from the EC2 instance (especially syslog) are sent to CloudWatch Logs.
-
Starts
fail2banto protect the instance against malicious SSH attempts. -
Runs the EKS bootstrap script to register the instance in the cluster.
-
Run
ip-lockdownto lock down the EC2 metadata endpoint so only therootandec2-userusers can access it.
Note that at the bottom of user-data.sh, there are some variables that are supposed to be filled in by Terraform
interpolation. How does that work? When you configured the worker nodes earlier in this guide, you set the
cluster_instance_user_data parameter to a template_file data source that didn’t yet exist; well, this is what’s
going to provide the variables via interpolation! Add the template_file data source as follows:
data "template_file" "user_data" {
  template = file("${path.module}/user-data/user-data.sh")

  vars = {
    aws_region                = var.aws_region
    eks_cluster_name          = var.cluster_name
    eks_endpoint              = module.eks_cluster.eks_cluster_endpoint
    eks_certificate_authority = module.eks_cluster.eks_cluster_certificate_authority
    vpc_name                  = var.vpc_name
    log_group_name            = var.cluster_name
  }
}
Configure logging, metrics, and alarms for the worker nodes
In order for the CloudWatch Logs Agent to be able to write to CloudWatch Logs, you need to give it the worker nodes the
proper IAM permissions. You can do that by using the
cloudwatch-log-aggregation-iam-policy module
from module-aws-monitoring:
module "cloudwatch_log_aggregation" {
  # Make sure to replace <VERSION> in this URL with the latest module-aws-monitoring release
  source = "git::git@github.com:gruntwork-io/module-aws-monitoring.git//modules/logs/cloudwatch-log-aggregation-iam-policy?ref=<VERSION>"

  name_prefix = var.cluster_name
}

resource "aws_iam_policy_attachment" "attach_cloudwatch_log_aggregation_policy" {
  name       = "attach-cloudwatch-log-aggregation-policy"
  roles      = [module.eks_workers.eks_worker_iam_role_name]
  policy_arn = module.cloudwatch_log_aggregation.cloudwatch_log_aggregation_policy_arn
}
Similarly, to be able to send disk and memory metrics to CloudWatch, you need to add more IAM permissions, this time using the cloudwatch-custom-metrics-iam-policy module:
module "cloudwatch_metrics" {
  # Make sure to replace <VERSION> in this URL with the latest module-aws-monitoring release
  source = "git::git@github.com:gruntwork-io/module-aws-monitoring.git//modules/metrics/cloudwatch-custom-metrics-iam-policy?ref=<VERSION>"

  name_prefix = var.cluster_name
}

resource "aws_iam_policy_attachment" "attach_cloudwatch_metrics_policy" {
  name       = "attach-cloudwatch-metrics-policy"
  roles      = [module.eks_workers.eks_worker_iam_role_name]
  policy_arn = module.cloudwatch_metrics.cloudwatch_metrics_policy_arn
}
Finally, you may want to configure some CloudWatch alerts to go off if the CPU usage, memory usage, or disk space
utilization gets too high on the worker nodes. You can do this using several of the
alarms modules from
module-aws-monitoring:
module "high_cpu_usage_alarms" {
  # Make sure to replace <VERSION> in this URL with the latest module-aws-monitoring release
  source = "git::git@github.com:gruntwork-io/module-aws-monitoring.git//modules/alarms/asg-cpu-alarms?ref=<VERSION>"

  asg_names            = [module.eks_workers.eks_worker_asg_id]
  num_asg_names        = 1
  alarm_sns_topic_arns = [data.terraform_remote_state.sns_region.outputs.arn]
}

module "high_memory_usage_alarms" {
  # Make sure to replace <VERSION> in this URL with the latest module-aws-monitoring release
  source = "git::git@github.com:gruntwork-io/module-aws-monitoring.git//modules/alarms/asg-memory-alarms?ref=<VERSION>"

  asg_names            = [module.eks_workers.eks_worker_asg_id]
  num_asg_names        = 1
  alarm_sns_topic_arns = [data.terraform_remote_state.sns_region.outputs.arn]
}

module "high_disk_usage_alarms" {
  # Make sure to replace <VERSION> in this URL with the latest module-aws-monitoring release
  source = "git::git@github.com:gruntwork-io/module-aws-monitoring.git//modules/alarms/asg-disk-alarms?ref=<VERSION>"

  asg_names            = [module.eks_workers.eks_worker_asg_id]
  num_asg_names        = 1
  file_system          = "/dev/xvda1"
  mount_path           = "/"
  alarm_sns_topic_arns = [data.terraform_remote_state.sns_region.outputs.arn]
}
Note that the code above assumes you’ve created an SNS topic to notify about these alerts in another module and pulls
in the ARN of that SNS topic using a terraform_remote_state data source:
data "terraform_remote_state" "sns_region" {
  backend = "s3"
  config = {
    region = var.terraform_state_aws_region
    bucket = var.terraform_state_s3_bucket
    key    = "${var.aws_region}/_global/sns-topics/terraform.tfstate"
  }
}
Configure role mapping
When you deploy the eks-cluster module later in this guide, it’ll give your IAM user or IAM role (whatever you’re
authenticated as) admin permissions in the cluster. You can use these admin permissions to configure permissions for
the other IAM users and roles on your team using the
eks-k8s-role-mapping module
in terraform-aws-eks:
module "eks_k8s_role_mapping" {
  # Make sure to replace <VERSION> in this URL with the latest terraform-aws-eks release
  source = "git::git@github.com:gruntwork-io/terraform-aws-eks.git//modules/eks-k8s-role-mapping?ref=<VERSION>"

  # This will configure the worker nodes' IAM role to have access to the system:node Kubernetes role
  eks_worker_iam_role_arns = [module.eks_workers.eks_worker_iam_role_arn]

  # The IAM role to Kubernetes role mappings are passed in via a variable
  iam_role_to_rbac_group_mappings = var.iam_role_to_rbac_group_mappings

  config_map_labels = {
    eks-cluster = module.eks_cluster.eks_cluster_name
  }
}
And here’s the corresponding input variable:
variable "iam_role_to_rbac_group_mappings" {
  description = "Mapping of AWS IAM roles to RBAC groups, where the keys are the AWS ARN of IAM roles and the values are the mapped k8s RBAC group names as a list."
  type        = map(list(string))
  default     = {}
}
This variable allows you to map different IAM role ARNs in different environments to various Kubernetes roles. You’ll see an example of this later in the guide.
Note that the eks-k8s-role-mapping module uses the Kubernetes provider to talk to your Kubernetes cluster directly
from Terraform. That means that (a) you can only apply this code from within your VPC and/or when connected via VPN and
(b) you have to configure the Kubernetes provider. The latter requires a little bit of hackery due to Terraform
limitations:
provider "kubernetes" {
  version = "~> 1.6"

  load_config_file       = false
  host                   = data.template_file.kubernetes_cluster_endpoint.rendered
  cluster_ca_certificate = base64decode(data.template_file.kubernetes_cluster_ca.rendered)
  token                  = data.aws_eks_cluster_auth.kubernetes_token.token
}

# Workaround for Terraform limitation where you cannot directly set a depends on directive or interpolate from resources
# in the provider config.
# Specifically, Terraform requires all information for the Terraform provider config to be available at plan time,
# meaning there can be no computed resources. We work around this limitation by creating a template_file data source
# that does the computation.
# See https://github.com/hashicorp/terraform/issues/2430 for more details
data "template_file" "kubernetes_cluster_endpoint" {
  template = module.eks_cluster.eks_cluster_endpoint
}

data "template_file" "kubernetes_cluster_ca" {
  template = module.eks_cluster.eks_cluster_certificate_authority
}

data "aws_eks_cluster_auth" "kubernetes_token" {
  name = module.eks_cluster.eks_cluster_name
}
Configure access to the control plane and worker nodes
If you want to make the control plane accessible outside of the cluster itself, you can add additional security group rules. For example, here is how you can make it possible to connect to the control plane from a VPN server:
resource "aws_security_group_rule" "openvpn_server_control_plane_access" {
  type                     = "ingress"
  from_port                = 443
  to_port                  = 443
  protocol                 = "tcp"
  security_group_id        = module.eks_cluster.eks_master_security_group_id
  # Replace <SECURITY_GROUP_ID> with the ID of a security group from which SSH access should be allowed. E.g., If you
  # are running a VPN server, you could use a terraform_remote_state data source to fetch its security group ID and
  # fill it in here.
  source_security_group_id = "<VPN_SECURITY_GROUP_ID>"
}
Note that if the VPN server is in another VPC (e.g., a management VPC), you will need to add DNS forwarding rules in
order for the VPN server to be able to resolve the private domain name of the EKS cluster. You can add these rules
using the
vpc-dns-forwarder-rules module
from terraform-aws-eks:
module "dns_forwarder_rule" {
  # Make sure to replace <VERSION> in this URL with the latest terraform-aws-eks release
  source = "git::git@github.com:gruntwork-io/module-vpc.git//modules/vpc-dns-forwarder-rules?ref=<VERSION>"

  vpc_id                                        = data.terraform_remote_state.mgmt_vpc.outputs.vpc_id
  origin_vpc_route53_resolver_endpoint_id       = data.terraform_remote_state.vpc.outputs.origin_vpc_route53_resolver_endpoint_id
  destination_vpc_route53_resolver_primary_ip   = data.terraform_remote_state.vpc.outputs.destination_vpc_route53_resolver_primary_ip
  destination_vpc_route53_resolver_secondary_ip = data.terraform_remote_state.vpc.outputs.destination_vpc_route53_resolver_secondary_ip

  num_endpoints_to_resolve = 1
  endpoints_to_resolve = [
    # endpoint returned here is of the form https://DOMAIN. We want just the domain, so we chop off the https
    replace(lower(module.eks_cluster.eks_cluster_endpoint), "https://", ""),
  ]
}
Note that this code pulls in the ID of the management VPC via a terraform_remote_state data source:
data "terraform_remote_state" "mgmt_vpc" {
  backend = "s3"
  config = {
    region = var.terraform_state_aws_region
    bucket = var.terraform_state_s3_bucket
    key    = "${var.aws_region}/mgmt/vpc/terraform.tfstate"
  }
}
If you want to be able to SSH to the worker nodes (e.g., for debugging), you can update the worker nodes security group to allow SSH access from specific IPs or security groups:
resource "aws_security_group_rule" "allow_inbound_ssh" {
  type                     = "ingress"
  from_port                = 22
  to_port                  = 22
  protocol                 = "tcp"
  security_group_id        = module.eks_workers.eks_worker_security_group_id
  # Replace <SECURITY_GROUP_ID> with the ID of a security group from which SSH access should be allowed. E.g., If you
  # are running a VPN server, you could use a terraform_remote_state data source to fetch its security group ID and
  # fill it in here.
  source_security_group_id = "<VPN_SECURITY_GROUP_ID>"
}
If you’re using ssh-grunt from
module-security to manage SSH access with IAM groups, you’ll need to give the worker nodes IAM permissions to talk to
IAM. You can do this using the
iam-policies module from
module-security:
module "iam_policies" {
  # Make sure to replace <VERSION> in this URL with the latest terraform-aws-eks release
  source = "git::git@github.com:gruntwork-io/module-security.git//modules/iam-policies?ref=<VERSION>"

  aws_account_id = var.aws_account_id

  # ssh-grunt is an automated app, so we can't use MFA with it
  iam_policy_should_require_mfa   = false
  trust_policy_should_require_mfa = false

  # If your IAM users are defined in a separate AWS account (e.g., a security account), you can pass in the ARN of
  # of that account via an input variable, and the IAM policy will give the worker nodes permission to assume that
  # IAM role
  allow_access_to_other_account_arns = [var.external_account_ssh_grunt_role_arn]
}

resource "aws_iam_role_policy" "ssh_grunt_permissions" {
  name   = "ssh-grunt-permissions"
  role   = module.eks_workers.eks_worker_iam_role_name
  policy = module.iam_policies.allow_access_to_other_accounts[0]
}
Deploy the EKS cluster
Your eks-cluster module is nearly complete! The only thing left to do is to add some useful output variables to
outputs.tf:
output "aws_region" {
  value = var.aws_region
}

output "eks_cluster_arn" {
  value = module.eks_cluster.eks_cluster_arn
}

output "eks_cluster_name" {
  value = module.eks_cluster.eks_cluster_name
}

output "eks_cluster_asg_name" {
  value = module.eks_workers.eks_worker_asg_name
}

output "eks_worker_security_group_id" {
  value = module.eks_workers.eks_worker_security_group_id
}

output "eks_worker_iam_role_arn" {
  value = module.eks_workers.eks_worker_iam_role_arn
}

output "eks_worker_iam_role_name" {
  value = module.eks_workers.eks_worker_iam_role_name
}

output "asg_name" {
  value = module.eks_workers.eks_worker_asg_name
}
At this point, run manual and automated tests for your code. Once your eks-cluster module is working the way you
want, submit a pull request, get your changes merged into the master branch, and create a new versioned release by
using a Git tag:
git tag -a "v0.6.0" -m "Added eks-cluster module"
git push --follow-tags
Head over to your infrastructure-live repo and create a terragrunt.hcl file to deploy your EKS cluster in one of
your environments, such as staging:
infrastructure-live
  └ root
  └ security
  └ stage
    └ us-east-2
      └ stage
        └ services
          └ eks-cluster
            └ terragrunt.hcl
  └ dev
  └ prod
  └ shared-services
Point the source URL in your terragrunt.hcl file to your eks-cluster module in the infrastructure-modules
repo, setting the ref param to the version you released earlier:
terraform {
  source = "git@github.com/<YOUR_ORG>/infrastructure-modules.git//services/eks-cluster?ref=v0.6.0"
}
Set the variables for the cloudtrail module in this environment in the inputs = { … } block of terragrunt.hcl:
inputs = {
  cluster_name                  = "eks-stage"
  cluster_instance_keypair_name = "stage-services-us-east-1-v1"

  # Fill in the ID of the AMI you built from your Packer template
  cluster_instance_ami          = "<AMI_ID>"

  # Set the max size to double the min size so the extra capacity can be used to do a zero-downtime deployment of updates
  # to the EKS Cluster Nodes (e.g. when you update the AMI). For docs on how to roll out updates to the cluster, see:
  # https://github.com/gruntwork-io/terraform-aws-eks/tree/master/modules/eks-cluster-workers#how-do-i-roll-out-an-update-to-the-instances
  cluster_min_size      = 3
  cluster_max_size      = 6
  cluster_instance_type = "t2.small"

  # If your IAM users are defined in a separate AWS account (e.g., in a security account), pass in the ARN of an IAM
  # role in that account that ssh-grunt on the worker nodes can assume to look up IAM group membership and public SSH
  # keys
  external_account_ssh_grunt_role_arn = "arn:aws:iam::1111222233333:role/allow-ssh-grunt-access-from-other-accounts"

  # Configure your role mappings
  iam_role_to_rbac_group_mappings = {
    # Give anyone using the full-access IAM role admin permissions
    "arn:aws:iam::444444444444:role/allow-full-access-from-other-accounts" = ["system:masters"]

    # Give anyone using the developers IAM role developer permissions. Kubernetes will automatically create this group
    # if it doesn't exist already, but you're still responsible for binding permissions to it!
    "arn:aws:iam::444444444444:role/allow-dev-access-from-other-accounts" = ["developers"]
  }
}
Configure your Terraform backend:
include {
  path = find_in_parent_folders()
}
And run terragrunt apply to deploy the EKS cluster:
cd infrastructure-live/stage/us-east-2/stage/services/eks-cluster
terragrunt apply
Try out the cluster
At this point, you can start interacting with your EKS cluster using kubectl. First, configure kubectl to
authenticate to the cluster. Here’s an example of how to do that using
kubergrunt:
kubergrunt eks configure --eks-cluster-arn <EKS_CLUSTER_ARN>You’ll need to replace EKS_CLUSTER_ARN with the ARN of the EKS cluster, which is one of the outputs you’ll get at the
end of the terragrunt apply.
Now you can start running typical kubectl commands:
kubectl get nodesUpdating the worker nodes
Deploying the cluster initially is a start. In the future, you’ll also need a way to roll out updates:
- Updating the control plane
-
EKS has built-in support for updating the control plane; the
eks-cluster-control-planemodule has built-in support for updating the plugins EKS uses, such asaws-vpc-cni,coredns, andkube-proxy. So, if you bump your Kubernetes version and runterragrunt apply, EKS will automatically roll out new master nodes with the new version installed, and theeks-cluster-control-planemodule will automatically execute a Python script that will update all the plugin versions as described in the official upgrade guide.NoteAWS warns that you may "experience minor service interruptions during an update." See Updating an Amazon EKS Cluster Kubernetes Version for more info. - Updating the worker nodes
-
EKS does not have a built-in way to update the worker nodes without downtime. If you need to update the worker nodes—e.g., roll out a new AMI—your best bet is to use the kubergrunt deploy command, which can do a zero-downtime rolling deployment of the worker node Auto Scaling Group:
kubergrunt eks deploy --region <AWS_REGION> --asg-name <AUTO_SCALING_GROUP_NAME>
Next steps
Now that you have your Kubernetes cluster deployed, you can start deploying all your apps as Kubernetes services and any data stores they depend on by using the following guides:
-
How to deploy a production grade services on Kubernetes(coming soon!) -
How to deploy a production grade database on AWS(coming soon!)

Comments