


Intro
This guide will walk you through how to use the Gruntwork Infrastructure as Code Library to define and manage a production-grade tech stack as code on top of AWS.
What is the Gruntwork Infrastructure as Code Library?
The Gruntwork Infrastructure as Code Library is a collection of over 300,000 lines of reusable, battle-tested, production-ready infrastructure code for AWS that lets you:
- Go to prod in days, not months
-
Most teams have the same basic infrastructure needs—e.g., Docker cluster, load balancer, database, cache, CI/CD, monitoring, secrets management, and so on—so instead of wasting months reinventing the wheel and building these same pieces from scratch, you get to leverage a library of reusable, battle-tested, off-the-shelf infrastructure that has been built by a team of DevOps experts and proven in production at hundreds of companies.
- Customize everything using infrastructure as code
-
Everything in the Gruntwork Infrastructure as Code Library is defined as code (primarily in Terraform, Go, Python, and Bash) and as a Gruntwork Subscriber, you get access to 100% of this code. You can combine and compose this code in any way you wish, see how everything works under the hood, debug any issues you run into, and customize and modify the code to fit your exact needs.
- Learn best practices
-
The Infrastructure as Code Library includes both thorough documentation and access to the DevOps Training Library, a collection of video training courses that teach a variety of DevOps topics, including infrastructure as code, Terraform, Docker, Packer, AWS, security, and more.
- Keep everything up to date
-
The Gruntwork team is constantly updating the Gruntwork Infrastructure as Code Library with the latest best practices, new features, and bug fixes. Instead of spending months fighting with Terraform or Kubernetes updates, better infrastructure is just a version number bump away (see the monthly Gruntwork Newsletter).
- Get commercial support
-
Work with a team of DevOps experts who can help you set up your infrastructure, design highly available and scalable systems, automate your builds and deployments, troubleshoot issues, and avoid gotchas and pitfalls. Reach out to Gruntwork Support via Slack, email, and phone/video calls, get code reviews, prioritized bug fixes, and SLAs on response times.
What you’ll learn in this guide
This guide consists of three main sections:
- Core concepts
-
An overview of the core concepts you need to understand to use the Gruntwork Infrastructure as Code Library, including a look into how the Infrastructure as Code Library is designed, how the Reference Architecture is designed, how we build production-grade infrastructure, and how to make use of infrastructure as code, Terraform, Terragrunt, Packer, Docker, immutable infrastructure, versioning, automated testing, and more.
- How to use the Gruntwork Infrastructure as Code Library
-
A step-by-step walkthrough of how to use the Gruntwork Infrastructure as Code Library.
- Next steps
-
What to do next once you’ve finished reading this guide.
Feel free to read the guide from start to finish or skip around to whatever part interests you!
Core concepts
The Gruntwork Infrastructure as Code Library
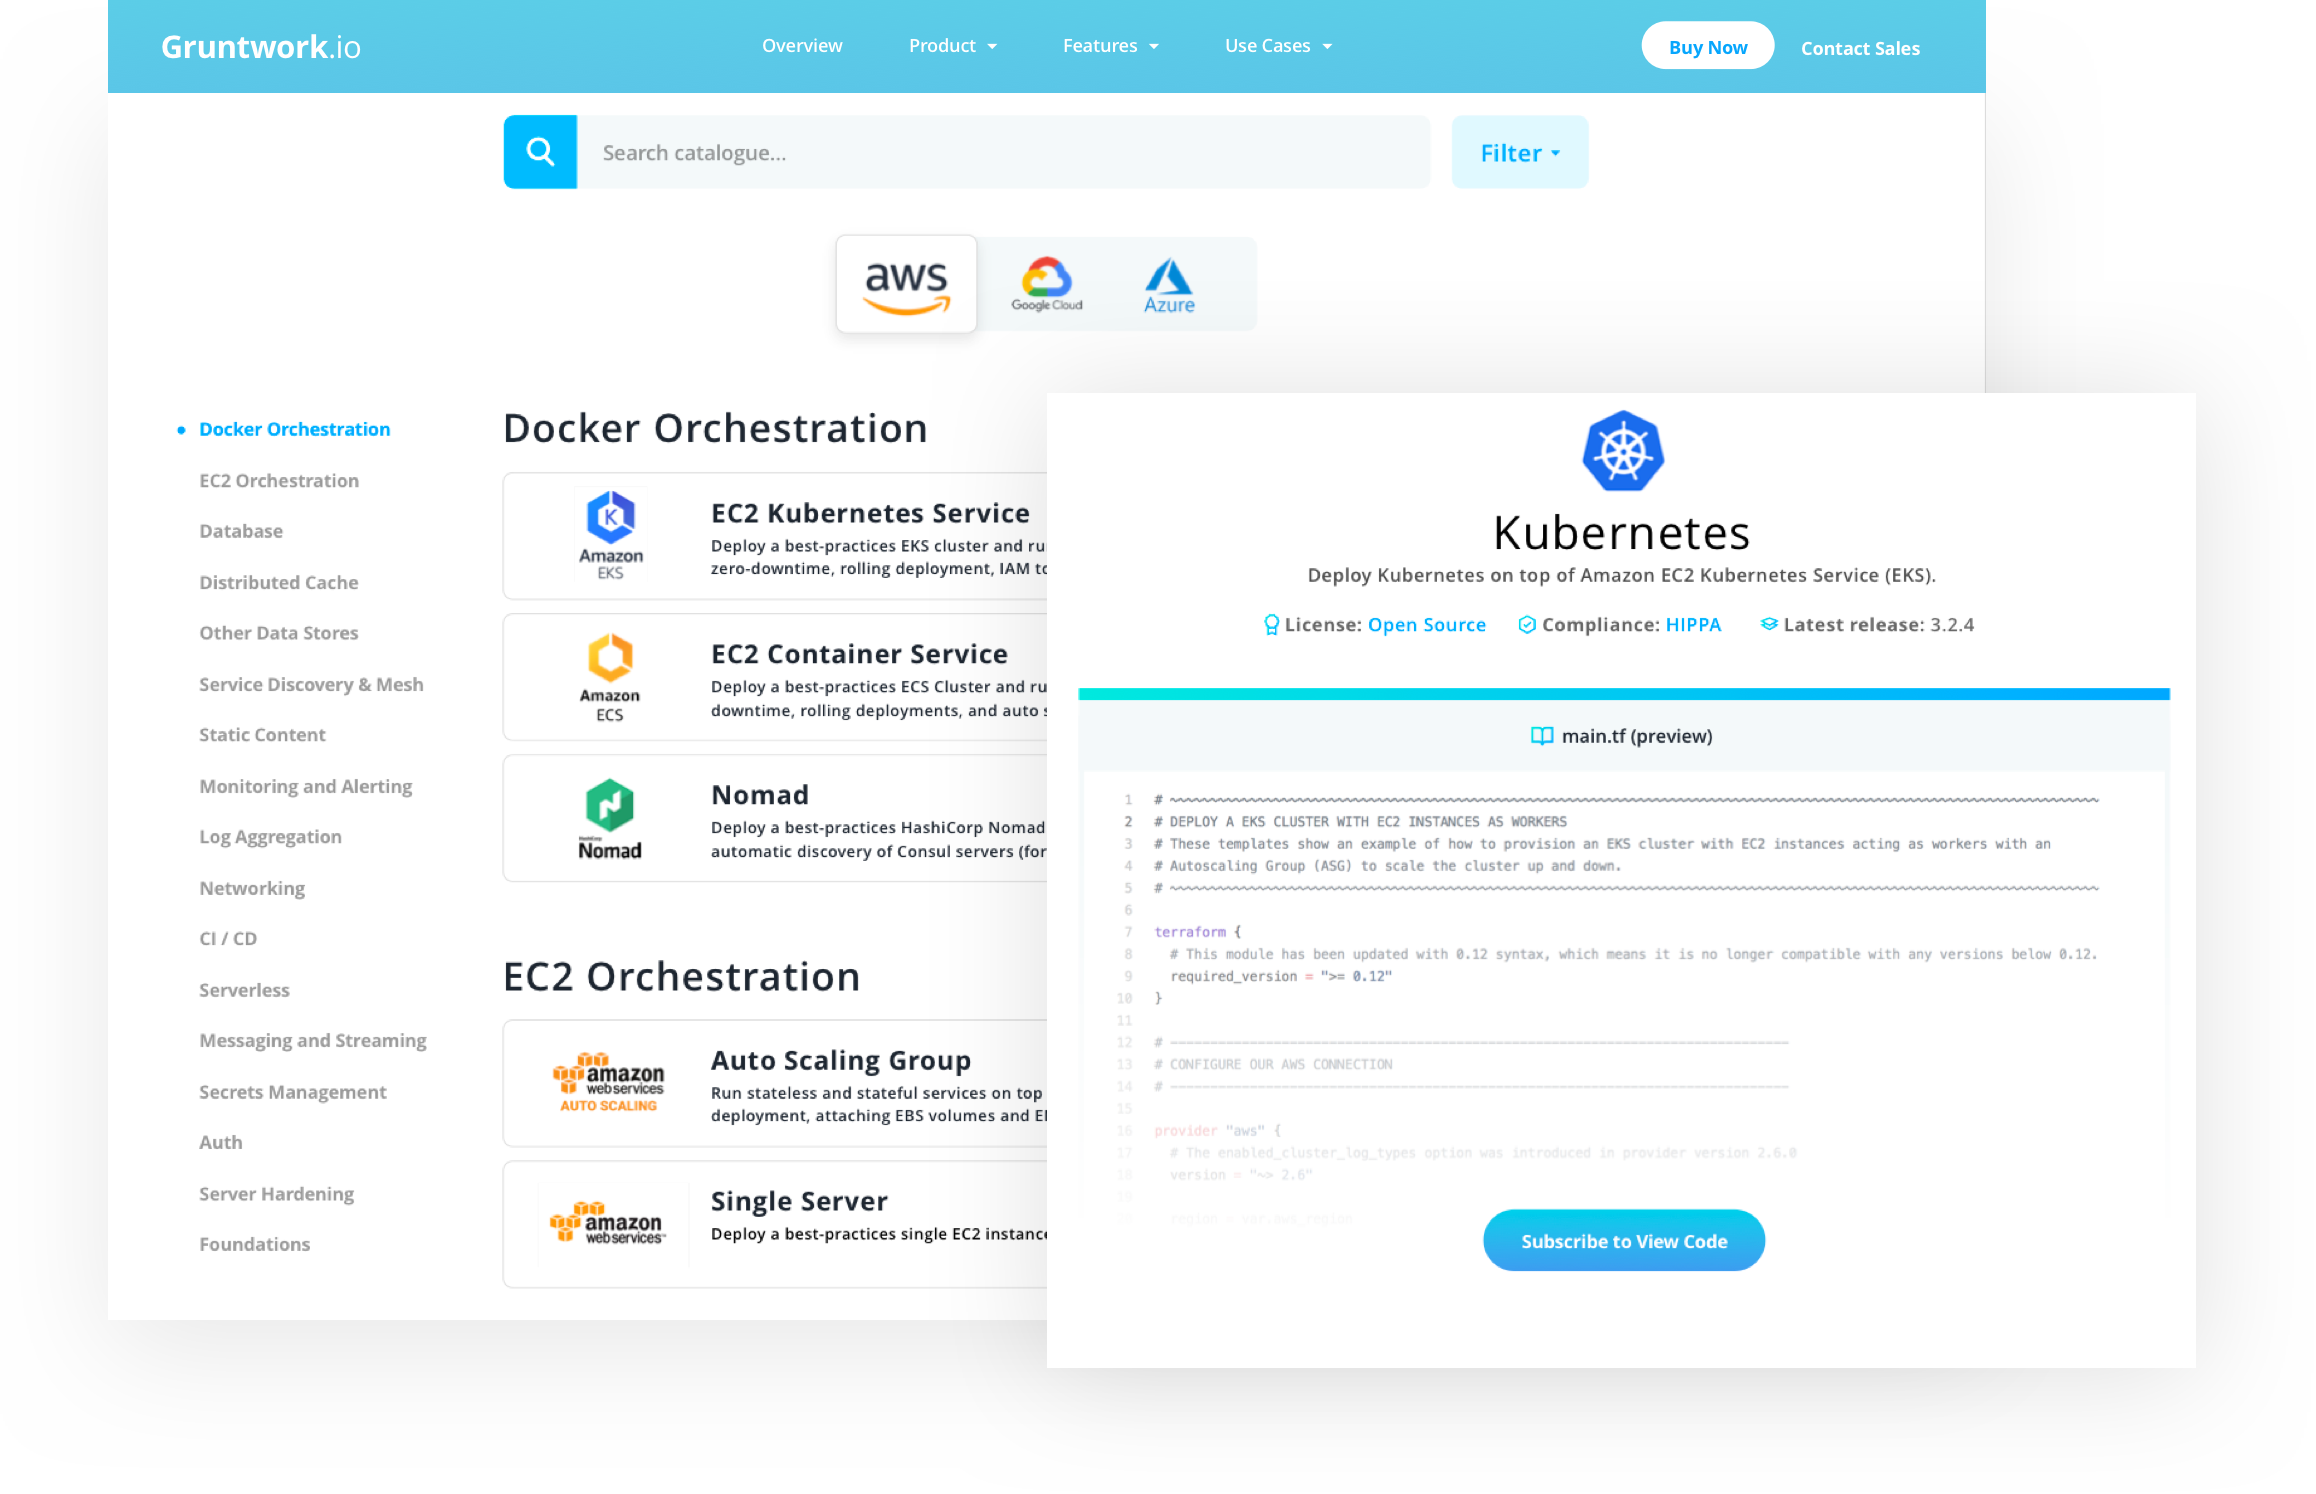
The Gruntwork Infrastructure as Code Library is a collection of over 300,000 lines of reusable, battle-tested infrastructure code that is organized into 40+ GitHub repos, some public and open source, and some private and only accessible to Gruntwork customers. Each repo is focused on one type of infrastructure: e.g., there is one repo that contains code for deploying and managing Kubernetes on AWS, one repo with code for deploying and managing the ELK stack (Elasticsearch, Logstash, Kibana), one repo that contains a collection of CI / CD code, and so on.
The code in the Gruntwork Infrastructure as Code Library is written using a combination of:
- Terraform
-
Used to define and manage most of the basic infrastructure, such as servers, databases, load balancers, and networking.
- Go
-
Used to build cross-platform CLI applications (e.g.,
ssh-gruntis a Go app you can run on your EC2 instances to manage SSH access to those instances via IAM groups) and to write automated tests for all of the modules (using the open source Go library Terratest). - Bash
-
Used for small scripts on Linux and macOS, including:
-
Install scripts: used to install and configure a piece of software. Example: the
install-elasticsearchscript can be used to install Elasticsearch on Linux. -
Run scripts: used to run a piece of software, typically during boot. Example: you can execute the
run-elasticsearchscript while a server is booting to auto-discover other Elasticsearch nodes and bootstrap an Elasticsearch cluster.
-
- Python
-
Used for more complicated scripts, especially those that need to run on other operating systems (e.g., Windows) and/or those that need to be called directly from Terraform (e.g., to fill in some missing functionality).
- Helm
-
Used to define and manage Kubernetes applications and resources. Example:
k8s-serviceis a helm chart that packages your application containers into a best practices deployment for Kubernetes.
Why these tools? We wrote a detailed blog post on why we use Terraform; as for Go, Bash, and Python, we use them because they work just about everywhere, with few or no external dependencies, and they can be integrated with almost any configuration management approach: e.g., you can use Bash scripts with Chef, Puppet, Ansible, Packer, and Docker.
We use helm because it has a strong community (including official support from the Cloud Native Computing Foundation) with many vendors officially packaging their applications into a Helm Chart (e.g. Hashicorp uses Helm to package Vault and Consul for Kubernetes).
The code in each repo is organized into three primary folders, modules (or charts for Helm), examples, and test, as described in the
following sections.
Modules
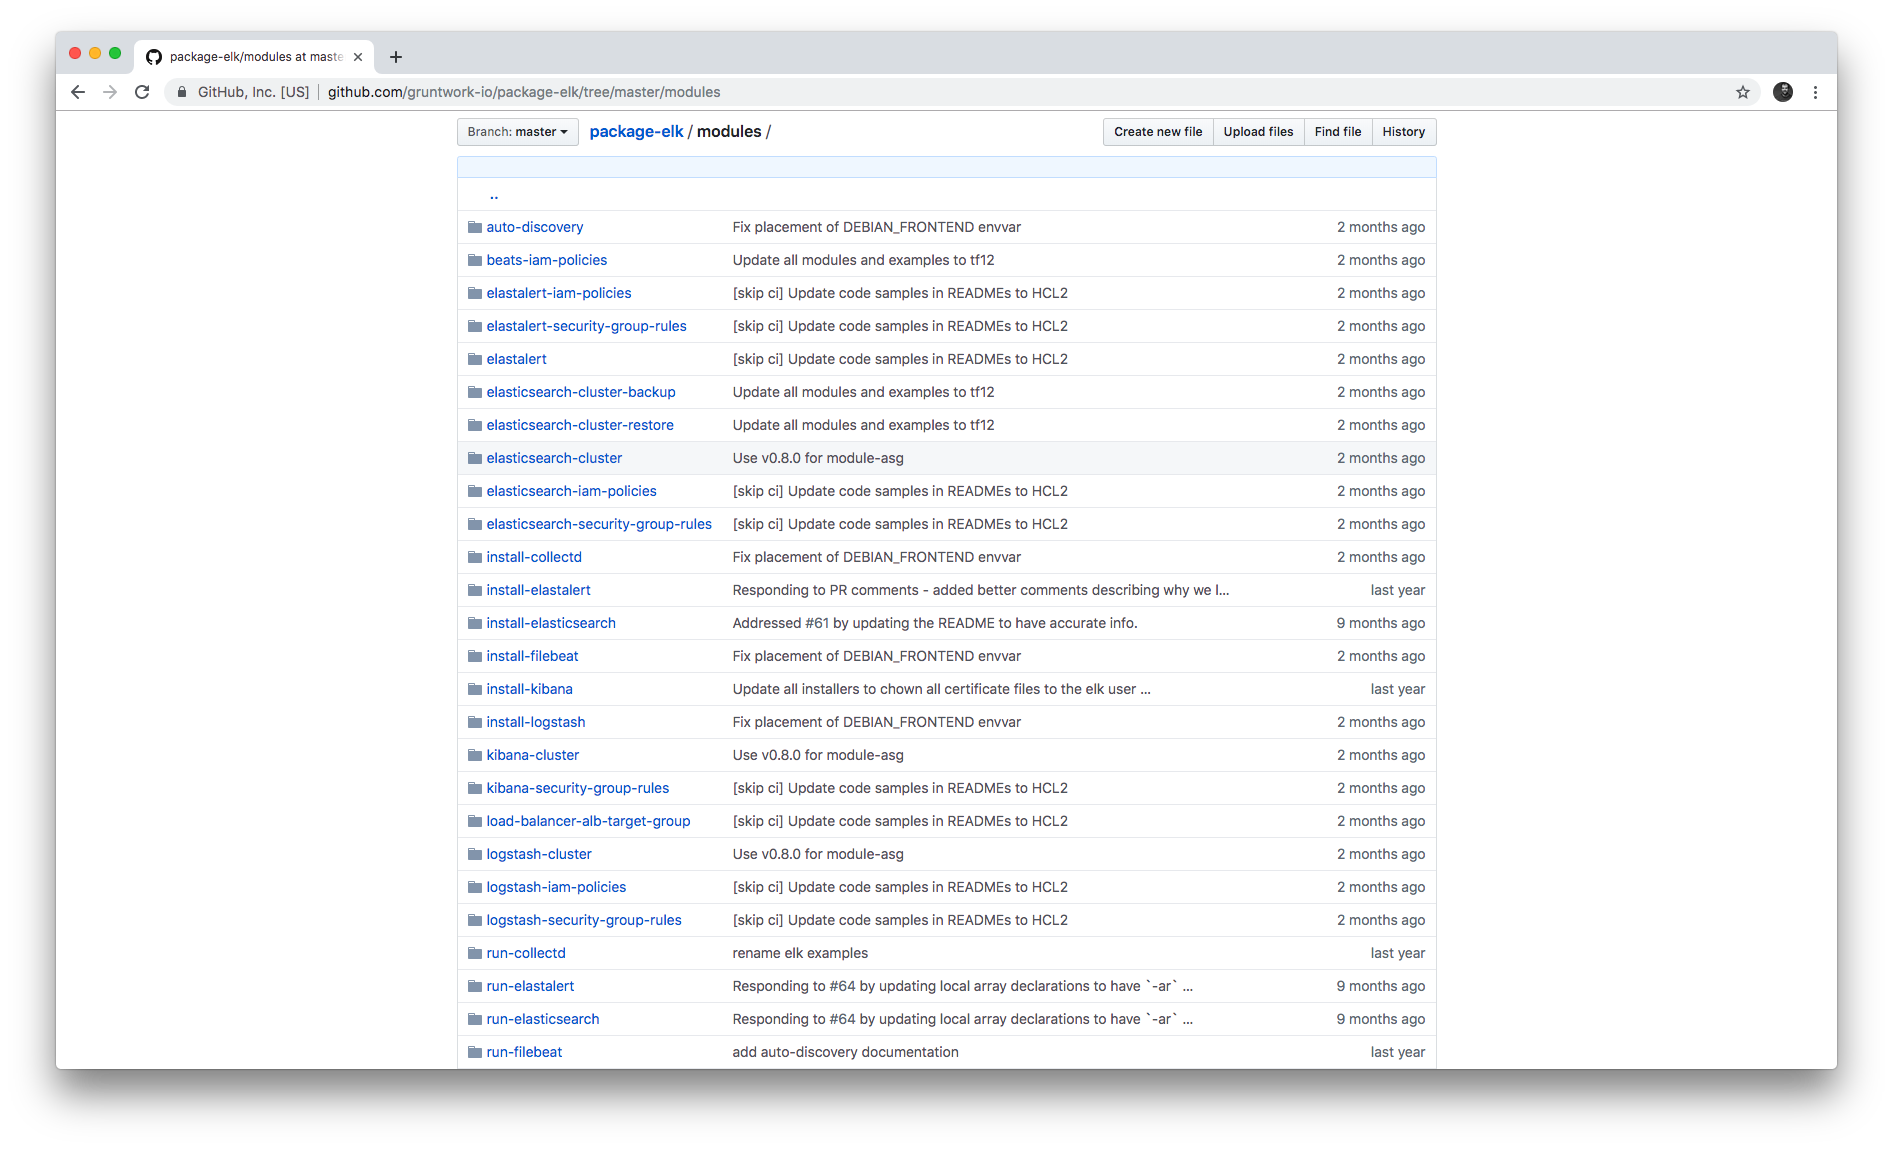
Each repo in the Gruntwork Infrastructure as Code Library contains a modules (or charts) folder that contains the main implementation code,
broken down into multiple standalone, orthogonal, reusable, highly configurable modules. For example, the ELK repo
(Elasticsearch, Logstash, Kibana) isn’t one giant module that deploys the entire ELK stack, but a bunch of separate
modules for installing, running, and deploying Elasticsearch, Kibana, Logstash, Elastalert, Beats, Collectd, and so on.
This allows you to combine and compose the modules in many different permutations to fit your exact needs: e.g., some use cases need only Elasticsearch, while others need the full ELK stack, and for those that use the full stack, you may run each component in separate clusters in some environments (e.g., in prod, for high availability and scalability) and all in a single cluster in other environments (e.g., in dev, to save money).
Examples
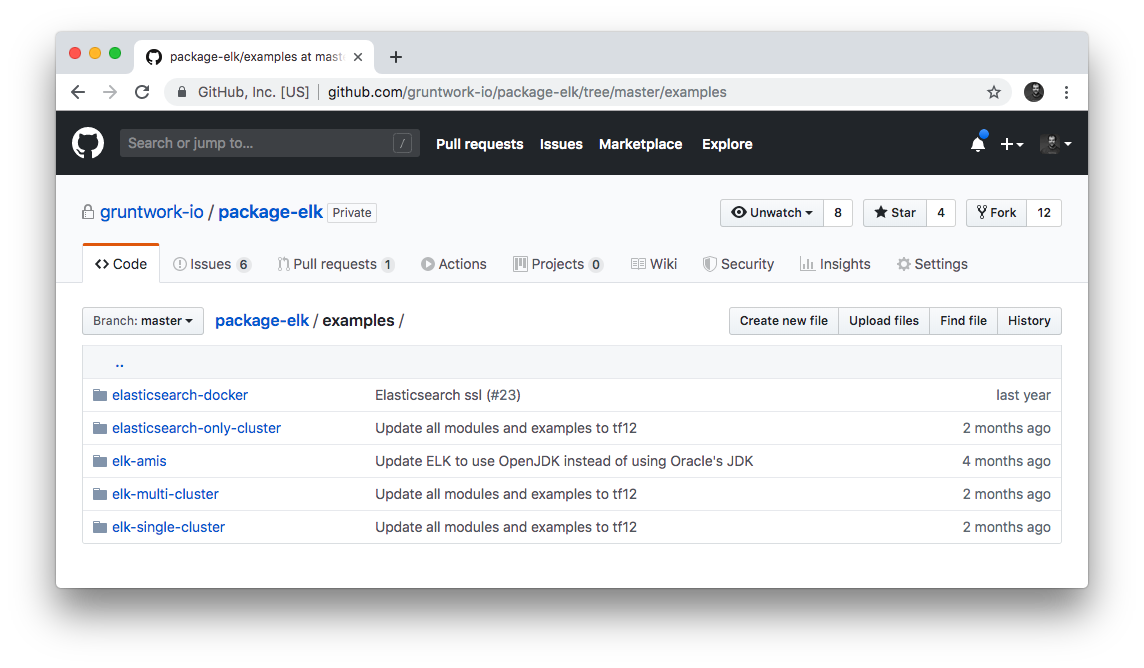
Each repo in the Gruntwork Infrastructure as Code Library contains an examples folder that shows you how to assemble the modules
from the modules folder into different permutations. This lets you try the modules out in minutes, without having to
write a line of code. In other words, this is executable documentation.
Automated tests
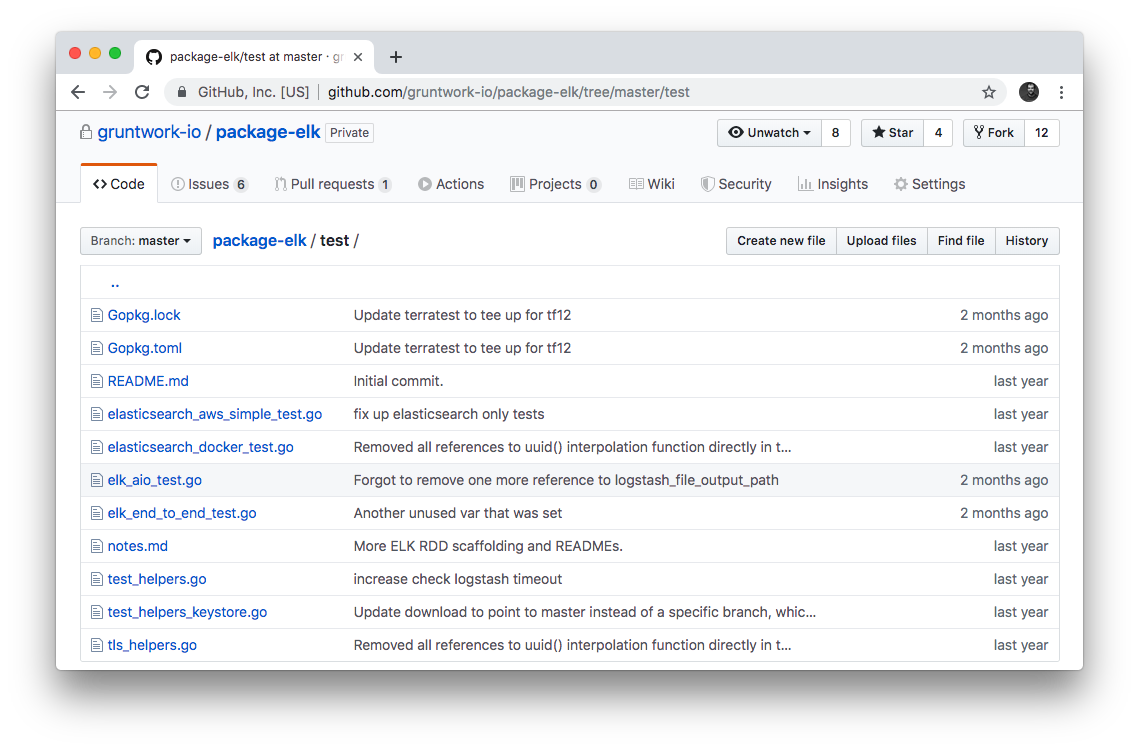
Each repo in the Gruntwork Infrastructure as Code Library contains a test folder that contains automated tests for the examples in
the examples folder. These are mostly integration tests, which use
Terratest under the hood to deploy the examples into real environments
(e.g., real AWS accounts), validate that everything works, and then tear everything down.
For example, after every commit to the ELK repo, we spin up a dozen ELK clusters, perform a variety of validation steps (e.g., read data, write data, access Kibana, etc.) and then tear it all down again. This is how we build confidence that the code does what we say it does—and that it continues to do it over years of updates.
Versioning

All of the code in the Gruntwork Infrastructure as Code Library is versioned. Every time we make a change, we put out a new versioned release, and announce it in the monthly Gruntwork Newsletter.
When you use the code from the Gruntwork Infrastructure as Code Library (a topic we’ll cover in How to use the Gruntwork Infrastructure as Code Library), you pin yourself to a specific version of the code. That way, you are not accidentally affected by any subsequent changes in the Gruntwork Infrastructure as Code Library until you explicitly choose to pull those changes in. And when you do want to pull the changes in, it’s just a matter of bumping the version number!
We use version numbers of the form MAJOR.MINOR.PATCH (e.g., 1.2.3), following the principles of
semantic versioning. In traditional semantic versioning, you increment the:
-
MAJOR version when you make incompatible API changes,
-
MINOR version when you add functionality in a backwards compatible manner, and
-
PATCH version when you make backwards compatible bug fixes.
However, much of the Gruntwork Infrastructure as Code Library is built on Terraform, and as Terraform is still not at version 1.0.0
(latest version as of August, 2019, was 0.12.6), most of the Gruntwork Infrastructure as Code Library is using 0.MINOR.PATCH
version numbers. With 0.MINOR.PATCH, the rules are a bit different, where you increment the:
-
MINOR version when you make incompatible API changes
-
PATCH version when you add backwards compatible functionality or bug fixes.
The Gruntwork Reference Architecture
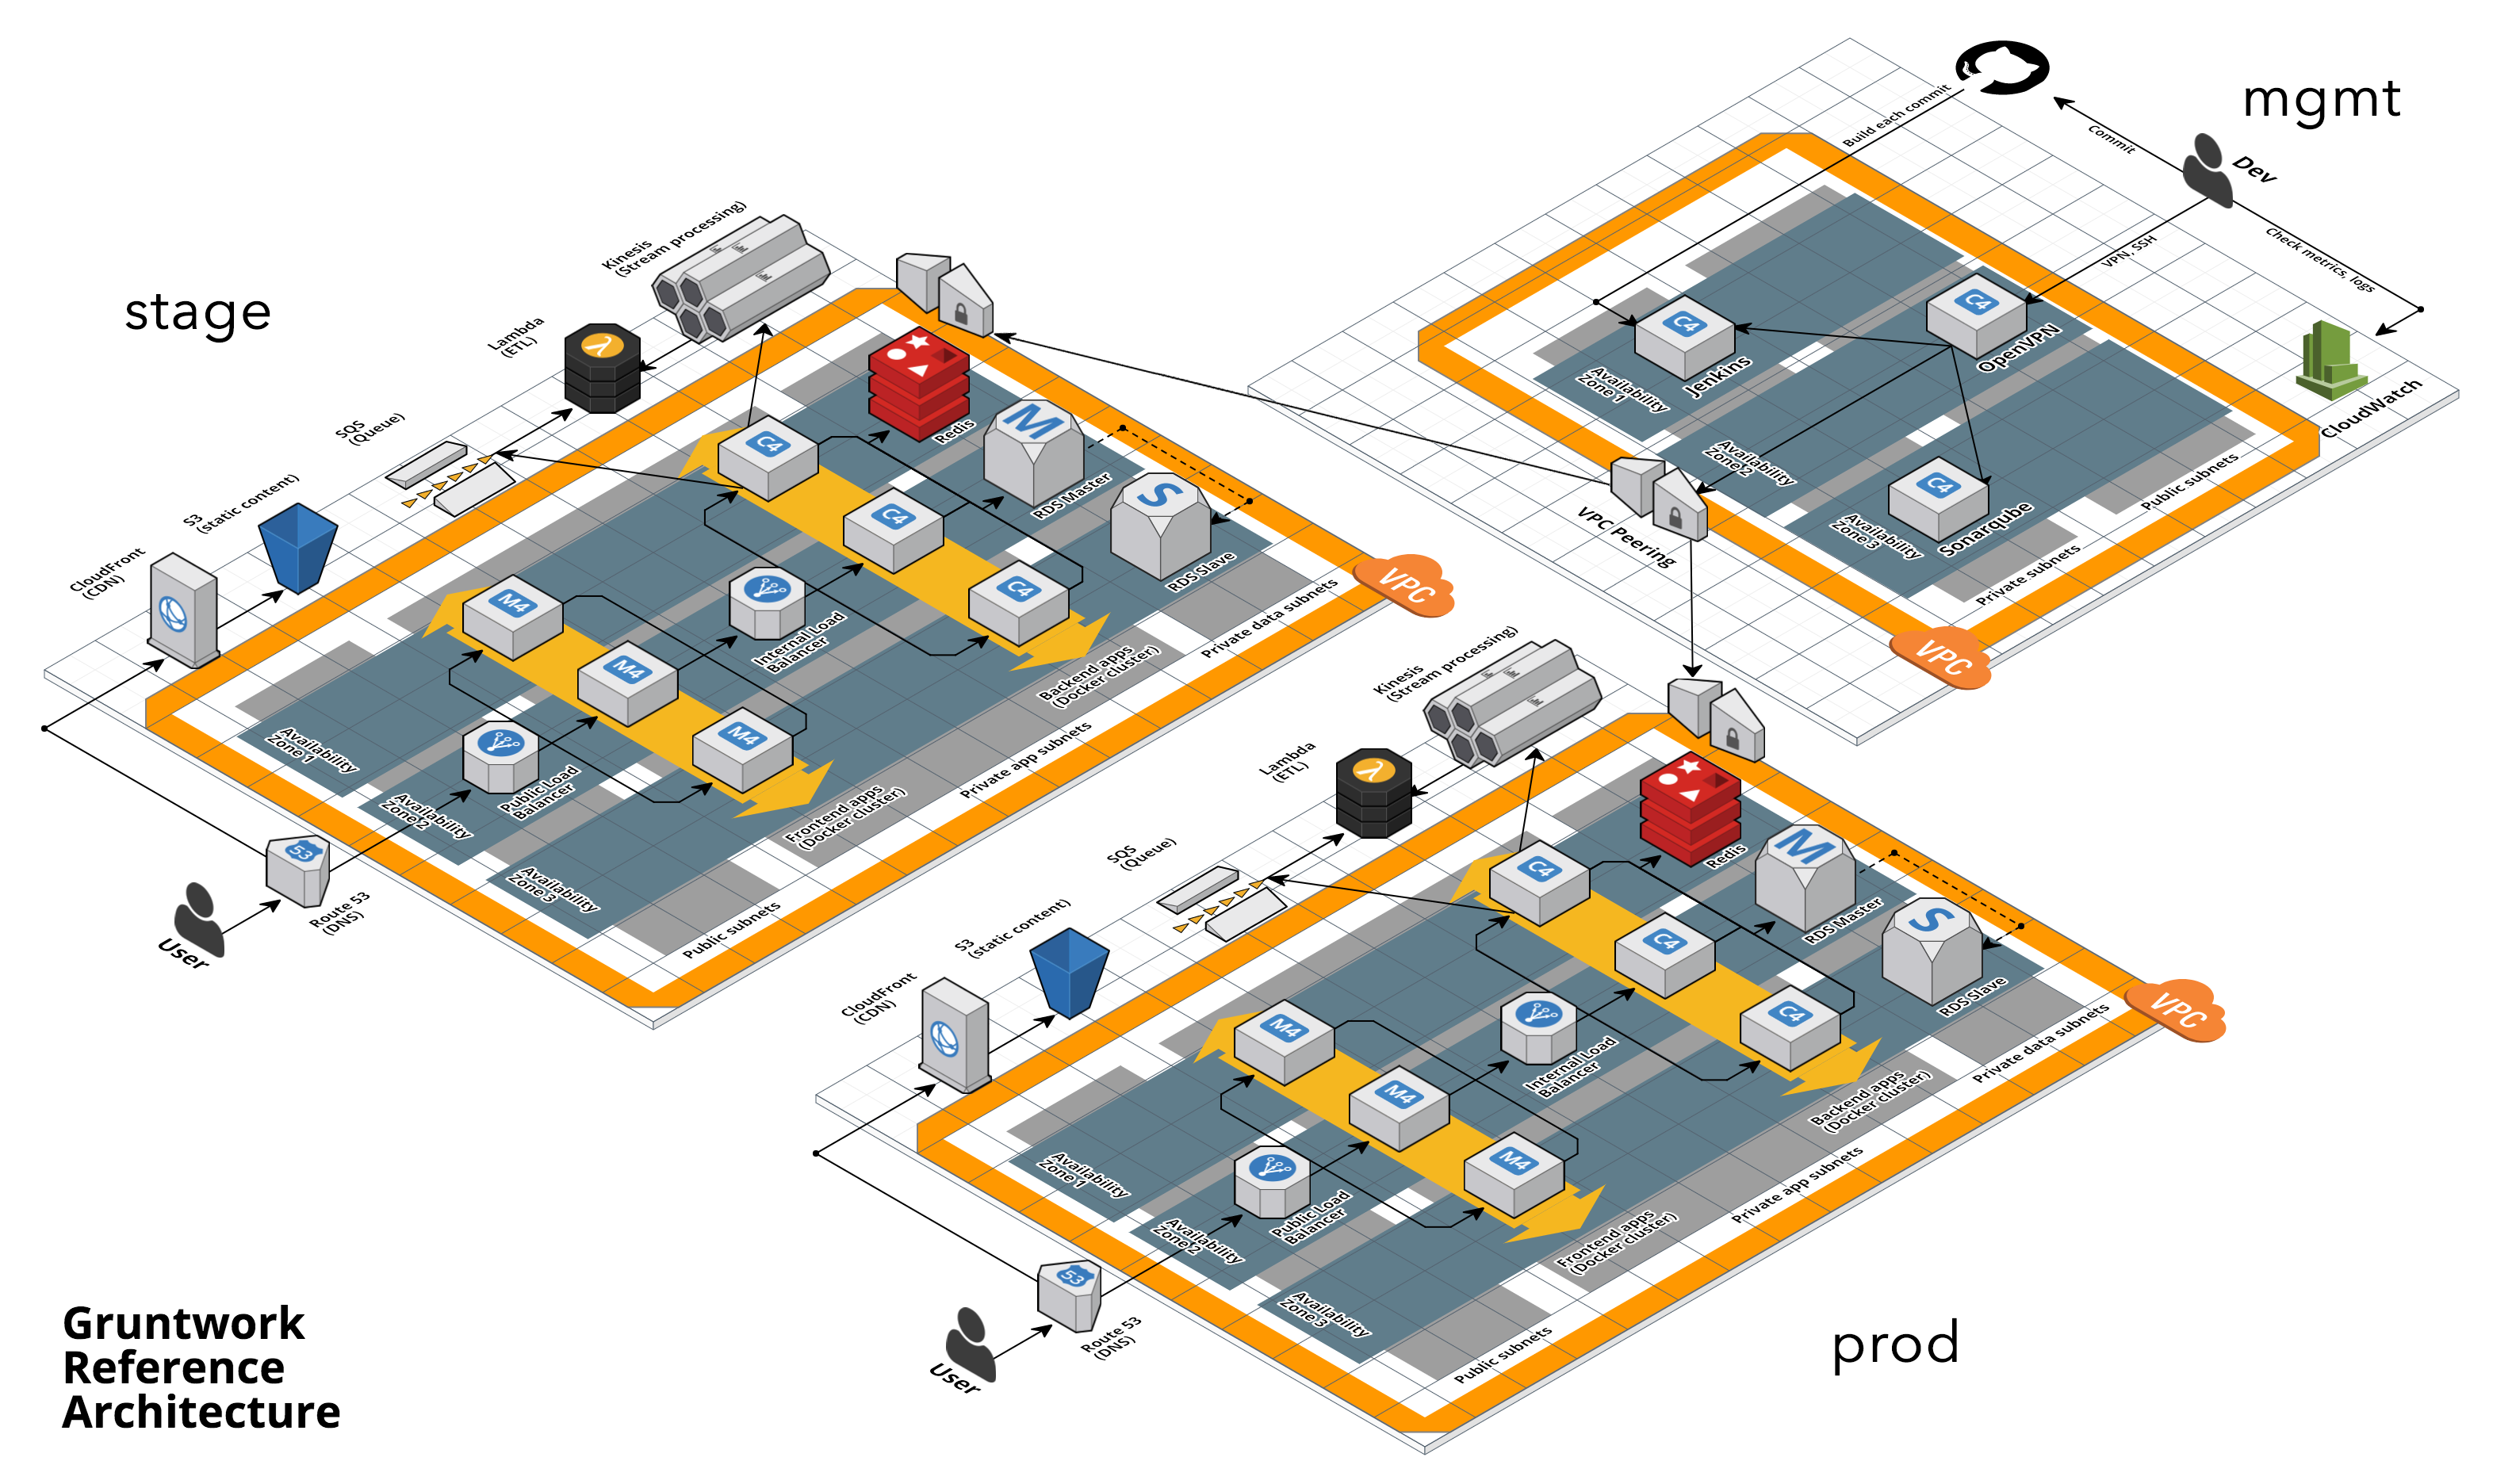
The Gruntwork Reference Architecture is a production-grade, end-to-end tech stack built on top of the modules from the Gruntwork Infrastructure as Code Library.
- What’s included
-
The Reference Architecture includes just about everything the typical company needs: multiple environments, each configured with server orchestration (e.g., Kubernetes), load balancers, databases, caches, network topology, monitoring, alerting, log aggregation, CI/CD, user management, secrets management, SSH management, VPN management, and much more. For a detailed walkthrough, see How to Build an End to End Production-Grade Architecture on AWS. We wire all these pieces together according to your needs, deploy everything into your AWS accounts, and give you 100% of the code—all in about one day.
- Opinionated code
-
Whereas the Gruntwork Infrastructure as Code Library is relatively unopinionated, allowing you to combine and compose modules, tools, and approaches however you want ("à la carte"), the Gruntwork Reference Architecture is more opinionated, giving you a pre-defined, standardized set of modules, tools, and approaches to choose from ("prix fixe"). If the opinionated design of the Reference Architecture looks like a good fit for your company, you may wish to purchase it as a way to save months of having to wire everything together and deploy it yourself. If the opinionated design is not a good fit, then you can use the Gruntwork Infrastructure as Code Library directly instead.
- See an example Reference Architecture
-
You can find the code for an example Reference Architecture for a fictional Acme corporation in the following repos:
ImportantYou must be a Gruntwork subscriber to access these example repos. -
Walkthrough documentation (start here!): The Reference Architecture comes with end-to-end documentation that walks you through all of the code so you know how to run things in dev, how to deploy changes to prod, how to find metrics and logs, how to connect over VPN and SSH, and so on. This is a great starting point for exploring the Reference Architecture.
-
infrastructure-modules: In this repo, you’ll find the reusable modules that define the infrastructure for the entire company (in this case, for Acme). These are like the blueprints for a house.
-
infrastructure-live: This repo uses the modules from
infrastructure-modulesto deploy all of the live environments for the company (dev, stage, prod, etc). These are like the real houses built from the blueprints. -
sample-app-frontend: This repo contains a sample app that demonstrates best practices for a Docker-based frontend app or microservice, including examples of how to talk to backend apps (i.e., service discovery), manage secrets, use TLS certs, and render HTML and JSON. This app is written in Node.js but the underlying patterns apply to any language or technology.
-
sample-app-backend: This repo contains a sample app that demonstrates best practices for a Docker-based backend app or microservice, including examples of how to talk to a database, do schema migrations, manage secrets, and use TLS certs. This app is written in Node.js but the underlying patterns apply to any language or technology.
-
The production-grade infrastructure checklist
The Gruntwork Infrastructure as Code Library is a collection of production-grade infrastructure—that is, the type of reliable, secure, battle-tested infrastructure that you’d bet your company on. Every time you deploy something to production, you’re betting that your infrastructure won’t fall over if traffic goes up; you’re betting that your infrastructure won’t lose your data if there’s an outage; you’re betting that your infrastructure won’t allow your data to be compromised when hackers try to break in; and if these bets don’t work out, your company may go out of business. That’s what’s at stake when we talk about "production-grade."
Building production-grade infrastructure requires taking into account a long list of details, which we have captured in The Production-Grade Infrastructure Checklist:
| Task | Description | Example tools |
|---|---|---|
Install |
Install the software binaries and all dependencies. |
Bash, Chef, Ansible, Puppet |
Configure |
Configure the software at runtime. Includes port settings, TLS certs, service discovery, leaders, followers, replication, etc. |
Bash, Chef, Ansible, Puppet |
Provision |
Provision the infrastructure. Includes EC2 instances, load balancers, network topology, security groups, IAM permissions, etc. |
Terraform, CloudFormation |
Deploy |
Deploy the service on top of the infrastructure. Roll out updates with no downtime. Includes blue-green, rolling, and canary deployments. |
Scripts, Orchestration tools (ECS, k8s, Nomad) |
High availability |
Withstand outages of individual processes, EC2 instances, services, Availability Zones, and regions. |
Multi AZ, multi-region, replication, ASGs, ELBs |
Scalability |
Scale up and down in response to load. Scale horizontally (more servers) and/or vertically (bigger servers). |
ASGs, replication, sharding, caching, divide and conquer |
Performance |
Optimize CPU, memory, disk, network, GPU, and usage. Includes query tuning, benchmarking, load testing, and profiling. |
Dynatrace, valgrind, VisualVM, ab, Jmeter |
Networking |
Configure static and dynamic IPs, ports, service discovery, firewalls, DNS, SSH access, and VPN access. |
EIPs, ENIs, VPCs, NACLs, SGs, Route 53, OpenVPN |
Security |
Encryption in transit (TLS) and on disk, authentication, authorization, secrets management, server hardening. |
ACM, EBS Volumes, Cognito, Vault, CIS |
Metrics |
Availability metrics, business metrics, app metrics, server metrics, events, observability, tracing, and alerting. |
CloudWatch, DataDog, New Relic, Honeycomb |
Logs |
Rotate logs on disk. Aggregate log data to a central location. |
CloudWatch logs, ELK, Sumo Logic, Papertrail |
Backup and Restore |
Make backups of DBs, caches, and other data on a scheduled basis. Replicate to separate region/account. |
RDS, ElastiCache, ec2-snapper, Lambda |
Cost optimization |
Pick proper instance types, use spot and reserved instances, use auto scaling, and nuke unused resources. |
ASGs, spot instances, reserved instances |
Documentation |
Document your code, architecture, and practices. Create playbooks to respond to incidents. |
READMEs, wikis, Slack |
Tests |
Write automated tests for your infrastructure code. Run tests after every commit and nightly. |
Terratest |
Most other collections of infrastructure code (e.g., AWS Quick Starts, Bitnami Application Catalog, the Terraform Registry, Ansible Galaxy, Chef Supermarket, etc) are useful for learning and example code, but they do not take most of this checklist into account, and therefore are not a good fit for direct production use. On the other hand, every module in the Gruntwork Infrastructure as Code Library goes through the production-grade checklist and is explicitly designed for use directly in production.
Infrastructure as code
Everything in the Gruntwork Infrastructure as Code Library is designed to allow you to define your infrastructure as code (IaC). That is, instead of deploying infrastructure manually (e.g., by clicking around a web page), the idea behind IaC is to write code to define, provision, and manage your infrastructure. This has a number of benefits:
- Self-service
-
Most teams that deploy code manually have a small number of sysadmins (often, just one) who are the only ones who know all the magic incantations to make the deployment work and are the only ones with access to production. This becomes a major bottleneck as the company grows. If your infrastructure is defined in code, then the entire deployment process can be automated, and developers can kick off their own deployments whenever necessary.
- Speed and safety
-
If the deployment process is automated, it’ll be significantly faster, since a computer can carry out the deployment steps far faster than a person; and safer, since an automated process will be more consistent, more repeatable, and not prone to manual error.
- Documentation
-
Instead of the state of your infrastructure being locked away in a single sysadmin’s head, you can represent the state of your infrastructure in source files that anyone can read. In other words, IaC acts as documentation, allowing everyone in the organization to understand how things work, even if the sysadmin goes on vacation.
- Version control
-
You can store your IaC source files in version control, which means the entire history of your infrastructure is now captured in the commit log. This becomes a powerful tool for debugging issues, as any time a problem pops up, your first step will be to check the commit log and find out what changed in your infrastructure, and your second step may be to resolve the problem by simply reverting back to a previous, known-good version of your IaC code.
- Validation
-
If the state of your infrastructure is defined in code, then for every single change, you can perform a code review, run a suite of automated tests, and pass the code through static analysis tools, all practices that are known to significantly reduce the chance of defects.
- Happiness
-
Deploying code and managing infrastructure manually is repetitive and tedious. Developers and sysadmins resent this type of work, as it involves no creativity, no challenge, and no recognition. You could deploy code perfectly for months, and no one will take notice—until that one day when you mess it up. That creates a stressful and unpleasant environment. IaC offers a better alternative that allows computers to do what they do best (automation) and developers to do what they do best (coding).
- Reuse
-
You can package your infrastructure into reusable modules, so that instead of doing every deployment for every product in every environment from scratch, you can build on top of known, documented, battle-tested pieces. You can build these reusable modules yourself or use an existing collection of modules, such as the Gruntwork Infrastructure as Code Library.
Some of the main IaC tools you’ll see used and referenced in the Gruntwork Infrastructure as Code Library are Terraform, Terragrunt, Packer, Docker, and Helm, each of which we’ll discuss in the next several sections.
Terraform
Terraform is an open source provisioning tool that allows you to define and manage as code a
wide variety of infrastructure (e.g., servers, load balancers, databases, network settings, and so on) across
a wide variety of providers (e.g., AWS, GCP, Azure). For example, here’s some example Terraform code you can use to
deploy an EC2 instance (a virtual server) running Ubuntu 18.04 into the us-east-2 region of AWS:
# Deploy to the us-east-2 region of AWS
provider "aws" {
  region = "us-east-2"
}

# Deploy an EC2 instance running Ubuntu 18.04
resource "aws_instance" "example" {
  ami           = "ami-0c55b159cbfafe1f0"
  instance_type = "t2.micro"
}
You can deploy this server by running terraform init and terraform apply. Check out the
Comprehensive Guide to Terraform for a
thorough introduction to the language.
A large percentage of the infrastructure code in the Gruntwork Infrastructure as Code Library is defined using Terraform. We even wrote the book on it!
Terraform Cloud and Terraform Enterprise
Terraform Cloud and Terraform Enterprise are HashiCorp’s commercial Terraform products. They include many additional features for Terraform, including plan and apply workflows with approvals, role-based access control for teams, policy as code using Sentinel, and more.
The Gruntwork module library and open source tools are compatible with Terraform Cloud and Terraform Enterprise.
Terragrunt
Terragrunt is a thin, open source wrapper for Terraform. It is designed to
fill in some missing features in Terraform, such as allowing you to define your Terraform backend configuration in
one terragrunt.hcl file, rather than having to copy/paste the same config over and over again:
remote_state {
  backend = "s3"
  config = {
    bucket         = "my-terraform-state"
    key            = "${path_relative_to_include()}/terraform.tfstate"
    region         = "us-east-1"
    encrypt        = true
    dynamodb_table = "my-lock-table"
  }
}
Once you’ve created your terragrunt.hcl configuration, you can run all the usual Terraform commands, but with
terragrunt as the binary: e.g., terragrunt plan, terragrunt apply, terragrunt destroy. Check out
Terragrunt: how to keep your Terraform code DRY and maintainable
for a thorough introduction.
Note that while the Gruntwork Reference Architecture relies on Terragrunt as one of its opinionated tools, the Gruntwork Infrastructure as Code Library does NOT require Terragrunt; you can use the Terraform modules in the Gruntwork Infrastructure as Code Library with plain Terraform, Terraform Enterprise, Atlantis, Terragrunt, or any other tools you prefer.
Packer
Packer is an open source tool you can use to define machine images (e.g., VM images, Docker images) as code. For example, here is how you can use Packer to define an Ubuntu 18.04 Amazon Machine Image (AMI) that has Node.js installed:
{
  "builders": [{
    "type": "amazon-ebs",
    "region": "us-east-2",
    "source_ami": "ami-0c55b159cbfafe1f0",
    "instance_type": "t2.micro",
    "ssh_username": "ubuntu",
    "ami_name": "packer-example-{{timestamp}}"
  }],
  "provisioners": [{
    "type": "shell",
    "inline": [
      "curl -sL https://deb.nodesource.com/setup_10.x | sudo -E bash -",
      "sudo apt-get update -y",
      "sudo apt-get install -y nodejs"
    ]
  }]
}
You can run packer build packer-example.json to build an AMI from this code and then deploy this AMI to your AWS
account using other tools. For example, the Gruntwork Infrastructure as Code Library contains several Terraform modules that can
deploy AMIs across one or more servers (e.g., into an AWS Auto Scaling Group), with support for auto scaling, auto
healing, zero-downtime deployments, etc.
The Gruntwork Infrastructure as Code Library contains a number of scripts and binaries that you can run on your servers: e.g., the
ELK code includes scripts you run during boot on Elasticsearch servers to bootstrap the cluster, and the security code
includes an ssh-grunt binary you can run on each server to manage SSH access to that server using IAM groups (i.e.,
IAM users in specific IAM groups will be able to SSH to specific servers using their own usernames and SSH keys).
To get these scripts and binaries onto your virtual servers (e.g., onto EC2 instances in AWS), we recommend using Packer to build VM images that have these scripts and binaries installed. You’ll see an example of how to do this in How to use the Gruntwork Infrastructure as Code Library. Note that Gruntwork Infrastructure as Code Library does NOT require that you use Packer (e.g., you could also use Ansible or Chef to install the scripts and binaries), but the Gruntwork Reference Architecture does use Packer as one of its opinionated tools.
Docker
Docker is an open source tool you can use to run containers and define container images as code. A container is a bit like a lightweight VM, except instead of virtualizing all the hardware and the entire operating system, containers virtualize solely user space, which gives you many of the isolation benefits of a VM (each container is isolated in terms of memory, CPU, networking, hard drive, etc), but with much less memory, CPU, and start-up time overhead. For example, here is how you can define an Ubuntu 18.04 Docker image that has Node.js installed:
FROM ubuntu:18.04

RUN curl -sL https://deb.nodesource.com/setup_10.x | sudo -E bash - && \
    sudo apt-get update -y && \
    sudo apt-get install -y nodejs
You can run docker build -t example-image . to build a Docker image from this code, push the image to a Docker
Registry (e.g., ECR or Docker Hub), and then deploy the Docker image using other tools. For example, the Gruntwork
Infrastructure as Code Library contains a number of modules for running container orchestration tools such as Kubernetes, ECS, and
Nomad that you can use to deploy and manage Docker images.
Helm
Helm is a package and module manager for Kubernetes that allows you to define, install, and manage Kubernetes applications as reusable packages called Charts. Helm provides support for official charts in their repository that contains various applications such as Jenkins, MySQL, and Consul to name a few.
Charts are written in go templates and allow templatization of Kubernetes manifests to allow deployment across varying inputs. This allows vendors to simplify distribution of their applications for Kubernetes so that users can deploy and upgrade their application in a single command.
Each vendor distributes their charts using chart repositories, which is a server that serves chart packages. You can access any chart in a repository once you add it to your local configuration.
For example, you can use the helm client to add the official Elastic repository to install ElasticSearch onto Kubernetes:
helm repo add elastic https://helm.elastic.co
helm install elastic/elasticsearch
The Gruntwork Infrastructure as Code Library contains a number of Helm charts that help you manage your deployments of
your applications: e.g the k8s-service helm chart packages your application containers into a best practices
deployment for managing on Kubernetes. You can access the Gruntwork Helm charts by adding the Gruntwork Helm Chart
Repository. You will see an example of how to do this in How to use the Gruntwork Infrastructure as Code Library.
Immutable infrastructure
With mutable infrastructure, you deploy a set of servers, and you continuously update those servers in place. Every new update gets installed on top of the previous updates, either manually (e.g., by SSHing to each server and running commands), or via tools like Ansible, Chef, or Puppet. The idea behind immutable infrastructure is that once you deploy a server, you never change it again. If you need to roll out an update, you deploy a new server with that update, and undeploy the old one. This paradigm is built for use with (a) the cloud, where you can easily spin up or tear down servers on-demand and (b) machine images, as every time there’s a change, you can use tools like Packer or Docker to build a new, immutable, versioned machine image (e.g., VM image or Docker image), and deploy new servers with that image.
The advantages of immutable infrastructure are:
- Easier to reason about servers
-
With mutable infrastructure, each server builds up a unique history of changes, so each one is a little different, which (a) makes it difficult to reason about what’s actually installed and (b) leads to tricky bugs that only show up on some servers, and not on others. With immutable infrastructure, you avoid these sorts of bugs, and you always know what’s installed on any server, as you know the exact image each server is running, and that the image never changes.
- You can run the same images in all environments
-
Whereas it’s rare to run mutable infrastructure tools such as Ansible, Chef, or Puppet in your local dev environment, it’s common to run the same Docker or VM image in all environments, including your laptop, staging, and production. This helps to reduce "works on my machine" and environment-specific bugs, and makes it easier to debug those issues when they do happen.
- Easier scaling and rollback
-
With immutable images, you can quickly and easily spin up 100 or 1,000 servers, with no need to worry about how long it’ll take to configure all those servers (e.g., via Ansible, Chef, or Puppet), as all the configuration has already happened and is captured in the VM or Docker image. Rollback is easier too, as you can quickly jump back to a previous image, without having to wait for and worry about running a bunch of older install commands (which may no longer work, e.g., if certain packages have been removed from APT or YUM).
How to use the Gruntwork Infrastructure as Code Library
With all the core concepts out of the way, let’s now discuss how to use the Gruntwork Infrastructure as Code Library to build production-grade infrastructure.
Learning resources
The first step is to learn! You’ll need to learn about the AWS cloud, infrastructure (e.g., VPCs, Kubernetes, Kafka, ELK), tools (e.g., Terraform, Docker, Packer), and DevOps practices (e.g., CI, CD). Here are some useful resources:
-
Gruntwork DevOps Training Library: a collection of video training courses that teach a variety of DevOps topics, such as infrastructure as code, Terraform, Docker, Packer, AWS, security, and more.
-
Gruntwork Production Deployment Guides: a collection of guides that do step-by-step walkthroughs of how to go to production. You’re reading one now!
-
Gruntwork DevOps Resources: a collection of blog posts, talks, books, and checklists for learning about DevOps, AWS, Terraform, Docker, Packer, and more.
Get access to the Gruntwork Infrastructure as Code Library
The next step is to get access to the Gruntwork Infrastructure as Code Library.
-
To get access, you must become a Gruntwork subscriber.
-
As part of the sign up process, we’ll ask for your GitHub user ID. The Gruntwork Infrastructure as Code Library lives in 40+ GitHub repos, most of them private, so you’ll need to send us a GitHub user ID so we can grant you access. If you don’t already have a GitHub user, you can create one for free on github.com.
-
If you haven’t already, create an SSH key, add it to
ssh-agent, and associate it with your GitHub user (instructions). You’ll need a working SSH key to access Terraform modules in the Gruntwork Infrastructure as Code Library (you’ll see examples of this later in the guide). -
If you haven’t already, create a GitHub personal access token (instructions). You’ll need a working GitHub personal access token to access scripts and binaries in the Gruntwork Infrastructure as Code Library (you’ll see examples of this later in the guide).
Find the modules you want to use
The next step is to find the modules you want to use. Head over to the
Gruntwork Infrastructure as Code Library and find the repos that you wish to
use. Browse the modules folder each the repo to see what modules are available and the examples folders to see the
various ways to combine those modules. You can also browse the example Reference Architecture
to find production-grade code to use as a starting point.
Within the Infrastructure as Code Library, you’ll find two types of modules: (1) Terraform modules and (2) scripts and binaries. The next two sections of the guide will walk you through how to use each of these.
Using Terraform Modules
This section will show you how to use Terraform modules from the Gruntwork Infrastructure as Code Library. As an illustrative example,
we’ll deploy the vpc-app Terraform module from module-vpc.
|
Important
|
You must be a Gruntwork subscriber to access module-vpc.
|
You can use this module to deploy a production-grade VPC on AWS. For full background information on VPCs, check out How to deploy a production-grade VPC on AWS.
Create a wrapper module
The Terraform modules in the Gruntwork Infrastructure as Code Library are intentionally designed to be unopinionated, so they do not
configure provider or backend settings. Moreover, you will often use multiple modules from the Infrastructure as Code Library,
rather than just one at a time. Therefore, the canonical way to consume a Terraform module from the Gruntwork
Infrastructure as Code Library is to create a wrapper module in one of your own Git repos.
Let’s assume you have a repo called infrastructure-modules and create a vpc-app wrapper module in it:
infrastructure-modules
  └ networking
    └ vpc-app
      └ main.tf
      └ outputs.tf
      └ variables.tf
Configure your providers
Inside of main.tf, configure whatever Terraform providers you’re using. Since the vpc-app module you’re using in
this guide is an AWS module, you’ll need to configure the AWS provider:
provider "aws" {
  # The AWS region in which all resources will be created
  region = var.aws_region

  # Require a 2.x version of the AWS provider
  version = "~> 2.6"

  # Only these AWS Account IDs may be operated on by this template
  allowed_account_ids = [var.aws_account_id]
}
This configures the AWS provider as follows:
- Use a specific AWS region
-
The AWS region is configured via the
aws_regioninput variable (you’ll declare this shortly). This allows you to deploy this module in multiple regions. - Pin the AWS provider version
-
The code above ensures that you always get AWS provider version
2.xand won’t accidentally get version3.xin the future, which would be backwards incompatible. We recommend pinning the versions for all providers you’re using. - Pin AWS account IDs
-
The code above will only allow you to run it against the AWS account with ID passed in via the
aws_account_idinput variable (you’ll declare this shortly). This is an extra safety measure to ensure you don’t accidentally authenticate to the wrong AWS account while deploying this code—e.g., so you don’t accidentally deploy changes intended for staging to production (for more info on working with multiple AWS accounts, see How to Configure a Production Grade AWS Account Structure).
Let’s add the corresponding input variables in variables.tf:
variable "aws_region" {
  description = "The AWS region in which all resources will be created"
  type        = string
}

variable "aws_account_id" {
  description = "The ID of the AWS Account in which to create resources."
  type        = string
}
Configure Terraform
Next, configure Terraform itself in main.tf:
terraform {
  # Partial configuration for the backend: https://www.terraform.io/docs/backends/config.html#partial-configuration
  backend "s3" {}

  # Only allow this Terraform version. Note that if you upgrade to a newer version, Terraform won't allow you to use an
  # older version, so when you upgrade, you should upgrade everyone on your team and your CI servers all at once.
  required_version = "= 0.12.6"
}
This configures Terraform as follows:
- Configure a backend
-
The code above configures a backend, which is a shared location where Terraform state can be stored and accessed by your team. You can use any of the supported backends (the example above uses S3, which is a good choice for AWS users). See How to manage Terraform state for more info.
- Partial configuration
-
The backend uses a partial configuration, which means most of the backend configuration (e.g., which S3 bucket and path to use) will be specified from outside of the code. You’ll see an example of this soon.
- Pin the Terraform version
-
The code above will ONLY allow you to run it with a specific Terraform version. This is a safety measure to ensure you don’t accidentally pick up a new version of Terraform until you’re ready. This is important because (a) Terraform is a pre 1.0.0 tool, so even patch version number bumps (e.g.,
0.12.6→0.12.7) are sometimes backwards incompatible or buggy and (b) once you’ve upgraded to a newer version, Terraform will no longer allow you to deploy that code with any older version. For example, if a single person on your team upgrades to0.12.7and runsapply, then you’ll no longer be able to use the state file with0.12.6, and you’ll be forced to upgrade everyone on your team and all your CI servers to0.12.7. It’s best to do this explicitly, rather than accidentally, so we recommend pinning Terraform versions.
Use the modules from the Gruntwork Infrastructure as Code Library
Now you can pull in the Terraform modules you want from the Gruntwork Infrastructure as Code Library as follows:
module "vpc" {
  # Make sure to replace <VERSION> in this URL with the latest module-vpc release
  source = "git@github.com:gruntwork-io/module-vpc.git//modules/vpc-app?ref=<VERSION>"

  aws_region       = var.aws_region
  vpc_name         = var.vpc_name
  cidr_block       = var.cidr_block
  num_nat_gateways = var.num_nat_gateways
}
This code does the following:
- Terraform module support
-
This code pulls in a module using Terraform’s native
modulefunctionality. For background info, see How to create reusable infrastructure with Terraform modules. - SSH Git URL
-
The
sourceURL in the code above uses a Git URL with SSH authentication (see module sources for all the types ofsourceURLs you can use). If you followed the SSH instructions in Get access to the Gruntwork Infrastructure as Code Library, this will allow you to access private repos in the Gruntwork Infrastructure as Code Library without having to hard-code a password in your Terraform code. - Versioned URL
-
Note the
?ref=<VERSION>at the end of thesourceURL. This parameter allows you to pull in a specific version of each module so that you don’t accidentally pull in (potentially backwards incompatible code) in the future. You should replace<VERSION>with the latest version from the releases page of the repo you’re using (e.g., here’s the releases page for module-vpc). - Module arguments
-
Below the
sourceURL, you’ll need to pass in the module-specific arguments. You can find all the required and optional variables defined invars.tf(old name) orvariables.tf(new name) of the module (e.g., here’s the variables.tf for vpc-app). The code above sets these to input variables (which you’ll define shortly) so that you can use different values in different environments.
Let’s add the new input variables in variables.tf:
variable "vpc_name" {
  description = "Name of the VPC. Examples include 'prod', 'dev', 'mgmt', etc."
  type        = string
}

variable "cidr_block" {
  description = "The IP address range of the VPC in CIDR notation. A prefix of /16 is recommended. Do not use a prefix higher than /27. Example: '10.100.0.0/16'."
  type        = string
}

variable "num_nat_gateways" {
  description = "The number of NAT Gateways to launch for this VPC. For production VPCs, multiple NAT Gateways are recommended."
  type        = number
}
You may also want to add useful output variables in outputs.tf:
output "vpc_name" {
  description = "The VPC name"
  value       = module.vpc.vpc_name
}

output "vpc_id" {
  description = "The VPC ID"
  value       = module.vpc.vpc_id
}

output "vpc_cidr_block" {
  description = "The VPC CIDR block"
  value       = module.vpc.vpc_cidr_block
}

output "public_subnet_cidr_blocks" {
  description = "The CIDR blocks of the public subnets"
  value       = module.vpc.public_subnet_cidr_blocks
}

output "private_app_subnet_cidr_blocks" {
  description = "The CIDR blocks of the private app subnets"
  value       = module.vpc.private_app_subnet_cidr_blocks
}

output "private_persistence_subnet_cidr_blocks" {
  description = "The CIDR blocks of the private persistence subnets"
  value       = module.vpc.private_persistence_subnet_cidr_blocks
}

output "public_subnet_ids" {
  description = "The IDs of the public subnets"
  value       = module.vpc.public_subnet_ids
}

output "private_app_subnet_ids" {
  description = "The IDs of the private app subnets"
  value       = module.vpc.private_app_subnet_ids
}

output "private_persistence_subnet_ids" {
  description = "The IDs of the private persistence subnets"
  value       = module.vpc.private_persistence_subnet_ids
}
Manual tests for Terraform code
Now that the code is written, you may want to test it manually. We recommend testing in a sandbox environment where you can deploy infrastructure without affecting any other environments (especially production!). For example, if you’re using AWS, this should be a separate AWS account.
The easiest way to test is to create a testing/terraform.tfvars file:
infrastructure-modules
  └ networking
    └ vpc-app
      └ main.tf
      └ outputs.tf
      └ variables.tf
      └ testing
        └ terraform.tfvars
Inside this file, you can set all the variables for your module to test-friendly values:
aws_region       = "us-east-2"
aws_account_id   = "555566667777"
vpc_name         = "example-vpc"
cidr_block       = "10.0.0.0/16"
num_nat_gateways = 1
You should also add a testing/backend.hcl file:
infrastructure-modules
  └ networking
    └ vpc-app
      └ main.tf
      └ outputs.tf
      └ variables.tf
      └ testing
        └ terraform.tfvars
        └ backend.hcl
In this file, you can configure test-friendly settings for your backend. For example, if you’re using the S3 backend, you can specify:
bucket = "<YOUR-BUCKET-FOR-TESTING>"
key    = "manual-testing/<YOUR-NAME>/terraform.tfstate"
region = "us-east-2"
You can now test manually by authenticating to your sandbox environment (see A Comprehensive Guide to Authenticating to AWS on the Command Line) and running:
cd infrastructure-modules/networking/vpc-app/testing
terraform init -backend-config=backend.hcl ../
terraform apply ../
When you’re done testing, clean up by running:
terraform destroy ../Automated tests for Terraform code
You may also want to create automated tests for your module. Automated tests for infrastructure code will spin up and tear down a lot of infrastructure, so we recommend a separate testing environment (e.g. yet another AWS account) for running automated tests—separate even from the sandboxes you use for manual testing. You can run a tool like cloud-nuke on a schedule to periodically clean up left-over resources in your testing environment (e.g., delete all resources that are older than 24h).
The only way to build confidence that your infrastructure code works as you expect is to deploy it into a real AWS account. That means you’ll primarily be writing integration tests that:
-
Run
terraform applyto deploy your module -
Perform a bunch of validations that the deployed infrastructure works as expected
-
Run
terraform destroyat the end to clean up
In short, you’re automating the steps you took to manually test your module!
You can make it easier to write tests of this format by leveraging Terratest, an open source Go library that contains helpers for testing many types of infrastructure code, including Terraform, Packer, and Docker.
You can define tests for your vpc-app module in a vpc_app_test.go file in a test folder:
infrastructure-modules
  └ networking
    └ vpc-app
      └ main.tf
      └ outputs.tf
      └ variables.tf
      └ testing
        └ terraform.tfvars
        └ backend.hcl
  └ test
    └ vpc_app_test.go
Check out the Terratest install instructions for how to configure your environment for Go and install Terratest.
Next, write some test code in vpc_app_test.go that looks like this:
package test

import (
	"testing"

	"fmt"
	"github.com/gruntwork-io/terratest/modules/random"
	"github.com/gruntwork-io/terratest/modules/terraform"
)

func TestVpcApp(t *testing.T) {
	// Run this test in parallel with all the others
	t.Parallel()

	// Unique ID to namespace resources
	uniqueId := random.UniqueId()
	// Generate a unique name for each VPC so tests running in parallel don't clash
	vpcName := fmt.Sprintf("test-vpc-%s", uniqueId)
	// Generate a unique key in the S3 bucket for the Terraform state
	backendS3Key := fmt.Sprintf("vpc-app-test/%s/terraform.tfstate", uniqueId)

	terraformOptions := &terraform.Options {
		// Where the Terraform code is located
		TerraformDir: "../networking/vpc-app",

		// Variables to pass to the Terraform code
		Vars: map[string]interface{}{
			"aws_region":       "us-east-2",
			"aws_account_id":   "111122223333", // ID of testing account
			"vpc_name":         vpcName,
			"cidr_block":       "10.0.0.0/16",
			"num_nat_gateways": 1,
		},

		// Backend configuration to pass to the Terraform code
		BackendConfig: map[string]interface{}{
			"bucket":   "<YOUR-S3-BUCKET>", // bucket in testing account
			"region":   "us-east-2", // region of bucket in testing account
			"key":      backendS3Key,
		},
	}

	// Run 'terraform destroy' at the end of the test to clean up
	defer terraform.Destroy(t, terraformOptions)

	// Run 'terraform init' and 'terraform apply' to deploy the module
	terraform.InitAndApply(t, terraformOptions)
}
The test code above implements a minimal test that does the following:
- Configure variables
-
This is similar to the
testing/terraform.tfvarsused in manual testing. - Configure the backend
-
This is similar to the
testing-backend.hclused in manual testing. - Namespace resources
-
The code uses
random.UniqueId()to generate unique identifiers for all the resources in this test. This allows multiple tests to run in parallel (e.g., on your computer, your teammates' computers, CI servers) without running into conflicts (e.g., without conflicts over resources that require unique names, such as VPCs). - Defer terraform destroy
-
The test code uses
deferto scheduleterraform.Destroyto run at the end of the test, whether or not the test passes. - terraform init and apply
-
The test runs
terraform initandterraform applyon the module. If this hits any errors, the test will fail.
This is a minimal test that just makes sure your module can deploy and undeploy successfully. This is a great start, and will catch a surprising number of bugs, but for production-grade code, you’ll probably want more validation logic. Check out the real module-vpc tests to see how we validate VPCs by, for example, launching EC2 instances in various subnets and making sure that connections between some subnets work, and others are blocked, based on the networking settings in that VPC.
To run the test, authenticate to your testing environment and do the following:
cd infrastructure-modules/test
go test -v -timeout 45m
Note the use of the -timeout 45m argument with go test. By default, Go imposes a time limit of 10 minutes for
tests, after which it forcibly kills the test run, causing the tests to not only fail, but even preventing the cleanup
code (i.e., terraform destroy) from running. This VPC test should take closer to ten minutes, but whenever running a
Go test that deploys real infrastructure, it’s safer to set an extra long timeout to avoid the test being killed part
way through and leaving all sorts of infrastructure still running.
For a lot more information on writing automated tests for Terraform code, see:
-
Terratest documentation, especially the many examples and corresponding tests in the
examplesandtestfolders, respectively, and the testing best practices section. -
Terraform: Up & Running, 2nd edition, has an entire chapter dedicated to automated testing for Terraform code, including unit tests, integration tests, end-to-end tests, dependency injection, running tests in parallel, test stages, and more.
Deploying Terraform code
Now that your module has been thoroughly tested, you can deploy it to your real environments (e.g., staging and production). There are many ways to deploy Terraform modules, so in this guide, we’ll focus on just the following ones:
Deploy using plain Terraform
One option is to deploy all of your environments using plain-old-Terraform. The approach is nearly identical to the way you did manual testing; let’s walk through it for the staging environment.
First, create a staging/terraform.tfvars file:
infrastructure-modules
  └ networking
    └ vpc-app
      └ main.tf
      └ outputs.tf
      └ variables.tf
      └ testing
        └ terraform.tfvars
        └ backend.hcl
      └ staging
        └ terraform.tfvars
  └ test
    └ vpc_app_test.go
Inside the file, set the variables for this module to values appropriate for this environment:
aws_region       = "us-east-2"
aws_account_id   = "888888888888"
vpc_name         = "staging-vpc"
cidr_block       = "10.10.0.0/16"
num_nat_gateways = 1
Next, create a staging/backend.hcl file:
infrastructure-modules
  └ networking
    └ vpc-app
      └ main.tf
      └ outputs.tf
      └ variables.tf
      └ testing
        └ terraform.tfvars
        └ backend.hcl
      └ staging
        └ terraform.tfvars
        └ backend.hcl
  └ test
    └ vpc_app_test.go
Inside this file, configure the backend for staging:
bucket         = "<YOUR-BUCKET-FOR-STAGING>"
key            = "networking/vpc-app/terraform.tfstate"
region         = "us-east-2"
encrypt        = true
dynamodb_table = "<DYNAMODB-TABLE-FOR-STAGING>"
And now you can deploy to the staging environment as follows:
cd infrastructure-modules/networking/vpc-app/staging
terraform init -backend-config=backend.hcl ../
terraform apply ../
To deploy to other environments, create analogous .tfvars and .hcl files (e.g., production/terraform.tfvars and
production/backend.hcl) and run terraform init and terraform apply with those files.
Benefits of this approach
-
No external tooling required.
-
Analogous to how you run manual and automated tests.
-
Quick feedback cycle.
-
Completely free and open source.
Drawbacks to this approach
-
You’re always deploying "latest" from a branch. No versioning or easy rollback.
-
Lots of command-line arguments to pass. Easy to make mistakes. Most teams end up creating hacky wrapper scripts.
-
Lots of backend configuration to copy for each module. Manually setting a unique
keyfor each module is repetitive and error prone. -
From a quick glance at the code, it’s not clear what accounts, environments, or regions you deploy to. Figuring this out requires digging through many folders.
Deploy using Terragrunt
Another option is to use Terragrunt, an open source wrapper for Terraform that helps alleviate some of the drawbacks mentioned in the previous approach.
The first step with Terragrunt is to version your code. You can do this by creating Git tags in
infrastructure-modules:
cd infrastructure-modules
git tag -a "v0.0.1" -m "Created vpc-app module"
git push --follow-tags
This will allow you to deploy different versions of your module in different environments (e.g., v0.0.1 in prod and
v0.0.2 in stage) and rollback to previous versions if necessary. With Terragrunt, we recommend defining your live
environments in a separate repo called infrastructure-live that uses a folder structure with the following format:
infrastructure-live
  └ <account>
    └ terragrunt.hcl
    └ _global
    └ <region>
      └ _global
      └ <environment>
        └ <resource>
          └ terragrunt.hcl
Where:
- <account>
-
A the top level, you have accounts (e.g., an AWS account).
- <region>
-
Within each account, there will be one or more regions (e.g., in AWS,
us-east-1,eu-west-1, etc). There may also be a_globalfolder that defines resources that are available across all the regions in this account, such as IAM users and DNS settings. Each account also has a rootterragrunt.hclfile that defines common Terraform settings that apply to the entire account, such as what backend to use to store Terraform state. - <environment>
-
Within each region, there will be one or more environments, such as dev, stage, prod, mgmt, etc. There may also be a
_globalfolder that defines resources that are available across all the environments in this region. - <resource>
-
Within each environment, you use Terraform modules to deploy one or more resources, such as servers, databases load balancers, and so on. Each module is configured via a
terragrunt.hclfile.
For example, if you were using AWS, with separate accounts for staging and production (see
How to Configure a Production Grade AWS Account Structure),
and you wanted to deploy the vpc-app module in the us-east-2 region in
each of these accounts, the folder structure would look like this:
infrastructure-live
  └ staging
    └ terragrunt.hcl
    └ us-east-2
      └ stage
         └ networking
           └ vpc-app
             └ terragrunt.hcl
  └ production
    └ terragrunt.hcl
    └ us-east-2
      └ prod
        └ networking
          └ vpc-app
            └ terragrunt.hcl
|
Note
|
Environments within accounts
In the folder structure above, it may seem redundant to have an environment, such as |
The terragrunt.hcl in the root of each account defines the backend settings for that account (including special
helpers to automatically set the key value). Here’s an example of what staging/terragrunt.hcl might look
like:
remote_state {
  backend = "s3"
  config = {
    # Set defaults for all the backend settings for this environment
    bucket         = "<YOUR-BUCKET-FOR-STAGING>"
    region         = "us-east-2"
    encrypt        = true
    dynamodb_table = "<DYNAMODB-TABLE-FOR-STAGING>"

    # Automatically set the key parameter to the relative path between this root terragrunt.hcl file and the child
    # terragrunt.hcl file (e.g., for vpc-app, it'll end up us-east-2/stage/networking/vpc-app/terraform.tfstate).
    key = "${path_relative_to_include()}/terraform.tfstate"
  }
}
The terragrunt.hcl for each child module within an account specifies what module to deploy—including the version to
use—and sets the variables to values appropriate for that environment. Here’s an example of what
staging/us-east-2/stage/vpc-app/terragrunt.hcl might look like:
# Deploy the vpc-app module at a specific version (via the ref=xxx param)
terraform {
  source = "git@github.com:<ORG>/infrastructure-modules.git//networking/vpc-app?ref=v0.0.1"
}

# Set the variables for the vpc-app module in this environment
inputs = {
  aws_region       = "us-east-2"
  aws_account_id   = "888888888888"
  vpc_name         = "staging-vpc"
  cidr_block       = "10.10.0.0/16"
  num_nat_gateways = 1
}

# Automatically include settings from the root terragrunt.hcl in this account
include {
  path = find_in_parent_folders()
}
To deploy vpc-app in staging, you do the following:
cd infrastructure-live/staging/us-east-2/stage/vpc-app
terragrunt apply
When you run this command, Terragrunt will:
-
Checkout the
infrastructure-modulesrepo at versionv0.0.1into a scratch directory. -
Run
terraform initin the scratch directory, configuring the backend to the values in the rootterragrunt.hcl. -
Run
terraform applyin the scratch directory, configuring the variables to the values in theinputs = { … }block.
You can deploy the production environment by creating an analogous
infrastructure-live/production/us-east-2/prod/vpc-app/terragrunt.hcl file and running terragrunt apply in
infrastructure-live/production/us-east-2/prod/vpc-app/. If you have multiple modules and you want to deploy all of
them, you can use terragrunt apply-all. For example, to deploy everything in the production account, you would
do the following:
cd infrastructure-live/production
terragrunt apply-all
Benefits of this approach
-
All your code is versioned. You can deploy different versions in different environments, and roll back to older versions if necessary.
-
Backend configuration is DRY. No more copy/pasting values, no more manually setting
keyfor each module. -
CLI arguments are DRY. No need for long commands or extra wrapper scripts.
-
The full structure of all accounts, environments, and regions is visible at a glance in the
infrastructure-liverepo. -
Completely free and open source.
-
Deploy multiple modules using
apply-all.
Drawbacks to this approach
-
You have to install, learn, and manage a new tool / abstraction layer.
-
The scratch directory can make debugging/troubleshooting tricky.
Updating
Now that you have your Terraform module deployed, you can pull in updates as follows:
-
Subscribe to the monthly Gruntwork Newsletter to be notified of all updates to the Gruntwork Infrastructure as Code Library. Alternatively, you can "watch" repos in GitHub that you’re interested in.
-
When you find an update you’d like for a specific module, update any code using that module in
infrastructure-modulesto the new version number. For example, if you were usingmodule-vpcatv0.7.2and you wanted to update tov0.7.3, you would change from:module "vpc" { source = "git@github.com:gruntwork-io/module-vpc.git//modules/vpc-app?ref=v0.7.2" # ... }to:
module "vpc" { source = "git@github.com:gruntwork-io/module-vpc.git//modules/vpc-app?ref=v0.7.3" # ... } -
Pay close attention to the release notes for any additional instructions. In particular, if the MINOR version number was increased (e.g.,
v0.6.0→v0.7.0), that implies a backwards incompatible change, and the release notes will explain what you need to do (e.g., you might have to add, remove, or change arguments you pass to the module). -
Tests your changes locally. You do this using the same process outlined in Manual tests for Terraform code and Automated tests for Terraform code.
-
Deploy your changes to each environment. You do this using the same process outlined in Deploying Terraform code.
Integrating with Terraform Cloud and Enterprise
This section will cover how to use Gruntwork in conjunction with two popular HashiCorp products: Terraform Cloud (TFC) and Terraform Enterprise (TFE). Although the open source edition of Terraform is quite powerful and flexible as a standalone project, many organizations turn to TFC/TFE for the CLI/UI integration, approval-based workflow capabilities, Sentinel policy framework, and more. At its core, Terraform Enterprise is basically Terraform Cloud repackaged for a self-hosted environment. We’ll use "TFC" as short hand for both Terraform Cloud and Enterprise throughout this guide.
In the sections above, we discussed how to use Gruntwork with two VCS repositories: infrastructure-modules, containing your Terraform code that wraps the modules from Gruntwork Library, and infrastructure-live, containing Terragrunt configurations that enable you to manage Terraform easily across multiple accounts and environments. When using Gruntwork with TFC, you have two choices regarding these repositories:
- Use TFC without Terragrunt
-
Using this approach, Terraform modules are still defined in an
infrastructure-modulesrepository as discussed above. Each module has a dedicated TFC workspace. You create the workspace in advance, and then you can run the Terraform modules either from theterraformCLI or from the TFC UI. In essence, TFC replaces Terragrunt andinfrastructure-live. You’ll be able to use the full TFC feature set, but you won’t be able to take advantage of the benefits provided by Terragrunt, such as keeping your code and variables, CLI args, etc DRY, and adding support for applying changes across multiple modules / environments. - Use TFC with Terragrunt
-
Alternatively, you can use both
infrastructure-modulesandinfrastructure-liverepositories as described above, storing the wrapper modules ininfrastructure-modules, and usinginfrastructure-liveand Terragrunt for deployments. In this approach, TFC is used as a remote backend for Terraform. You use Terragrunt to run deployments from the CLI, which in turn invokes Terraform on the TFC backend. The TFC UI is used for audit and tracking capabilities, but not for executing Terraform runs.
We cover each approach below, but first, you’ll need to complete a few one time set up steps.
One time set up
|
Important
|
If you’re using TFE, you’ll need to follow HashiCorp’s Enterprise installation instructions first. Most of the details below still apply to TFE, but you should adjust any URLs, such as app.terraform.io, to use your TFE installation instead.
|
Create an account
The first step is to establish an account. Visit the Terraform Cloud sign up page to create a free account.
Create an organization
Once the account is established, you’ll verify your email address. It’s safe to skip the initial set up instructions.
After doing so, you’ll be presented with the option to create a new organization. We suggest using lowercase
organization names, optionally with - or _ characters, but without whitespace.
Set up an SSH key
When you’re using Gruntwork modules, you use the source attribute on a module block to read a module from a Gruntwork
code repository. As a simple example, if you wanted to create an SQS queue using the SQS module from package-messaging, you might create something like the following:
provider "aws" {
 region = "us-east-1"
}

module "sns" {
  source = "git::git@github.com:gruntwork-io/package-messaging.git//modules/sqs?ref=v0.3.2"
  name   = "my-queue"
}
The git::git@github.com:gruntwork-io portion of the source attribute indicates that this module is accessed over SSH. Thus, TFC will need access to the Gruntwork code repositories via SSH.
To set up this access, take the following steps:
-
First, if you don’t have one already, you’ll need a machine user that has access to Gruntwork. A machine user is an account that is only used for automation, and is not used by humans. In this case, the "machine" in question is the TFC executor. Create a new Github user, and send the machine user’s username and email address to support@gruntwork.io. We’ll make sure the user has access to our repositories.
-
Next, generate an SSH key pair, and add the public key to the new GitHub machine user. GitHub has easy-to-follow instructions.
-
Now, add the private SSH key to TFC. You’ll find the option under SSH Keys in the TFC organization settings. We called ours Gruntwork access. TFC will use this key to clone Gruntwork code repositories.
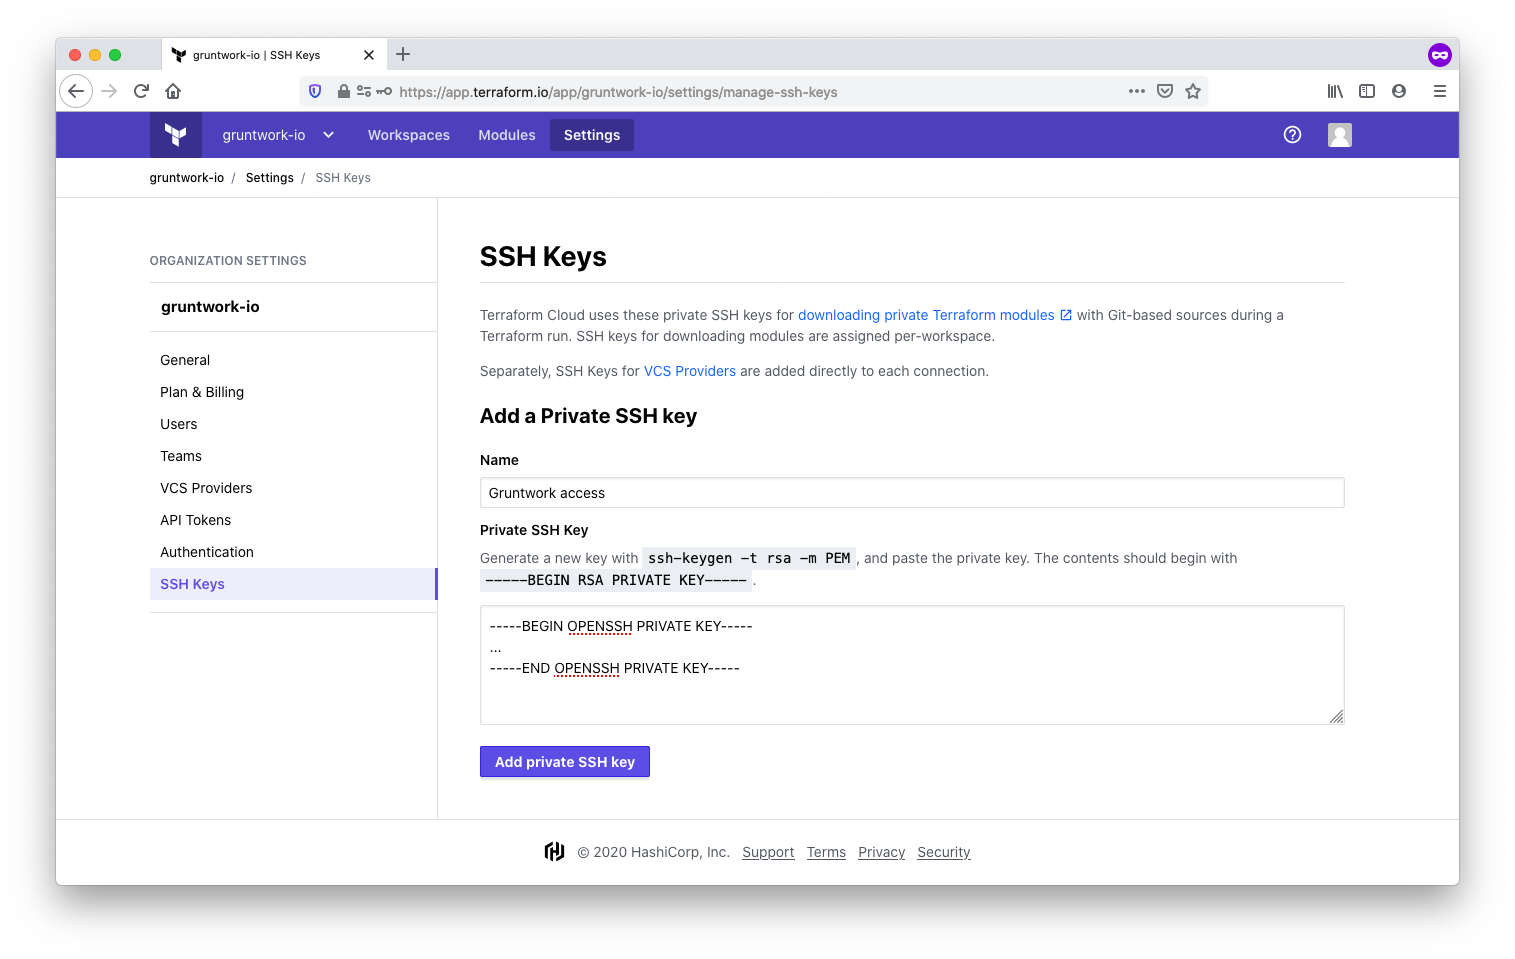
With the SSH key in place, the one time set up is complete.
Using TFC without Terragrunt
This section will demonstrate how to use TFC to deploy your infrastructure, leveraging Gruntwork’s Terraform modules to do the heavy lifting. With this method, you can run Terraform from your local CLI or from the TFC UI.
Workspaces store the state
associated with the infrastructure that is managed by Terraform. The state is
stored in TFC. You can use the
remote_state
data source to use the outputs of one workspace as the variable inputs for
another workspace. In this manner, you can link multiple workspaces together to
build an end-to-end infrastructure.
In the Using Terraform Modules section, we discussed the wrapper module
pattern in which multiple Terraform modules are contained in a hierarchy of directories located under
infrastructure-modules/modules. Using such a hierarchy, each workspace will use the same infrastructure-modules repository, but pointed at different subdirectories within the repository.
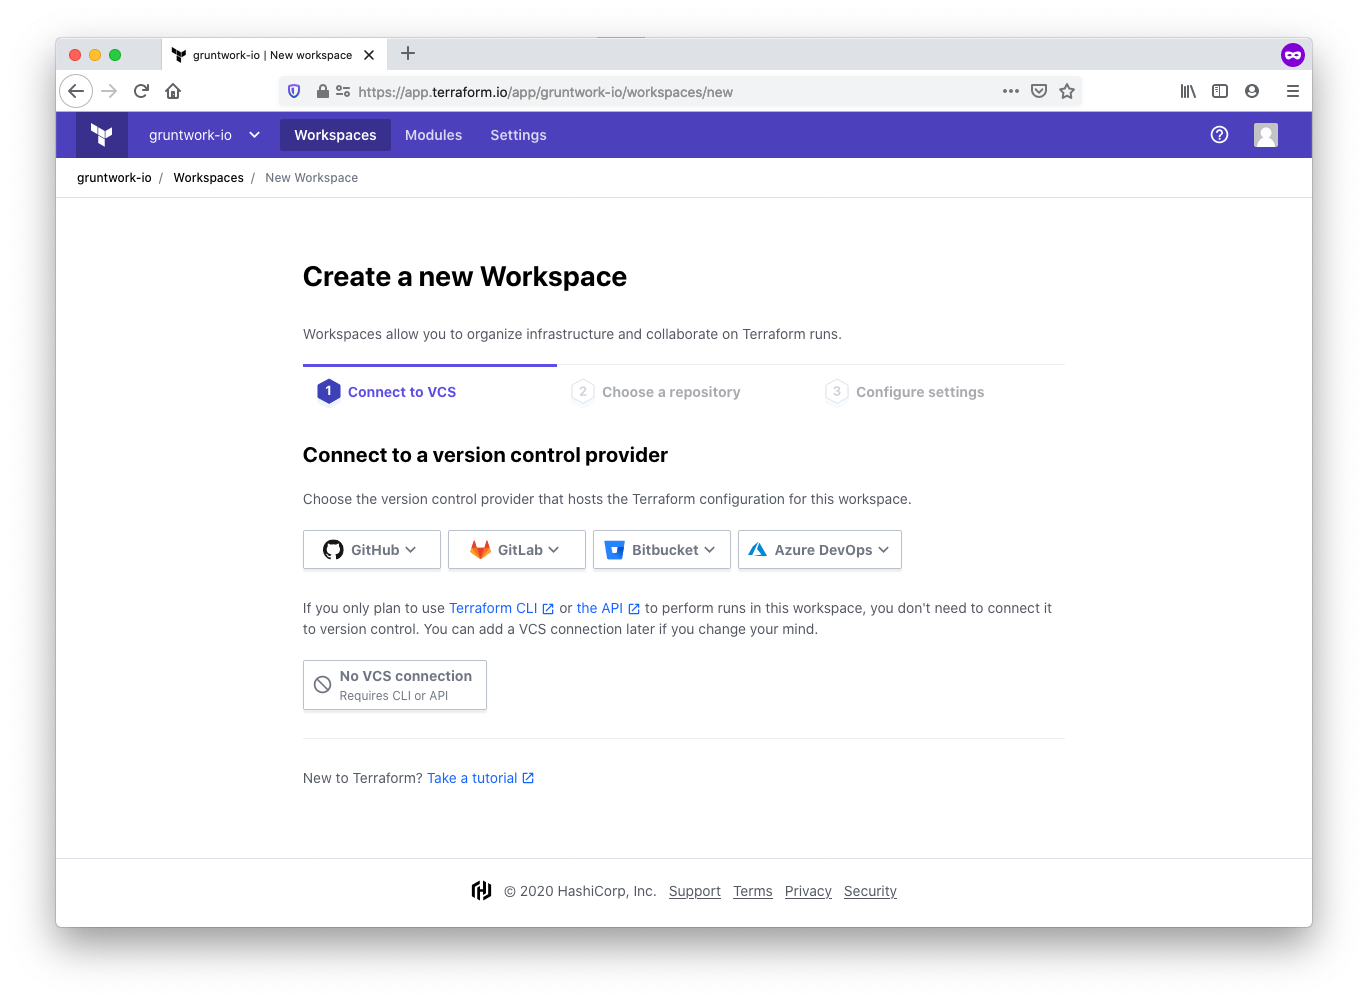
We’ll demonstrate how to set up a workspace for a simple SQS module. To get started, create a new workspace and connect in to your VCS provider.
Connect to a version control provider
Connect the workspace to the version control system of your choice. For example, GitHub, GitLab, or Bitbucket. This allows TFC to access your infrastructure-modules repository. Once your VCS is connected, select your infrastructure-modules repository from the list of repositories presented.
Configure the workspace settings
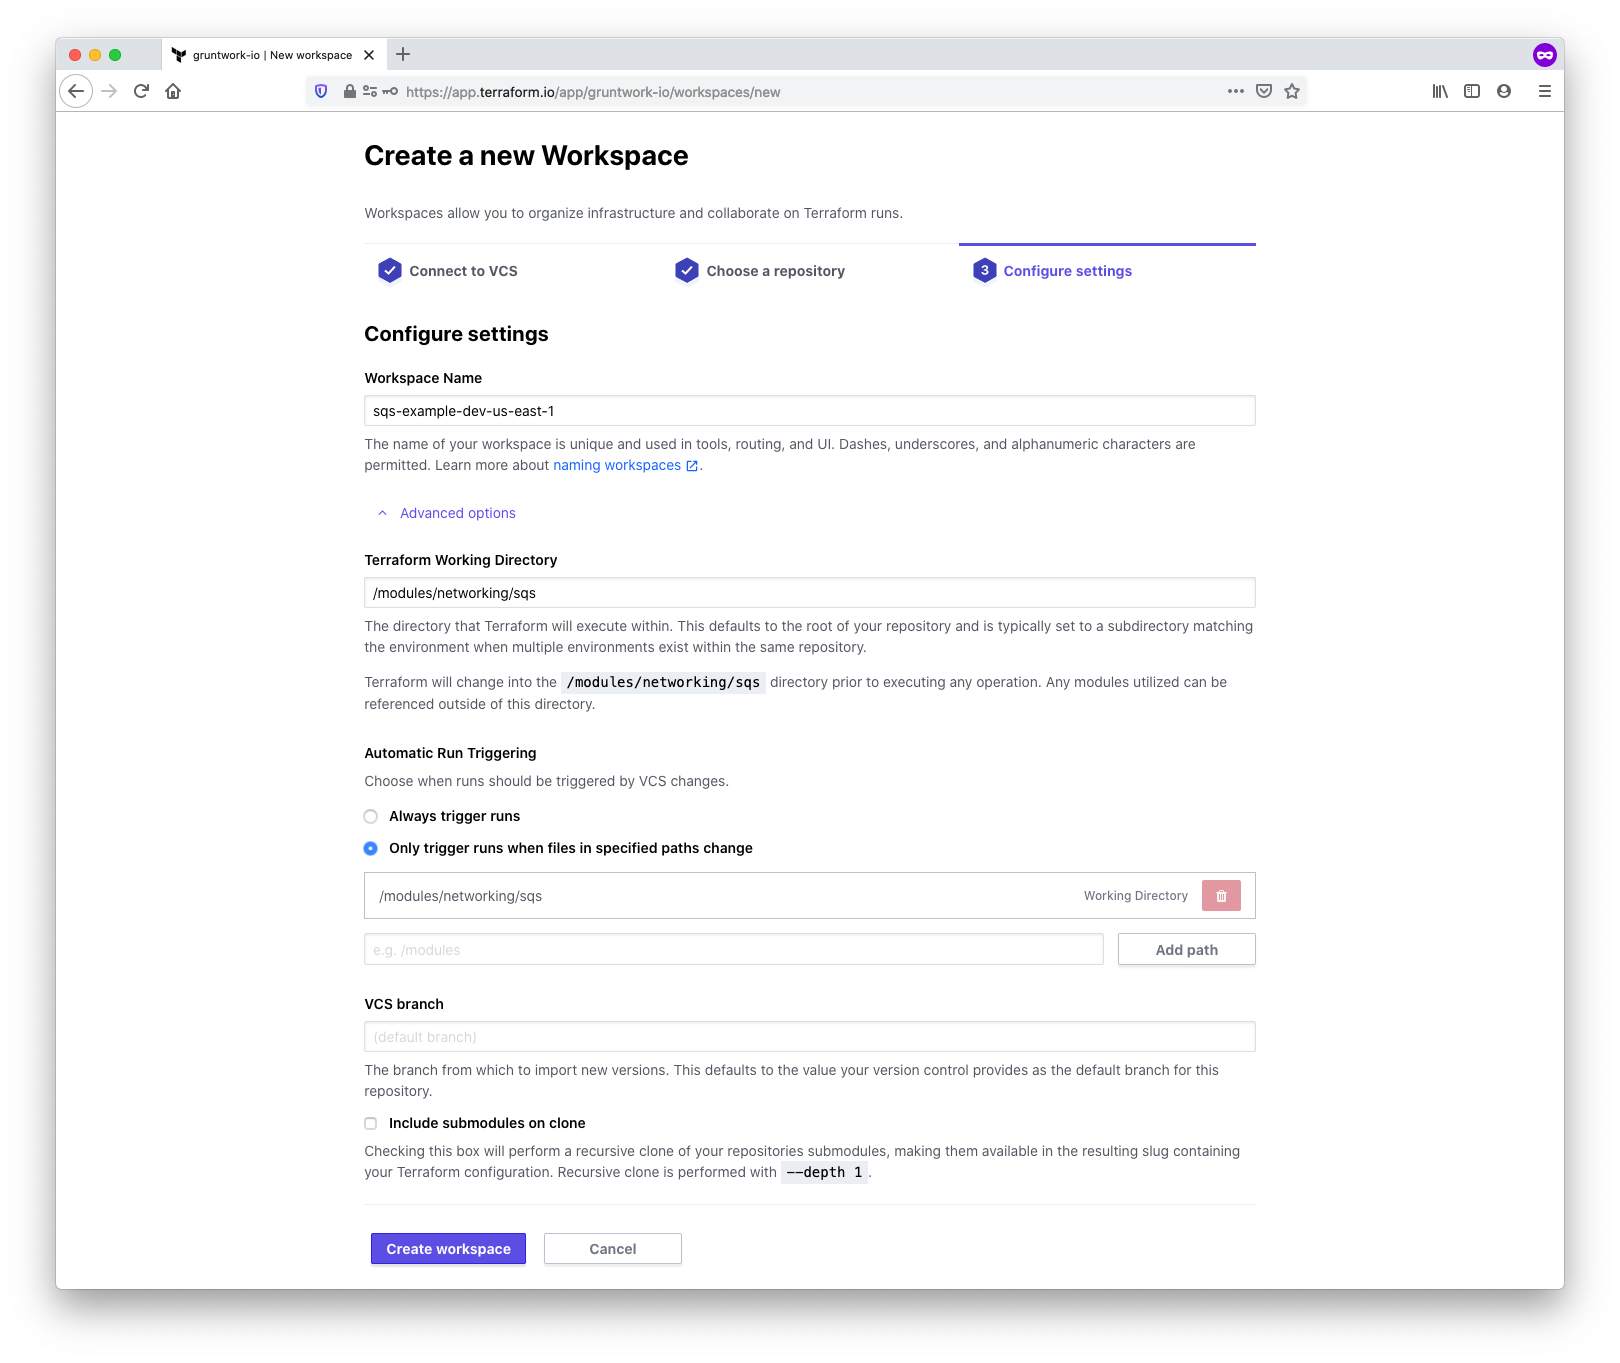
In this step, you’ll choose a name and configure additional settings relating to the workspace. Be sure to
follow the workspace naming guidelines to ensure a
consistent yet flexible naming convention. For this example, we’ll choose sqs-example-dev-us-east-1.
We also need to inform TFC where to find the correct module. Under the
Advanced options, locate the Terraform Working Directory field, and enter
the path to the module. TFC will automatically enter the same value for
Automatic Run Triggering to ensure that Terraform runs for this workspace
only occur when changes are detected to the module path. For our SQS example,
we enter the value /modules/networking/sqs.
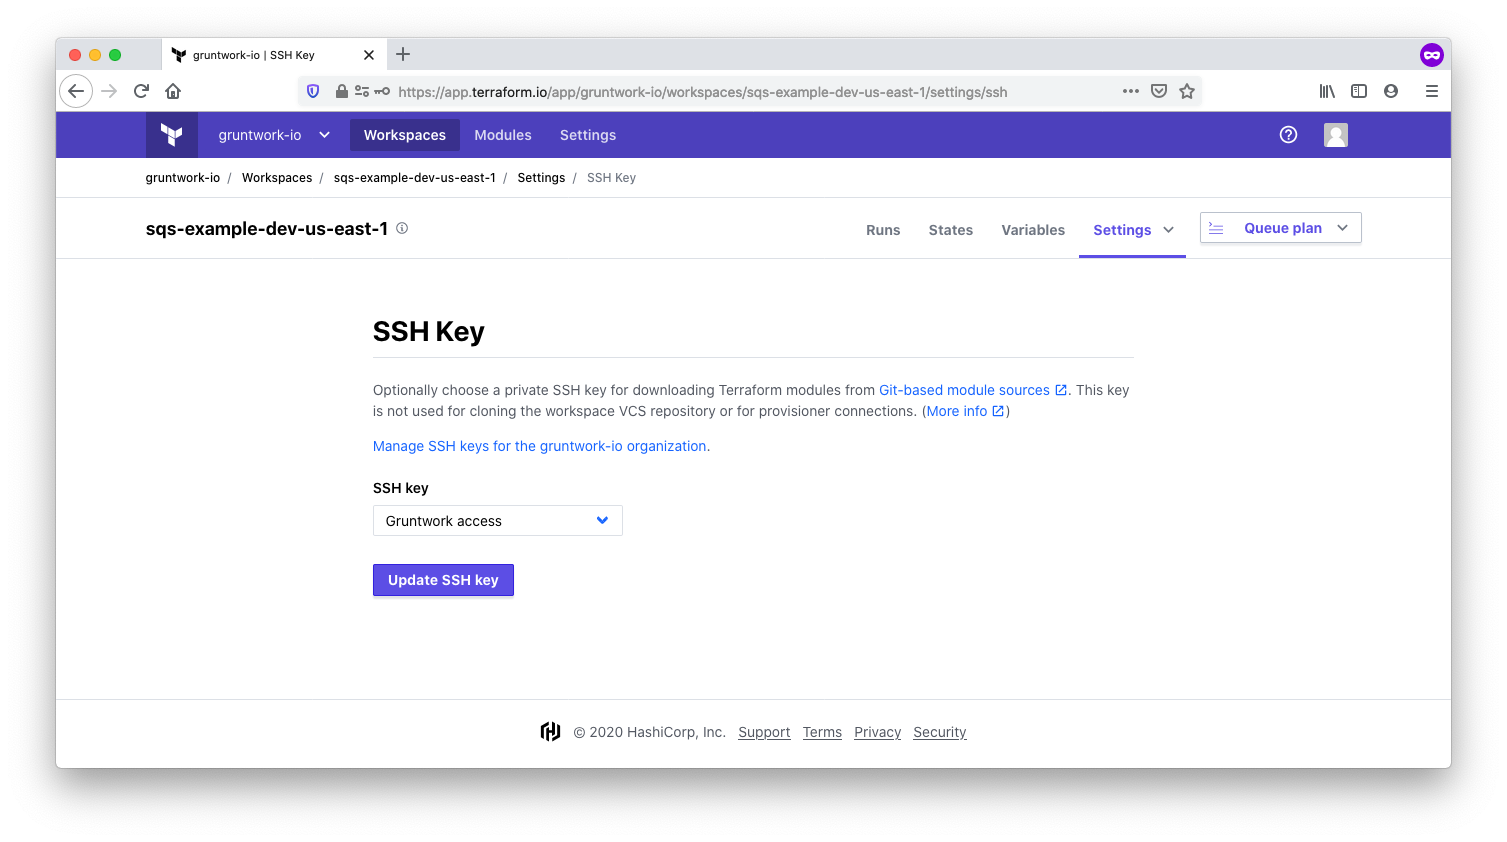
Use the SSH key
In the one time set up steps described above, you created an SSH key. You’ll now need to choose this SSH key in the workspace settings.
Configure credentials and variables
The Terraform AWS provider used by the SQS module will need credentials to communicate with the AWS API. You can set this up using the standard AWS_ACCESS_KEY_ID and AWS_SECRET_ACCESS_KEY environment variables in the workspace. When setting the variables, be sure to mark the Sensitive checkbox so that the variables are write only.
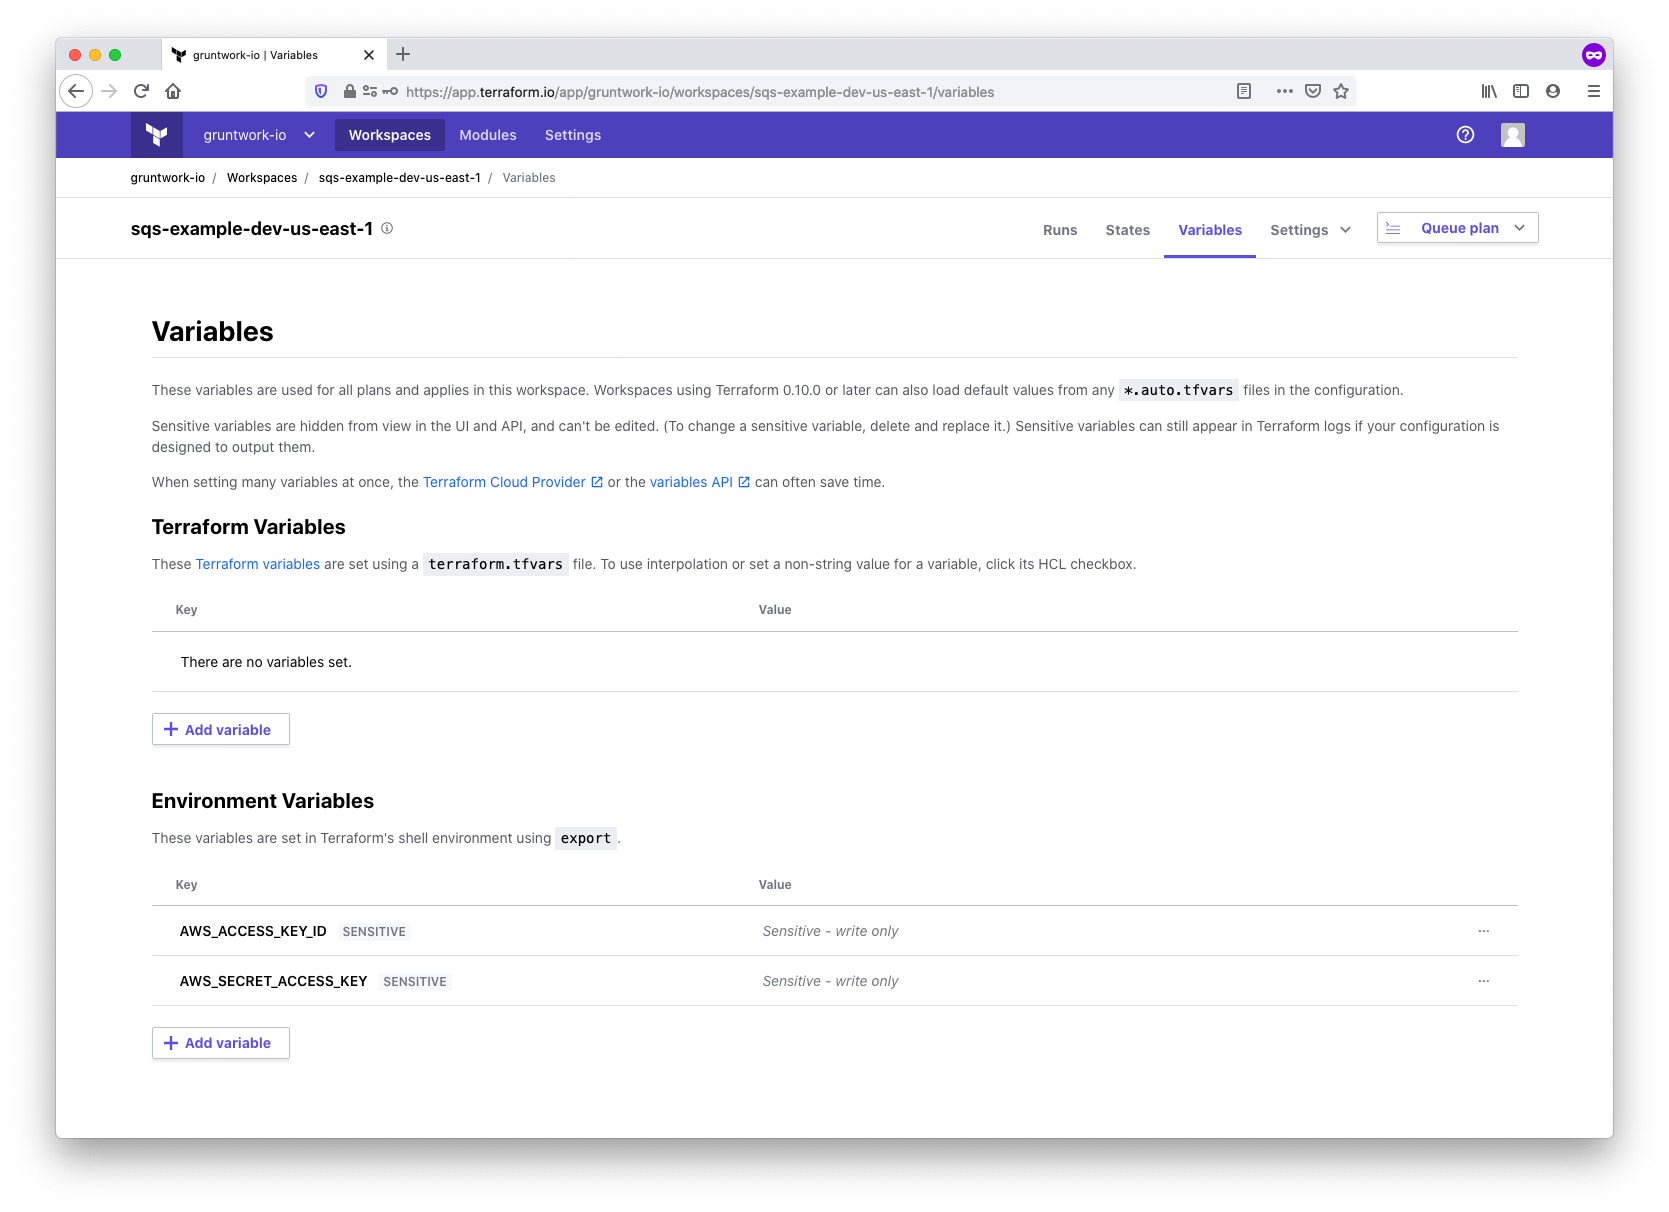
You can also enter values for any Terraform variables for the module. For our simple SQS module we don’t define any variables.
Queue and apply the configuration
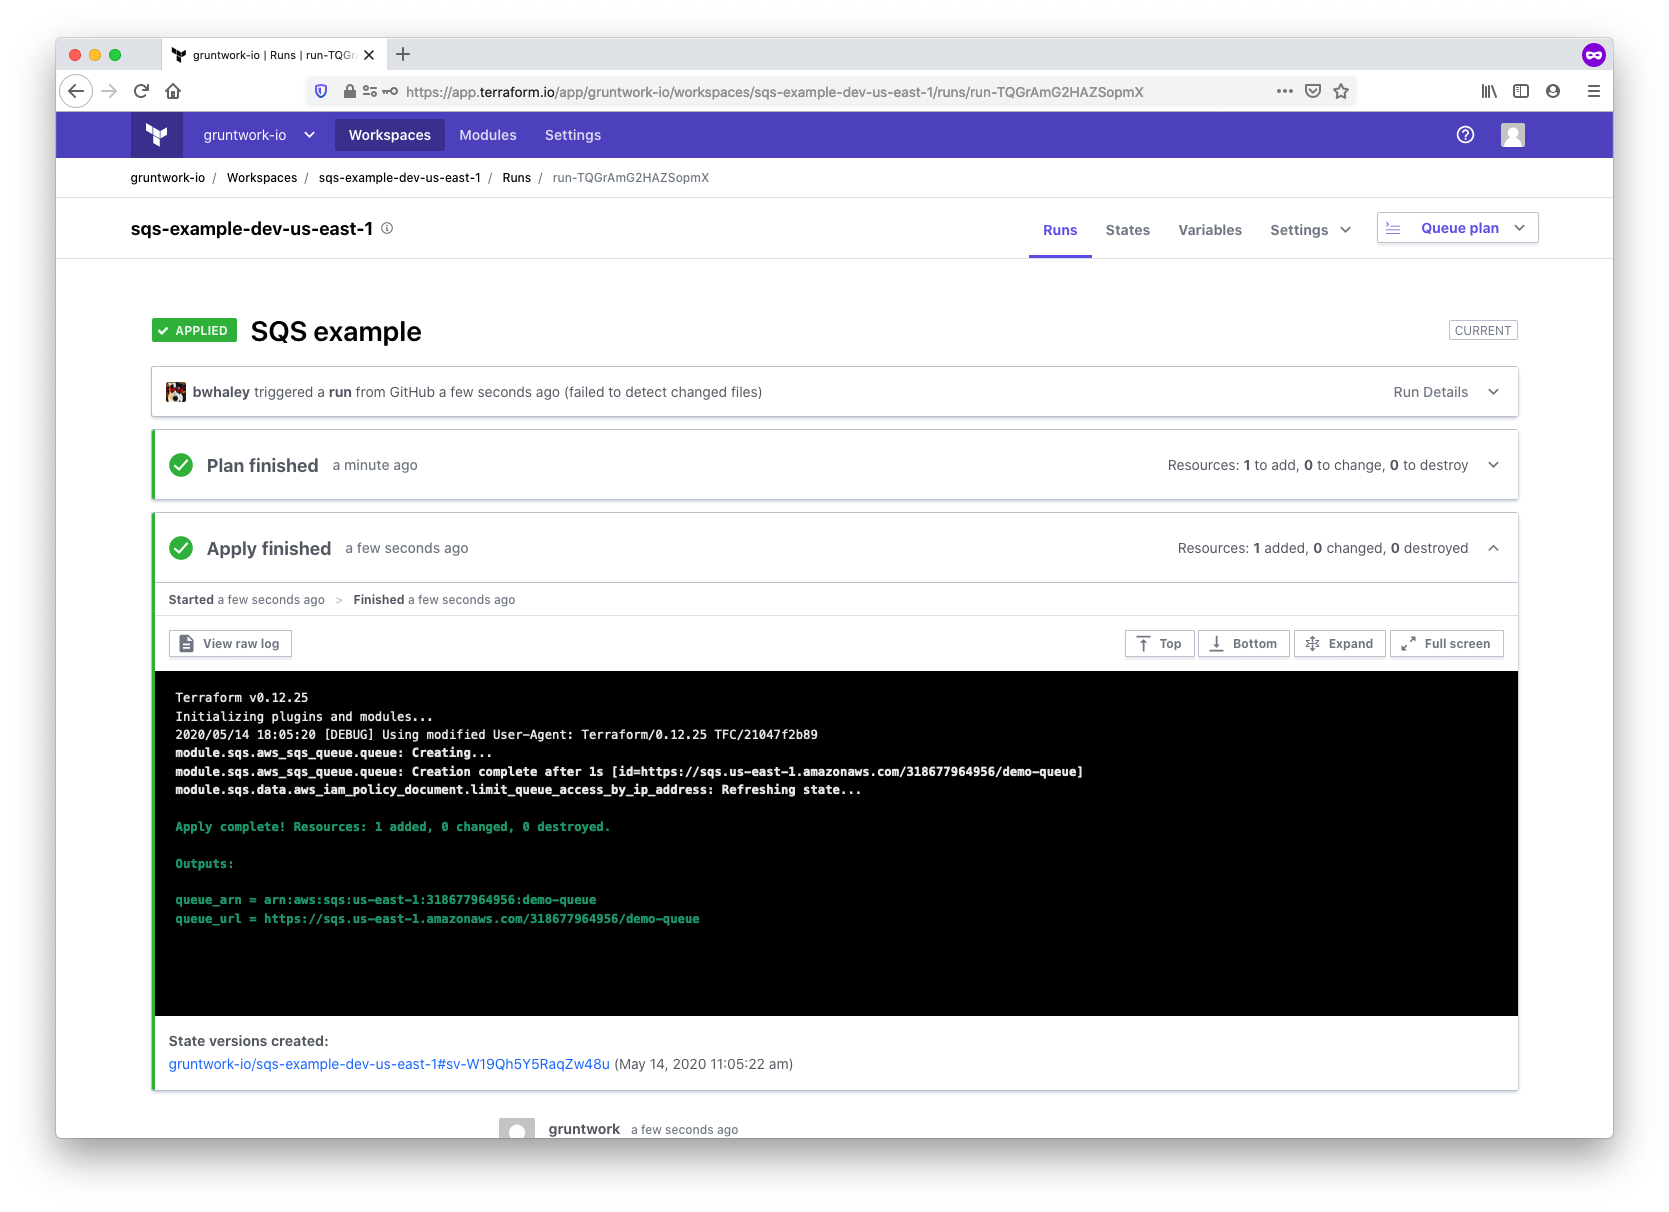
With all the configuration complete, it’s time to kick off the plan and apply. You can trigger the run by making a
commit to a file in the working directory that you set up when configuring workspace settings (in our case, in
/modules/networking/sqs), or by manually triggering the run using the Queue plan button in the TFC UI. The run will:
-
Clone your
infrastructure-modulesrepository using the VCS connection -
Download the AWS provider and set credentials using the environment variables
-
Download the Gruntwork SQS module using the SSH key
-
Run a
terraform plan -
Wait for confirmation
-
Once confirmed, run a
terraform apply
Final thoughts on integrating TFC with the Gruntwork library
It’s easy to use TFC with the Gruntwork library. When using the infrastructure-modules approach outlined in this
guide, all of your Terraform wrapper modules will be in one place. You can configure one workspace per module, and you
can link modules together with the remote_state
data source. Note that you’ll need to set up the AWS credentials and SSH key within each workspace.
You can use this pattern for any of Gruntwork’s Terraform modules. This even works for modules like
terraform-aws-eks which need to download external dependencies (like
kubergrunt). Those modules use the special
executable-dependency
module to install the external dependency within the executor (the TFC node, in this case) at run time. In the future,
Gruntwork may offer modules through a private Terraform registry to remove the SSH key requirement, further simplifying
the process.
Once the workspace is set up, you can trigger runs through the UI or from the terraform CLI. To use the CLI, follow the CLI-driven Run Workflow instructions.
Using TFC with Terragrunt
The TFC UI runs only Terraform commands. Terragrunt expects you to run it, and it, in turn, will run Terraform.
Therefore, it currently is not possible to use the TFC UI to trigger Terragrunt. However, you can set up Terraform to run
remote operations such as plan and apply. That is, you use Terragrunt to organize your code and keep it DRY, and you can
configure it so that when you run terragrunt apply on your computer (or on a CI server), it runs terraform apply in
TFC rather than on your local system.
You’ll still need workspaces, as described in the sections above on using TFC without Terragrunt. You can create the workspace automatically or re-use a workspace that already exists, including variables and env vars already set in it, such as your AWS access keys, so you don’t need to have those locally. You’ll also be able to see the apply output in the web UI (but not trigger it from the web UI) and see the history of all apply calls in the web UI.
The steps involved to set all this up include:
-
Obtain an API token to permit Terraform to use TFC
-
Generate a
backend.tffile to configure Terraform to point at TFC as a remote backend -
Set up workspaces for each module managed by Terragrunt
-
Set input variables
Before digging in, we’ll review an example Terragrunt configuration.
Setting up
For this example, we’ll once again deploy an SQS queue from Gruntwork package-messaging repository.
Consider the following directory structure for an infrastructure-live repository:
.
├── dev
│   ├── account.hcl
│   └── us-east-1
│       ├── region.hcl
│       └── sqs
│           └── terragrunt.hcl
├── common.hcl
└── terragrunt.hcl
For simplicity, the example shows a single environment, dev, the sqs module, but this pattern could be expanded to more environments and regions as needed.
Obtain an API token
Terraform needs an API token to communicate with TFC as a backend. To obtain a token, open the user settings, and click on Tokens. If you’re running Terragrunt on a CI system, this token should be associated with a machine user rather than an individual user account.
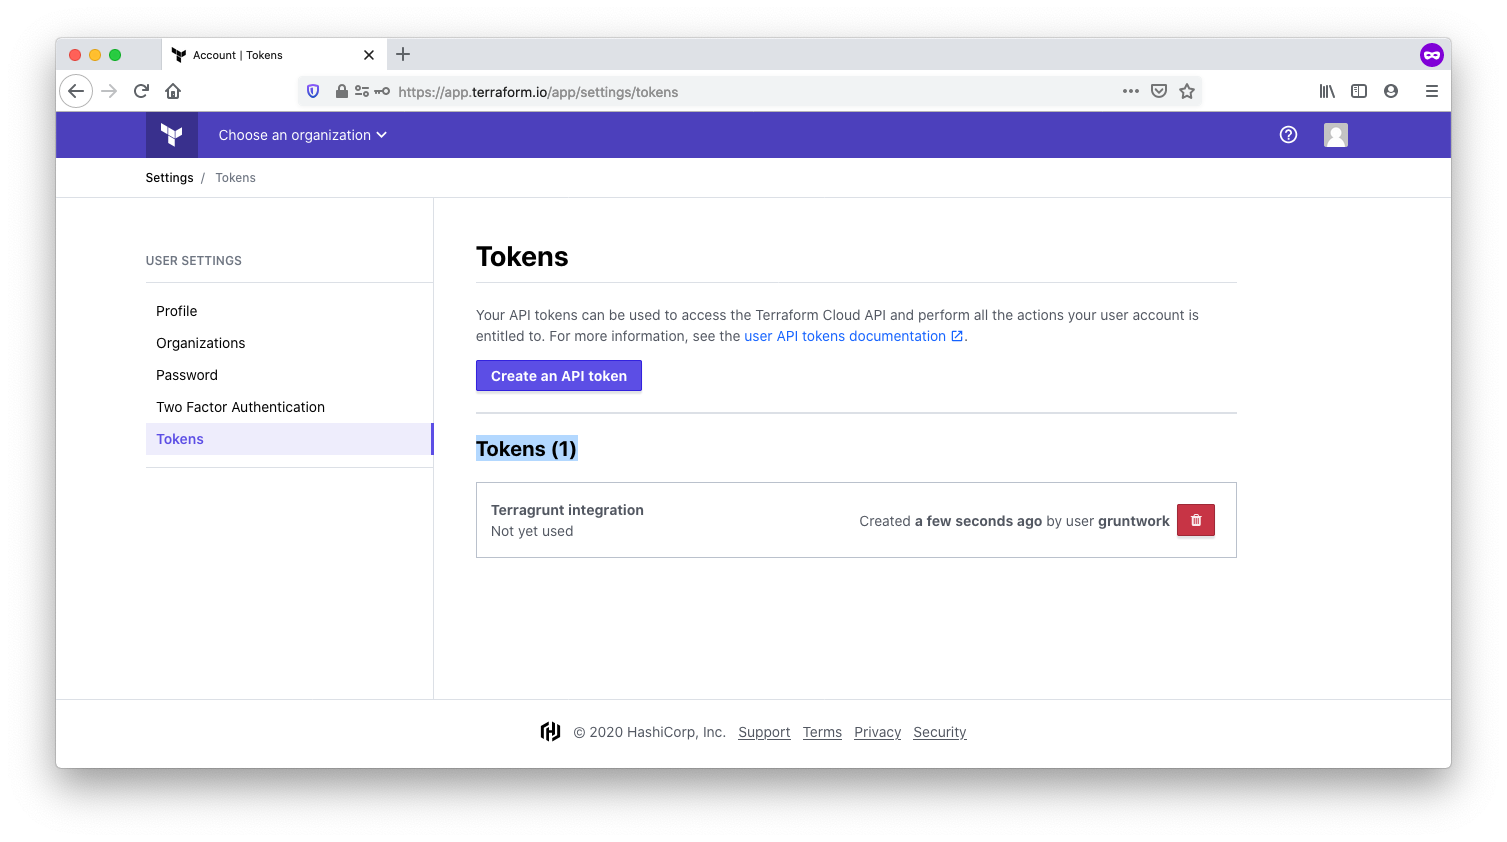
Now you’ll add the token to your ~/.terraformrc file in a credentials block.
# For TFE, substitute the custom hostname for your TFE host
credentials "app.terraform.io" {
  token = "xxxxxxyyyyyyyyyzzzzzzzzzzzz"
}
Generating the backend
For Terragrunt to use TFC as a remote executor, you’ll need a backend block. The backend is what determines where
Terraform reads state and how execution is handled. The Terragrunt
generate block can generate
the backend block dynamically so you don’t need to include one in each module.
Terraform workspaces store the state associated with a given
backend. In the Terragrunt configuration hierarchy defined above, each module (just sqs in this case) uses a separate workspace and must have its own name in the backend block. Therefore, we’ll need to gather all the component parts of our chosen workspace naming convention to use when setting up the backend.
Following the advice from HashiCorp, we’ll need:
-
The name of the component, such as sqs
-
The name of the environment, such as dev
-
The region, such as us-east-1
The snippet below shows one technique for gathering the requisite information and generating the backend:
locals {
  tfc_hostname     = "app.terraform.io" # For TFE, substitute the custom hostname for your TFE host
  tfc_organization = "gruntwork-io"
  workspace        = reverse(split("/", get_terragrunt_dir()))[0] # This will find the name of the module, such as "sqs"
  account_vars     = read_terragrunt_config(find_in_parent_folders("account.hcl"))
  region_vars     = read_terragrunt_config(find_in_parent_folders("region.hcl"))
}

generate "remote_state" {
  path      = "backend.tf"
  if_exists = "overwrite_terragrunt"
  contents = <<EOF
terraform {
  backend "remote" {
    hostname = "${local.tfc_hostname}"
    organization = "${local.tfc_organization}"
    workspaces {
      name = "${local.workspace}-${local.account_vars.locals.account}-${local.region_vars.locals.region}"
    }
  }
}
EOF
}
This code shows off a few features of Terragrunt:
-
The
generateblock creates a file calledbackend.tfthat will be created alongside the other*.tffiles for the module that Terragrunt is operating on. This effectively adds a dynamically generatedbackendconfiguration to the module. -
Terragrunt has a set of built-in functions, like
find_in_parent_folders(),read_terragrunt_config(), andget_terragrunt_dir(). These functions are used to obtain values need to configure the backend. -
Terragrunt can also use all of the native Terraform functions. In the configuration above, we’re using
split()andreverse()to obtain the leaf directory name (such assqs) that is used as the workspace suffix.
This configuration is at the root of the Terragrunt configuration tree so that it can be reused across each module, reducing code duplication. Note the use of get_terragrunt_dir() to obtain the workspace name. This function retrieves the current Terragrunt directory. If you run terragrunt apply from the sqs module, the value returned by get_terragrunt_dir() will be the fully qualified filesystem path to the sqs subdirectory. Although the function is in the root terragrunt.hcl, it runs in the context of the directory where terragrunt is invoked.
Creating a workspace and setting provider credentials
By default, if you configure the remote backend for a workspace that doesn’t yet exist, TFC will automatically create one when you run terraform init. This is known as implicit workspace creation. Once the workspace exists, your Terraform code will need API credentials to interface with the cloud provider.
There are a few ways to set these credentials:
-
Create all the workspaces manually in advance, and set the
AWS_ACCESS_KEY_IDandAWS_SECRET_ACCESS_KEYin each workspace, as described in Configure credentials and variables. -
Create all the workspaces manually by running
terragrunt init, and still set up the environment variables as previously mentioned. -
To set this up programmatically, you can use the
tfe_workspaceandtfe_variableresources to configure the workspaces with Terraform.
In all cases, you’ll need to ensure that your workspaces stay in sync with your Terragrunt configuration. Each time you add a new module in Terragrunt, you’ll need a corresponding workspace. Furthermore, if you rotate your AWS API keys, you’ll need to update them within each workspace. For that reason, the final option above is recommended.
Setting variables
In typical Terragrunt usage, variables are passed to Terraform using the inputs attribute. Anything defined in the inputs will be passed to Terraform using the environment variable mechanism. However, this mechanism is not supported by TFC. Instead, you can generate a *.auto.tfvars file containing the inputs.
|
Important
|
The generated terragrunt.auto.tfvars file will be present on local disk. Depending upon your configuration, this file may contain sensitive data. Do not commit this file to version control. We recommend adding the *.auto.tfvars to .gitignore.
|
The following code shows how to generate a terragrunt.auto.tfvars file.
terraform {
  source = "git::ssh://git@github.com/gruntwork-io/package-messaging//modules/sqs?ref=v0.3.2"
}

include {
  path = find_in_parent_folders()
}

locals {
  common_vars = read_terragrunt_config(find_in_parent_folders("common.hcl"))
}

generate "tfvars" {
  path      = "terragrunt.auto.tfvars"
  if_exists = "overwrite"
  disable_signature = true
  contents = <<-EOF
name = "${local.common_vars.locals.name}"
EOF
}
The configuration has a few sections:
-
The
terraformblock at the top uses the Gruntworksqsmodule frompackage-messaging. -
The
includeblock includes the configuration from the parent directories. This is how the remotebackendblock from the rootterragrunt.hclis included. -
The
localsblock reads the values fromcommon.hclin the root of the hierarchy, making them available for local reference. -
Finally, the
generateblock creates a file calledterragrunt.auto.tfvars. Like thebackend.tffile, this file will be generated alongside the rest of the*.tffiles that Terragrunt downloads from thesqsmodule, making those inputs available for TFC to read when runningterraformcommands in the remote executor.
Any of the inputs needed by the module must be included in the generated tfvars file. In the configuration above, only
the name variable is specified. Most modules will need more configuration.
Running Terragrunt
With all the pieces in place, you can run terragrunt init to initialize the workspace, if it isn’t already there, and then terragrunt apply, and watch as Terragrunt invokes Terraform, which executes the plan and apply stages on TFC, pausing in between to allow confirmation. Note that when running a terragrunt apply-all, Terragrunt adds the -auto-approve flag to Terraform to skip interactive approval. This means that with apply-all, there will be no confirmation step.
First, we run terragrunt init. Terragrunt generates the backend configuration, the tfvars file, and connects to the remote. Irrelevant details have been omitted from the output.
$ terragrunt init
[terragrunt] 2020/05/15 14:36:54 Reading Terragrunt config file at <redacted>/infrastructure-live/dev/us-east-1/sqs/terragrunt.hcl
... [snip] ...
[terragrunt] 2020/05/15 14:36:55 Generated file <redacted>/infrastructure-live/dev/us-east-1/sqs/.terragrunt-cache/m6q2Wdn6A9TxoqahZZQpvrPqzAU/owCGC2BufzNDW7KyzOE-oDrwatg/modules/sqs/backend.tf.
[terragrunt] 2020/05/15 14:36:55 Generated file <redacted>/infrastructure-live/us-east-1/sqs/.terragrunt-cache/m6q2Wdn6A9TxoqahZZQpvrPqzAU/owCGC2BufzNDW7KyzOE-oDrwatg/modules/sqs/terragrunt.auto.tfvars.
[terragrunt] 2020/05/15 14:36:55 Running command: terraform init

Initializing the backend...
Backend configuration changed!

Terraform has detected that the configuration specified for the backend
has changed. Terraform will now check for existing state in the backends.

Successfully configured the backend "remote"! Terraform will automatically
use this backend unless the backend configuration changes.
Next, we run terragrunt apply:
$ terragrunt apply
Running apply in the remote backend. Output will stream here. Pressing Ctrl-C
will cancel the remote apply if it's still pending. If the apply started it
will stop streaming the logs, but will not stop the apply running remotely.

Preparing the remote apply...

To view this run in a browser, visit:
https://app.terraform.io/app/gruntwork-io/sqs-dev-us-east-1/runs/run-esQKC9ATKPnDywN1

Waiting for the plan to start...

Terraform v0.12.24
Configuring remote state backend...
Initializing Terraform configuration...
2020/05/15 21:41:31 [DEBUG] Using modified User-Agent: Terraform/0.12.24 TFC/ba6190e398
Refreshing Terraform state in-memory prior to plan...
The refreshed state will be used to calculate this plan, but will not be
persisted to local or remote state storage.

------------------------------------------------------------------------

Terraform will perform the following actions:

  # aws_sqs_queue.queue will be created
  + resource "aws_sqs_queue" "queue" {
      + arn                               = (known after apply)
      + content_based_deduplication       = false
      + delay_seconds                     = 0
      + fifo_queue                        = false
      + id                                = (known after apply)
      + kms_data_key_reuse_period_seconds = 300
      + max_message_size                  = 262144
      + message_retention_seconds         = 345600
      + name                              = "example-name"
      + policy                            = (known after apply)
      + receive_wait_time_seconds         = 0
      + visibility_timeout_seconds        = 30
    }

Plan: 1 to add, 0 to change, 0 to destroy.
Do you want to perform these actions in workspace "sqs-dev-us-east-1"?
  Terraform will perform the actions described above.
  Only 'yes' will be accepted to approve.

  Enter a value: <enter yes>

aws_sqs_queue.queue: Creating...
aws_sqs_queue.queue: Creation complete after 0s [id=https://sqs.us-east-1.amazonaws.com/0123456789012/example-name]
data.aws_iam_policy_document.limit_queue_access_by_ip_address: Refreshing state...

Apply complete! Resources: 1 added, 0 changed, 0 destroyed.

Outputs:

queue_arn = arn:aws:sqs:us-east-1:0123456789012:example-name
queue_name = example-name
queue_url = https://sqs.us-east-1.amazonaws.com/0123456789012/example-name
TFC runs a plan first, waits for confirmation, and then runs apply. The confirmation can be entered either on the command line or in the UI. Once complete, the results are visible in the TFC UI:
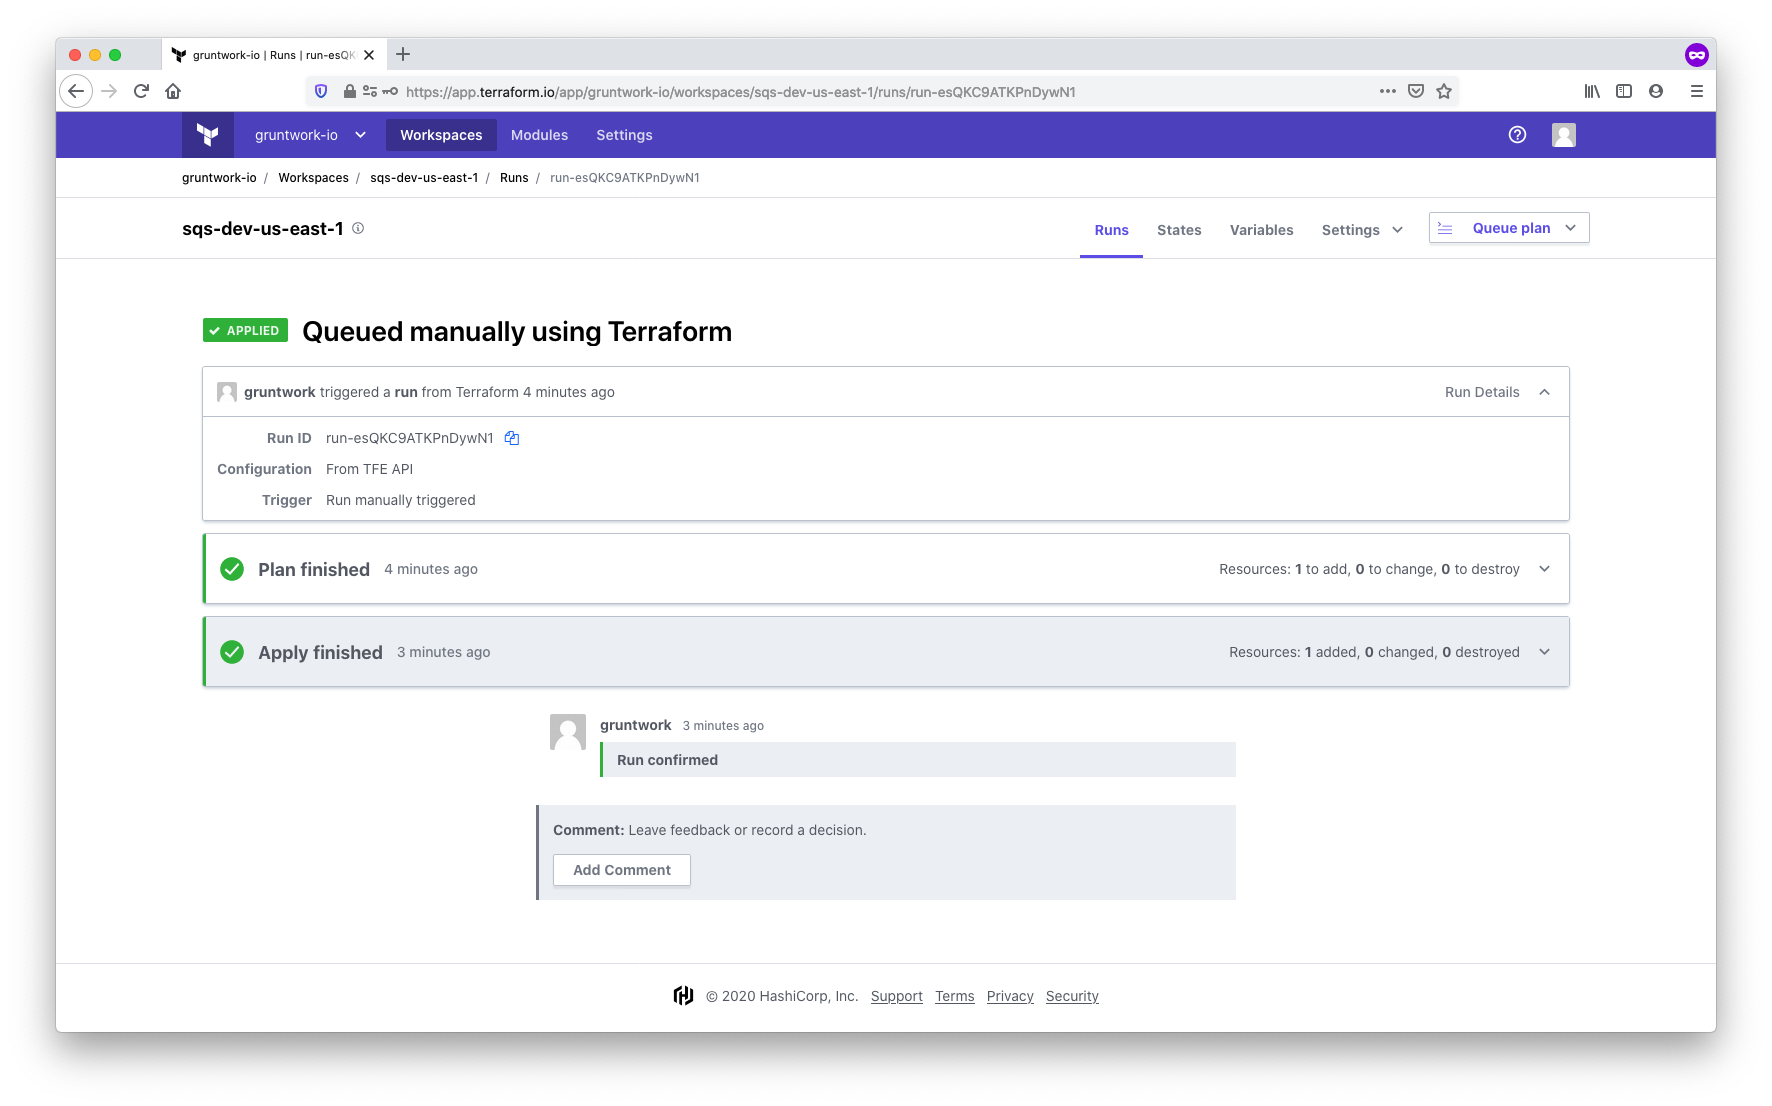
Other commands, such as destroy, work in the same way.
Summarizing Terragrunt and TFC/TFE compatibility
Using the combination of features above, you can effectively use Terragrunt with TFC or TFE as a remote backend.
Terragrunt can generate backend blocks and tfvars files. Commands like terragrunt apply-all will operate in the same
way as they do without TFC/TFE, calling each module dependency in order, and allowing for passing outputs between
modules. Workspaces must be created in advance so that you can set up credentials for access to the cloud.
Happy Terragrunting!
Using scripts and binaries
This section will show you how to use scripts and binaries from the Gruntwork Infrastructure as Code Library. As illustrative examples,
we’ll deploy the ip-lockdown script and ssh-grunt binary from
module-security.
|
Important
|
You must be a Gruntwork subscriber to access module-security.
|
- ip-lockdown
-
ip-lockdownis a Bash script you can use to lock down specific outgoing IP addresses on a Linux server so only whitelisted OS users can access them. The main motivation is to lock down the metadata endpoint on EC2 instances so only specific users (e.g., root) can access it—and thereby access the attached IAM permissions—rather than just any user who happens to get access to the EC2 instance. - ssh-grunt
-
ssh-gruntis a binary (compiled from Go code) that allows you to manage SSH access to your EC2 instances using an identity provider such as AWS IAM or any SAML-based identity provider (e.g., Active Directory, Google, Okta, etc.). This allows you to grant access to specific EC2 instances by putting developers into certain groups (e.g., into specific IAM groups or AD groups) and for each developer to SSH to EC2 instances using their own username and SSH key.
Let’s walk through how to use these two tools.
Gruntwork Installer
The easiest way to install scripts and binaries from the Gruntwork Infrastructure as Code Library is to use the
Gruntwork Installer. This is an open source Bash script that
allows you to install scripts and binaries via a one-liner, similar to apt-get install or yum install (if you’re
curious why we don’t use apt or yum directly, see
Gruntwork Installer Motivation).
The first step is to install the Gruntwork Installer itself, which you can do as follows (make sure to replace
<VERSION> below with the latest version from the
Gruntwork Installer releases page):
curl -LsS https://raw.githubusercontent.com/gruntwork-io/gruntwork-installer/master/bootstrap-gruntwork-installer.sh | bash /dev/stdin --version <VERSION>Now you can install any script XXX at version YYY from repo ZZZ of the Gruntwork Infrastructure as Code Library as follows:
gruntwork install --module-name XXX --tag YYY --repo ZZZAnd you can install any binary XXX at version YYY from repo ZZZ of the Gruntwork Infrastructure as Code Library as follows:
gruntwork install --binary-name XXX --tag YYY --repo ZZZNote that if repo ZZZ is a private GitHub repo (which module-security is), you’ll need to authenticate by setting
your GitHub personal access token
as the environment variable GITHUB_OAUTH_TOKEN:
export GITHUB_OAUTH_TOKEN=(YOUR_TOKEN)Once you’ve set this token, to install the ip-lockdown script and ssh-grunt binary, you run the following (make
sure to replace <VERSION> with the latest version from the
module-security releases page):
gruntwork install \
  --module-name ip-lockdown \
  --tag <VERSION> \
  --repo https://github.com/gruntwork-io/module-security

gruntwork install \
  --binary-name ssh-grunt \
  --tag <VERSION> \
  --repo https://github.com/gruntwork-io/module-security
Now that you know how to use Gruntwork Installer, let’s talk about where to use it. Your goal is to install the scripts and binaries onto your servers (e.g., EC2 instances, compute instances). To do this, we recommend following Immutable infrastructure practices, and creating versioned, immutable images using Packer and/or Docker, as described in the next two sections.
Building images with Packer
If you want to build machine images with scripts and binaries from the Gruntwork Infrastructure as Code Library, such as an Amazon Machine Image (AMI) for use in AWS, you can use Packer.
Packer basics
Here’s an example of how to use gruntwork-install in a Packer template:
{
  "variables": {
    "github_auth_token": "{{env `GITHUB_OAUTH_TOKEN`}}"
  },
  "builders": [{
    "type": "amazon-ebs",
    "ami_name": "packer-example-{{timestamp}}",
    "region": "us-east-2",
    "source_ami_filter": {
      "filters": {
        "virtualization-type": "hvm",
        "architecture": "x86_64",
        "name": "ubuntu/images/hvm-ssd/ubuntu-bionic-18.04-amd64-server-*",
        "block-device-mapping.volume-type": "gp2",
        "root-device-type": "ebs"
      },
      "owners": [
        "099720109477"
      ],
      "most_recent": true
    },
    "instance_type": "t2.micro",
    "ssh_username": "ubuntu"
  }],
  "provisioners": [{
    "type": "shell",
    "inline": [
      "curl -LsS https://raw.githubusercontent.com/gruntwork-io/gruntwork-installer/master/bootstrap-gruntwork-installer.sh | bash /dev/stdin --version v0.0.22",
      "gruntwork install --module-name ip-lockdown --tag v0.18.4 --repo https://github.com/gruntwork-io/module-security",
      "gruntwork install --binary-name ssh-grunt --tag v0.18.4 --repo https://github.com/gruntwork-io/module-security"
    ],
    "environment_vars": [
      "GITHUB_OAUTH_TOKEN={{user `github_auth_token`}}"
    ]
  }]
}
A few things to notice about this Packer template:
-
The
typeof the builder isamazon-ebs, so this Packer template can be used to build an AMI. -
The
source_ami_filteris configured to find the latest Ubuntu 18.04 AMI to use as the base for this image. -
The GitHub personal access token is read from the environment variable
GITHUB_OAUTH_TOKEN(it is NOT hard-coded into the Packer template itself, as you should never store secrets in plain text) and passed to theshellprovisioner. -
The
shellprovisioner installs the Gruntwork Installer and then uses it to installip-lockdownandssh-gruntat specific versions.
Manually testing a Packer template
To build a machine image from a Packer template, you authenticate to a sandbox environment for testing and run:
export GITHUB_OAUTH_TOKEN=(YOUR_TOKEN)
packer build packer-example.json
At the end of the build, Packer will output the ID of your new image (e.g., the new AMI ID). You can then test the image works as you expect by deploying it into a sandbox environment. You can deploy manually or via an automated process, as described in Deploying Packer images.
Automated tests for a Packer template
Just as with Automated tests for Terraform code, you can use Terratest to create automated tests for your Packer template. These are typically integration tests that:
-
Build an artifact using Packer.
-
Deploy the artifact on top of real infrastructure (e.g., deploy the artifact onto real EC2 instances in AWS). Often, this is done by using Terraform code, passing in the artifact ID as an input variable.
-
Validate infrastructure works as expected.
-
Undeploy the infrastructure.
-
Delete the artifact.
Take a look at terraform_packer_example_test.go for an example of an automated test that implements this exact pattern. Check out the Automated tests for Terraform code section for instructions on how to write and run tests written with Terratest.
Using Docker for faster testing
Building machine images in the cloud (i.e., in AWS) can take a while, as you have to fire up a virtual server, run your provisioners, snapshot the server, shut it down, etc. This can add a few minutes of overhead to each Packer build. One way to speed it up for local testing is to add a Docker builder to your Packer template that uses the same base OS image. This will allow you to run the build completely locally and run the resulting image locally too (see Manually testing a Docker image), both of which can dramatically improve iteration speed. Once the Docker image is working fully, you can then build the machine image you want, with most of the errors in your template already resolved.
See Iterating locally using Docker for more details.
Deploying Packer images
Now that your Packer template has been thoroughly tested, you can deploy machine images to your real environments
(e.g., staging and production). There are many ways to deploy machine images. We recommend using Terraform modules,
as explained in Using Terraform Modules. For example, you can use the following modules, which allow you to specify
the machine image (i.e., AMI) to deploy via an input variable (e.g., ami_id):
-
AWS Auto Scaling Group: use the asg-rolling-deploy module for stateless apps that need auto scaling, auto healing, and zero-downtime rolling deployment; use the server-group module for stateful apps that need auto healing, zero-downtime rolling deployment, and persistent EBS volumes and ENIs. Both of these modules are part of
module-asg.ImportantYou must be a Gruntwork subscriber to access module-asg. -
Single EC2 Instance: use the single-server module to run a single EC2 instance that can attach persistent EBS volumes and ENIs. This module is part of
module-server.ImportantYou must be a Gruntwork subscriber to access module-server.Note that a single server is a single point of failure, so we generally recommend using one of the Auto Scaling Group modules instead, even just for one server, so you get auto healing and zero-downtime deployment.
Updating Packer templates
Now that you have your Packer images deployed, you can pull in updates as follows:
-
Subscribe to the monthly Gruntwork Newsletter to be notified of all updates to the Gruntwork Infrastructure as Code Library. Alternatively, you can "watch" repos in GitHub that you’re interested in.
-
When you find an update you’d like for a specific module, update any code using that module in your Packer templates to the new version number. For example, if you were using
module-securityatv0.18.3and you wanted to update tov0.18.4, you would change from:"gruntwork install --module-name ip-lockdown --tag v0.18.3 --repo https://github.com/gruntwork-io/module-security"to:
"gruntwork install --module-name ip-lockdown --tag v0.18.4 --repo https://github.com/gruntwork-io/module-security" -
Pay close attention to the release notes for any additional instructions. In particular, if the MINOR version number was increased (e.g.,
v0.17.0→v0.18.0), that implies a backwards incompatible change, and the release notes will explain what you need to do (e.g., you might have to add, remove, or change arguments you pass to the module). -
Tests your changes locally. You do this using the same process outlined in Manually testing a Packer template and Automated tests for a Packer template.
-
Deploy your changes to each environment. You do this using the same process outlined in Deploying Packer images.
Building images with Docker
If you want to build Docker images with scripts and binaries from the Gruntwork Infrastructure as Code Library, you can create a
Dockerfile.
Dockerfile basics
Here’s an example of how to use gruntwork-install in a Dockerfile:
# This is an intermediate stage. We can safely pass secrets into it, as this stage will be thrown away.
FROM ubuntu:18.04 as intermediate

# You must set a GitHub personal access token as a build arg. This will be used to access the private gruntwork-io
# GitHub repos
ARG GITHUB_OAUTH_TOKEN
RUN if [ -z "$GITHUB_OAUTH_TOKEN" ]; then echo "ERROR: You must set GITHUB_OAUTH_TOKEN as a Docker build arg."; exit 1; fi

RUN curl -LsS https://raw.githubusercontent.com/gruntwork-io/gruntwork-installer/master/bootstrap-gruntwork-installer.sh | bash /dev/stdin --version v0.0.22 && \
    gruntwork install --module-name ip-lockdown --tag v0.18.4 --repo https://github.com/gruntwork-io/module-security && \
    gruntwork install --binary-name ssh-grunt --tag v0.18.4 --repo https://github.com/gruntwork-io/module-security

# This is the real Docker image that will be created in the end. It just carefully copies code from the intermediate.
# Note that the secrets from the intermediate will NOT be copied and published.
FROM ubuntu:18.04

# Copy just what we need from the intermediate image
COPY --from=intermediate /usr/local/bin/ip-lockdown /usr/local/bin/ip-lockdown
COPY --from=intermediate /usr/local/bin/ssh-grunt /usr/local/bin/ssh-grunt
A few things to notice about this Packer template:
-
We are using a multi-stage build. This ensures that the GitHub personal access token, which is passed in as a build argument, does not get stored in the final Docker image.
-
The GitHub personal access token is passed in as a Docker build arg to the first stage. This stage is therefore able to run
gruntwork-installagainst private repos. -
The second stage copies just the installed scripts/binaries from the first stage. Note that none of the build arguments get copied, so they will NOT end up in the final Docker image.
Building a Docker image
To build a Docker image from a Dockerfile, you run:
docker build --build-arg GITHUB_OAUTH_TOKEN=<YOUR_TOKEN> -t <IMAGE_NAME>:<IMAGE_TAG> .where:
- YOUR_TOKEN
-
Your GitHub personal access token.
- IMAGE_NAME
-
The name to use for the image. When using Docker Hub as a Docker Registry (more on registries below), this is typically of the format
<ORG>/<NAME>, whereORGis your organization name andNAMEis the name for this image (e.g.,gruntwork-io/example-image). When using ECR as a Docker Registry, this will be a URL of the form<ACCOUNT_ID>.dkr.ecr.<REGION>.amazonaws.com/<NAME>, whereACCOUNT_IDis your AWS account ID,REGIONis the AWS region where the ECR repo lives, andNAMEis the name for this image (e.g.,111122223333.dkr.ecr.us-east-2.amazonaws.com/example-image). - IMAGE_TAG
-
An optional tag to add to the image. This is often used for version numbers (e.g.,
v1).
Manually testing a Docker image
To manually test a Docker image, you run:
docker run <IMAGE_NAME>:<IMAGE_TAG>Where IMAGE_NAME and IMAGE_TAG are the name and tag for the Docker image you built earlier, as defined in
Building a Docker image. This will run the default command (CMD) defined in the Dockerfile. Sometimes, you may
want to override this command. For example, to fire up a Bash prompt in your Docker image, you can typically run the
following:
docker run -it <IMAGE_NAME>:<IMAGE_TAG> bashNote the -it flags to enable an interactive TTY so you can enter commands at the bash prompt.
If your Docker image needs to listen on a port, you can map this port to a port number on your host OS using the -p
flag:
docker run -p 80:8080 <IMAGE_NAME>:<IMAGE_TAG>

# In another terminal
curl localhost:8080
If you find yourself running a lot of Docker commands, and having to remember lots of command-line arguments and
environment variables to set for each one, look into using Docker Compose, which
allows you to define one or more Docker containers to run and all the parameters for each one in a YAML file, and then
run everything with a single docker-compose up.
Automated tests for Docker images
Just as with Automated tests for Terraform code, you can use Terratest to create automated tests for your Docker images. These are typically integration tests that:
-
Build a Docker image.
-
Deploy the Docker image, either by running
docker run,docker-compose up, or deploying it via a Docker orchestration tool such as Kubernetes (more on this in Deploying Docker images). -
Validate the Docker image works as expected.
-
Undeploy the Docker image.
Take a look at kubernetes_basic_example_service_check_test.go for an example of an automated test that implements this exact pattern. Check out the Automated tests for Terraform code section for instructions on how to write and run tests written with Terratest.
Publishing Docker images to a registry
To be able to use your Docker images beyond a single computer, you can publish them to a Docker Registry. The most popular options are:
-
Amazon ECR: Recommended for AWS users.
-
Docker Hub: Recommended for open source.
The general workflow is:
-
Login to your Docker Registry:
docker login. Check your Registry’s documentation for authentication details. -
Build your Docker image:
docker build -t <IMAGE_NAME>:<IMAGE_TAG> . -
Push your Docker image to the Registry:
docker push <IMAGE_NAME>:<IMAGE_TAG>.
Deploying Docker images
Now that your Docker image has been thoroughly tested and pushed to a Docker Registry, you can deploy it to your real environments (e.g., staging and production). There are many ways to deploy Docker images, so in this guide, we’ll highlight just the following ones:
- Kubernetes
-
To deploy your Docker image to Kubernetes, you’ll first need to set up a Kubernetes cluster. For AWS, we recommend using terraform-aws-eks to deploy an EKS cluster.
ImportantYou must be a Gruntwork subscriber to access terraform-aws-eks.Once you have a working cluster, there are a number of ways to deploy Docker images. The basic version is to run
kubectl applyand pass it a YAML manifest. However, most teams find this too verbose and repetitive, so a more DRY option is to use something like Helm. To run Helm, we recommend using terraform-kubernetes-helm and helm-kubernetes-services. - ECS
-
To deploy your Docker image to ECS, you’ll first need to set up an ECS cluster, which you can do using the ecs-cluster module in
module-ecs.ImportantYou must be a Gruntwork subscriber to access module-ecs.Once you have a working cluster, you can deploy your Docker image using one of the
ecs-service-xxxmodules inmodule-ecs, such asecs-service-with-alborecs-daemon-service. - Fargate
-
To deploy a Docker image using Fargate, you’ll first need to set up a Fargate cluster. You can do this by directly using the aws_ecs_cluster Terraform resource, as Fargate will manage all the worker nodes for you. Once you’ve created the cluster, you can deploy your image using the ecs-fargate module in
module-ecs.ImportantYou must be a Gruntwork subscriber to access module-ecs.
Updating Docker images
Now that you have your Docker images deployed, you can pull in updates as follows:
-
Subscribe to the monthly Gruntwork Newsletter to be notified of all updates to the Gruntwork Infrastructure as Code Library. Alternatively, you can "watch" repos in GitHub that you’re interested in.
-
When you find an update you’d like for a specific module, update any code using that module in your
Dockerfilesto the new version number. For example, if you were usingmodule-securityatv0.18.3and you wanted to update tov0.18.4, you would change from:RUN gruntwork install --module-name ip-lockdown --tag v0.18.3 --repo https://github.com/gruntwork-io/module-securityto:
RUN gruntwork install --module-name ip-lockdown --tag v0.18.4 --repo https://github.com/gruntwork-io/module-security -
Pay close attention to the release notes for any additional instructions. In particular, if the MINOR version number was increased (e.g.,
v0.17.0→v0.18.0), that implies a backwards incompatible change, and the release notes will explain what you need to do (e.g., you might have to add, remove, or change arguments you pass to the module). -
Tests your changes locally. You do this using the same process outlined in Manually testing a Docker image and Automated tests for Docker images.
-
Deploy your changes to each environment. You do this using the same process outlined in Deploying Docker images.
Gruntwork Installer alternatives
The Gruntwork Installer may not be a good fit for all companies, either because it’s a Bash script, so it won’t work on
Windows, or perhaps due to security concerns (see
Gruntwork Installer Security). If that’s the case, your
best alternative is to copy the script (from the modules folder of the repo) or binary (from the releases page of
the repo) you’re interested in directly to your own repositories, so it’s a local file for your builds. This will allow
you to use, for example, the file provisioner in Packer to copy it into your machine images, or the COPY command in
Docker to copy it into your Docker images.
Note that the major drawback of copying these files is that you’ll have to manually pull in new versions any time the Gruntwork Infrastructure as Code Library is updated.
Packer and Docker alternatives
Although this guide outlines how to use Docker and Packer, you can also use the scripts and binaries in the Gruntwork Infrastructure as Code Library and the Gruntwork Installer with any other configuration management strategy, such as Chef, Ansible, Puppet, or Salt. Check the docs for your chosen configuration management tool on how to copy and execute scripts and binaries.
Using Helm Charts
This section will show you how to use Helm charts from the Gruntwork Infrastructure as Code Library. As an illustrative
example, we’ll deploy the official Nginx docker container using the k8s-service helm chart from
helm-kubernetes-services.
You can use this Helm chart to deploy any web or worker service Docker container onto Kubernetes.
Add Gruntwork Helm chart repository
The Helm charts in the Gruntwork Infrastructure as Code Library are distributed using a Helm Chart Repository. In order to access Helm charts that are a part of the Gruntwork Helm chart repository, you will need to add the repository for use with your client:
helm repo add gruntwork https://helmcharts.gruntwork.ioOnce the repository is added, you can install any chart that is a part of the repository by accessing them under the
namespace gruntwork. To find the available charts distributed by a particular repository, you can use the search
command from the helm client:
helm search gruntworkThis will query the Gruntwork Helm chart repository for information on all the available charts distributed by the repository, showing you a list similar to below:
NAME                    CHART VERSION   APP VERSION     DESCRIPTION
gruntwork/k8s-service   v0.0.10                         A Helm chart to package your application container for Ku...
Deploying a chart
Unlike most charts in the community, Helm charts that are a part of the Gruntwork Infrastructure as Code Library have a
set of required input values. Therefore, you can not run helm install CHART_NAME to install a chart on to your
Kubernetes cluster.
Each of the charts document the required and optional input values in the corresponding values.yaml file for the
chart. You can access the values.yaml of a chart either by inspecting the source code for the chart, or using the helm
inspect command. For example, to see the values of the k8s-service chart, you can run:
helm inspect values gruntwork/k8s-serviceYou can use this as a starting point to construct your own values.yaml file:
helm inspect values gruntwork/k8s-service > values.yamlYou can then open up this values.yaml file and fill in the required and optional parameters. For k8s-service, the two required
parameters are containerImage and applicationName. For this example, we can fill in the official Nginx container
from Docker Hub for the containerImage and nginx for the applicationName:
#----------------------------------------------------------------------------------------------------------------------
# CHART PARAMETERS
#----------------------------------------------------------------------------------------------------------------------

#----------------------------------------------------------------------------------------------------------------------
# REQUIRED VALUES
# These values are expected to be defined and passed in by the operator when deploying this helm chart.
#----------------------------------------------------------------------------------------------------------------------

# containerImage is a map that describes the container image that should be used to serve the application managed by
# this chart.
containerImage:
  repository: nginx
  tag: 1.16.1

# applicationName is a string that names the application. This is used to label the pod and to name the main application
# container in the pod spec. The label is keyed under "gruntwork.io/app-name"
applicationName: "nginx"
Note that you are free to override any default parameters in the values.yaml file. When you install the chart, this
values.yaml file is merged with the default values.yaml file distributed with the chart, allowing you to override
those parameters.
Once you have a values.yaml that specifies all the inputs, you can install the chart using those as inputs:
helm install -n nginx -f values.yaml gruntwork/k8s-serviceThis will render the yaml files in the chart using the input values as parameters and apply it onto the Kubernetes cluster.
|
Important
|
In the previous example, we passed in the parameter -n nginx to the install command. This allows us to
force a release name for the deployment. When you install a chart using Helm, Helm tracks that deployment as a
release and binds all the related resources under a unique name. If you don’t provide a release name, Helm will
automatically generate a random name that is not related to the charts (e.g witty-lobster). This makes maintenance
difficult as you will need to refer to this release name any time you want to make changes to the deployment.
|
Updating a previous deployment
Once a chart is installed and deployed, you can use the update command to make changes to it. For example, if you
wanted to deploy an updated version of Nginx using our example, you can update the values.yaml file to point to a
later version, and then run helm update with the updated input values and release name:
helm upgrade -f values.yaml nginx gruntwork/k8s-serviceThis command will render the gruntwork/k8s-service chart using the updated input values, and then replace the
resources under the Helm release nginx.
You can also use the upgrade command to update to a later version of the chart:
helm upgrade -f values.yaml --version v0.0.10 nginx gruntwork/k8s-serviceThe above command will use version v0.0.10 of the gruntwork/k8s-service chart when rendering the values.
Contributing to the Gruntwork Infrastructure as Code Library
Contributions to the Gruntwork Infrastructure as Code Library are very welcome and appreciated! If you find a bug or want to add a new feature or even contribute an entirely new module, we are very happy to accept pull requests, provide feedback, and run your changes through our automated test suite.
This section outlines the process for contributing.
File a GitHub issue
Before starting any work, we recommend filing a GitHub issue in the appropriate repo. This is your chance to ask questions and get feedback from the maintainers and the community before you sink a lot of time into writing (possibly the wrong) code. If there is anything you’re unsure about, just ask!
Update the documentation
We recommend updating the documentation before updating any code (see Readme Driven Development). This ensures the documentation stays up to date and allows you to think through the problem at a high level before you get lost in the weeds of coding.
Update the tests
We also recommend updating the automated tests before updating any code (see
Test Driven Development). That means you add or update a test
case, verify that it’s failing with a clear error message, and then make the code changes to get that test to pass.
This ensures the tests stay up to date and verify all the functionality in the repo, including whatever new
functionality you’re adding in your contribution. The test folder in every repo will have documentation on how to run
the tests locally.
Update the code
At this point, make your code changes and use your new test case to verify that everything is working.
Create a pull request
Create a pull request with your changes. Please make sure to include the following:
-
A description of the change, including a link to your GitHub issue.
-
Any notes on backwards incompatibility.
Merge and release
The maintainers for the repo will review your code and provide feedback. If everything looks good, they will merge the code and release a new version.
Forking the Gruntwork Infrastructure as Code Library
The Gruntwork Terms of Service give you permissions to fork the code from the Gruntwork Infrastructure as Code Library into your own repos. This is useful if your company does not allow external dependencies (e.g., you have a company policy that requires all source code to be pulled from an internal GitHub Enterprise or BitBucket server) or if you need to make modifications to the Infrastructure as Code Library that you do not wish to contribute back to Gruntwork. This section will walk you through what you need to do to fork the code.
|
Important
|
The definition of an Authorized User from the Gruntwork Terms of Service does NOT change if you fork the code. That is, if you create internal forks and give 50 users access to those internal forks, then the Gruntwork License requires that you pay for 50 Authorized Users. |
How to fork the code
Here is how you fork the code in the Gruntwork Infrastructure as Code Library:
-
Copy each Gruntwork repo into your private repositories.
-
You’ll also want to copy all the versioned releases (see the
/releasespage for each repo). -
For repos that contain pre-built binaries (such as
ssh-gruntmentioned earlier), you’ll want to copy those binaries as well. -
Within each repo, search for any cross-references to other Gruntwork repos. Most of the repos are standalone, but some of the Terraform and Go code is shared across repos (e.g., the
package-kafkaandpackage-zookeeperrepos use themodule-asgrepo under the hood to run an Auto Scaling Group). You’ll need to update Terraform source URLs and Go import statements fromgithub.com/gruntwork-ioto your private Git repo URLs.
You’ll want to automate the entire process above and run it on a regular schedule (e.g., daily). The Gruntwork Infrastructure as Code Library is updated continuously, both by the Gruntwork team and contributions from our community of customers (see the monthly Gruntwork Newsletter for details), so you’ll want to pull in these updates as quickly as you can.
How to use your forked code
Once you’ve forked the code, using it in is very similar to what is outlined in Using Terraform Modules and Using scripts and binaries, except for the following differences:
-
Point the
sourceURLs of your Terraform modules to your own Git repos, rather than thegruntwork-ioGitHub org. -
Point the
--repoparameter ofgruntwork-installto your own Git repos, rather than thegruntwork-ioGitHub org.
Drawbacks to forking
While forking is allowed under the Gruntwork Terms of Services, it has some downsides:
-
You have to do a lot of work up-front to copy the repos, releases, and pre-compiled binaries and update internal links.
-
You have to do more work to run this process on a regular basis and deal with merge conflicts.
-
If your team isn’t directly using the Gruntwork GitHub repos on a regular basis, then you’re less likely to participate in issues and pull requests, and you won’t be benefiting as much from the Gruntwork community.
So, whenever possible, use the code directly from the gruntwork-io GitHub org, as documented in
Using Terraform Modules and Using scripts and binaries. If your team relies on NPM, Docker Hub, Maven Central,
GitHub, or the Terraform Registry, using Gruntwork repos directly is no different. However, if your company completely
bans all outside sources, then follow the instructions above to fork the code, and good luck!
Operating system compatibility
Here’s a summary of the operating systems supported by Gruntwork the Gruntwork Infrastructure as Code Library as of August, 2019:
- Terraform modules
-
Just about all the Terraform modules in the Gruntwork Infrastructure as Code Library work on all major operating systems. However, there are a handful of modules where we have to call out to scripts from our Terraform code. Most of these scripts are Python and work on all major operating systems (as long as Python is installed), but there are a couple places where we call Bash code (mostly
sleep 30to work around Terraform bugs). If you run into a portability issue, please report it as a bug, and we’ll get it fixed! - Go binaries
-
The Gruntwork Infrastructure as Code Library includes a number of dev tools written in Go which are compiled into standalone binaries for every major operating system. This applies to tools such as
Terragrunt,cloud-nuke,openvpn-admin,houston,gruntkms,ssh-grunt,gruntsam, andkubergrunt. - Linux server scripts
-
There are a number of scripts in the Gruntwork Infrastructure as Code Library that are meant to be installed and executed on Linux servers in AWS. These include
install-xxxandrun-xxxscripts (e.g.,install-vault,run-vault,install-kafka,run-kafka,install-elasticsearch,run-elasticsearch, etc.), CI / CD scripts (e.g.,aws-helpers,build-helpers,circleci-helpers,git-helpers,terraform-helpers), and server scripts (e.g.,attach-eni,mount-ebs-volume,add-dns-a-record). See Using scripts and binaries for how these scripts are meant to be installed and used. - Deployment scripts
-
There are a handful of deployment scripts in the Gruntwork Infrastructure as Code Library that are meant to be executed by a developer directly, such as the
roll-out-ecs-cluster-update.pyscript used to do zero-downtime rolling deployments for ECS clusters. These scripts are written in Python and should work on all major operating systems. - Need Windows support?
-
While Windows users can use most of the Gruntwork Infrastructure as Code Library, the vast majority of Gruntwork customers use Linux or Mac, so we haven’t prioritized improving our Windows support. If you would like us to improve our Windows support, please contact us.
Next steps
Now that you’ve learned how to use the Gruntwork Infrastructure as Code Library, you can start leveraging it to build your infrastructure! Here are some good first steps:

Comments