

Intro
This guide will walk you through the process of configuring a production-grade AWS account structure, including how to manage multiple environments, users, permissions, and audit logging. We’ll also discuss how to implement a Landing Zone solution that lets you quickly spin up new AWS accounts that all implement a security baseline that enforces your company’s policies.
What is an AWS account structure?
To use AWS, you sign up for an AWS account. An AWS account structure is an organized collection of inter-connected AWS accounts designed to run production workloads.
Configuring an AWS account structure serves three primary purposes:
- Isolation (AKA compartmentalization)
-
You use separate AWS accounts to isolate different environments from each other and to limit the "blast radius" when things go wrong. For example, putting your staging and production environments in separate AWS accounts ensures that if an attacker manages to break into staging, they still have no access whatsoever to production. Likewise, this isolation ensures a developer making changes in staging is less likely to accidentally break something in production.
- Authentication and authorization
-
If you configure your AWS account structure correctly, you’ll be able to manage all user accounts in one place, making it easier to enforce password policies, multi-factor authentication, key rotation, and other security requirements. Using multiple AWS accounts also makes it easier to have fine-grained control over what permissions each developer gets in each environment.
- Auditing and reporting
-
A properly configured AWS account structure will allow you to maintain an audit trail of all the changes happening in all your environments, check if you’re adhering to compliance requirements, and detect anomalies. Moreover, you’ll be able to have consolidated billing, with all the charges for all of your AWS accounts in one place, including cost breakdowns by account, service, tag, etc.
What you’ll learn in this guide
This guide consists of four main sections:
- Core concepts
-
An overview of the core concepts you need to understand to set up an AWS account structure, including AWS Organizations, IAM Users, IAM Roles, IAM Groups, CloudTrail, and more.
- Production-grade design
-
An overview of how to configure a secure, scalable, highly available AWS account structure that you can rely on in production. To get a sense of what production-grade means, check out The production-grade infrastructure checklist.
- Deployment walkthrough
-
A step-by-step guide to configuring a production-grade AWS account structure using the Gruntwork AWS Landing Zone solution, including how to manage it all with customizable security baselines defined in Terraform.
- Next steps
-
What to do once you’ve got your AWS account structure configured.
Feel free to read the guide from start to finish or skip around to whatever part interests you.
Gruntwork AWS Landing Zone vs the alternatives
In June 2018, Amazon announced AWS Landing Zone, which solved three core problems:
-
Streamline the process of creating a new AWS account;
-
Configure that new AWS account according to best practices;
-
And make it possible to configure a best-practices multi-AWS-account setup.
Almost every AWS customer that creates more than a few accounts needs to solve these problems, so over time we saw additional solutions enter the market. We call all of these options "Landing Zone solutions" and when we evaluated them, we found that they varied along the following dimensions:
-
Customizability. Some users are content to stick with AWS’s default definition of "best practices" for how their newly created account should be configured, but other customers would like to add to, subtract from or modify that definition and some Landing Zones offer very little customization at all.
-
Automatable. Many users want to define their own custom pipeline for creating new AWS accounts, but not all Landing Zone solutions can be integrated into an arbitrary pipeline. For example, AWS Control Tower includes Landing Zone functionality, but does not expose any kind of API and is usable only from the management console.
-
UI-driven. Some AWS users want a first-class UI they can use to deploy new AWS accounts, but not all Landing Zone solutions expose a UI.
-
Terraform-native. Terraform users often want 100% of their deployed infrastructure to be codified in Terraform, but some Landing Zone solutions only offer support for CloudFormation or no infrastructure as code at all.
-
No dependencies. Some AWS Landing Zone solutions depend on purchasing related commercial products or services to have access to them or to make them work, whereas other Landing Zone solutions stand on their own without any third-party or related-service dependencies.
With these dimensions in mind, we set out to build a Landing Zone solution that:
-
Is fully customizable
-
Is easily automatable as part of a separate pipeline
-
Is 100% Terraform-native
-
Does not depend on any third-party products or related services
Because we use Terraform, we do not currently see the need for adding a first-class UI to our Landing Zone solution, however some users may wish to add UI or UI-like functionality through their CI system or other Terraform automation tools.
Core concepts
AWS account
To use AWS, you must create an AWS account. You do this by signing up at https://aws.amazon.com. Once you’ve created an account, it will get a unique, 12-digit AWS account ID (note: the account ID is not in and of itself a secret, so it’s OK to share it with trusted 3rd parties, but you might not want to go so far as to share it publicly on the Internet), and you will be logged into your new AWS account as the root user.
Root user
Each AWS account has exactly one root user:
- User name
-
The email address you provide when creating a new AWS account becomes the user name of your root user. This email address must be unique across ALL AWS accounts globally, so you can’t use the same email address to create multiple AWS accounts.
- Console password
-
When creating a new AWS account, you will create a console password that, along with the root user’s user name, you can use to login to the AWS console.
- Logging into the AWS console
-
After the initial sign up, if you wish to login as the root user, you have to go to https://console.aws.amazon.com and login using the root user’s email address and password.
- Access keys
-
The root user can optionally have a set of access keys, which are the credentials you use to login to your AWS account programmatically (e.g., on the command line or when making API calls). Access keys consist of two parts: an access key ID (for example,
AKIAIOSFODNN7EXAMPLE) and a secret access key (for example,wJalrXUtnFEMI/K7MDENG/bPxRfiCYEXAMPLEKEY). - Multi-Factor Authentication (MFA)
-
You can enable Multi-Factor Authentication (MFA) for the root user (strongly recommended), which will require you to provide not only the user name and password when logging in, but also a temporary, one-time token generated by either a virtual or physical MFA device (e.g., the Google Authenticator app, RSA key fob, or a YubiKey). This adds a strong second layer of security for your root user, as logging in now requires both something you know (the user name and password) and something you have (the virtual or physical MFA device). Note that, by default, if you enable MFA for a root user, the MFA token will only be required when logging in with the user name and console password in your web browser; you will NOT be required to provide an MFA token when logging in programmatically with access keys. If you want to require MFA tokens for programmatic access too (strongly recommended), you will need to use IAM policies, which are described later.
- Root permissions
-
The root user has access permissions to everything in your AWS account. By design, there’s almost no way to limit those permissions. This is similar in concept to the root or administrator user of an operating system. If your root user account gets compromised, the attacker will likely be able to take over everything in your account. Therefore, you typically only use the root user during initial setup to create IAM users (the topic of the next section) with more limited permissions, and then you’ll likely never touch the root user account again.
IAM users
In AWS, you use Identity and Access Management (IAM) to manage access to your AWS account. One of the things you can do in IAM is create an IAM user, which is an account a human being can use to access AWS.
- User name
-
Every IAM user in your AWS account must have a unique user name.
- Console password
-
Each IAM user can optionally have a console password. The user name and console password allows you to login as an IAM user to your AWS account in a web browser by using the IAM user sign-in URL.
- IAM user sign-in URL
-
Every AWS account has a unique IAM user sign-in URL. Note that to login as an IAM user, you do NOT go to https://console.aws.amazon.com, as that’s solely the sign-in URL for root users. Instead, IAM users will need to use a sign-in URL of the form
https://<ID_OR_ALIAS>.signin.aws.amazon.com/console, whereID_OR_ALIASis either your AWS account ID (e.g.,https://111122223333.signin.aws.amazon.com/console) or a custom account alias that you pick for your AWS account (e.g.,https://my-custom-alias.signin.aws.amazon.com/console). Whenever you create a new IAM user, make sure to send that IAM user their user name, console password, and the IAM user sign-in URL. - Access keys
-
Each IAM user can optionally have a set of access keys, which are the credentials you use to login to your AWS account programmatically (e.g., on the command line or when making API calls). Access keys consist of two parts: an access key ID (for example,
AKIAIOSFODNN7EXAMPLE) and a secret access key (for example,wJalrXUtnFEMI/K7MDENG/bPxRfiCYEXAMPLEKEY). - Multi-Factor Authentication (MFA)
-
Each IAM user can enable Multi-Factor Authentication (MFA) (strongly recommended), which will require you to provide not only the user name and console password when logging in, but also a temporary, one-time token generated by either a virtual or physical MFA device (e.g., the Google Authenticator app, RSA key fob, or a YubiKey). This adds a strong second layer of security for your IAM user, as logging in now requires both something you know (the user name and password) and something you have (the virtual or physical MFA device).
- Password policy
-
You can configure a password policy in your AWS account to enforce requirements on console passwords, such as minimum length, use of special characters, and password expiration.
- Permissions
-
By default, a new IAM user does not have permissions to do anything in the AWS account (principle of least privilege). In order to grant this user permissions, you will need to use IAM policies, which are the topic of the next section.
IAM policies
You can use IAM policies to define permissions in your AWS account.
- IAM policy basics
-
Each IAM policy is a JSON document that consists of one or more statements, where each statement can allow or deny specific principals (e.g., IAM users) to perform specific actions (e.g.,
ec2:StartInstances,s3:GetObject) on specific resources (e.g., EC2 instances, S3 buckets). Here’s an example IAM policy that allows an IAM user namedBobto performs3:GetObjecton an S3 bucket calledexamplebucket:{ "Version":"2012-10-17", "Statement": [ { "Effect":"Allow", "Principal": {"AWS": ["arn:aws:iam::111122223333:user/Bob"]}, "Action":["s3:GetObject"], "Resource":"arn:aws:s3:::examplebucket/*" } ] } - Managed policies
-
Each AWS account comes with a number of managed policies, which are pre-defined IAM policies created and maintained by AWS. These included policies such as
AdministratorAccess(full access to everything in an AWS account),ReadOnlyAccess(read-only access to everything in an AWS account),AmazonEC2ReadOnlyAccess(read-only access to solely EC2 resources in an AWS account), and many others. AWS managed policies are owned by AWS and cannot be modified or removed. - Customer-managed policies
-
While managed policies give you coarse-grained, generic permissions, to get more fine-grained, custom permissions, you can create custom IAM policies (known as customer-managed policies).
- Standalone policies
-
A standalone policy is an IAM policy that exists by itself and can be attached to other IAM entities. For example, you could create a single policy that gives access to a specific S3 bucket and attach that policy to several IAM users so they all get the same permissions.
- Inline policies
-
An inline policy is a policy that’s embedded within an IAM entity, and only affects that single entity. For example, you could create a policy embedded within an IAM user that gives solely that one user access to a specific S3 bucket.
IAM groups
An IAM group is a collection of IAM users. You can
attach IAM policies to an IAM group and all the users in that group will inherit the permissions from that policy.
Instead of managing permissions by attaching multiple IAM policies directly to each IAM user—which can become very hard
to maintain as the number of policies and users grows and your organization changes—you can create a relatively fixed
number of groups that represent your company’s structure and permissions (e.g., developers, admins, and billing)
and assign each IAM user to the appropriate IAM groups.
IAM roles
An IAM role is a standalone IAM entity that (a) allows you to attach IAM policies to it, (b) specify which other IAM entities to trust, and then (c) those other IAM entities can assume the IAM role to be temporarily get access to the permissions in those IAM policies. The two most common use cases for IAM roles are:
- Service roles
-
Whereas an IAM user allows a human being to access AWS resources, one of the most common use cases for an IAM role is to allow a service—e.g., one of your applications, a CI server, or an AWS service—to access specific resources in your AWS account. For example, you could create an IAM role that gives access to a specific S3 bucket and allow that role to be assumed by one of your EC2 instances. The code running on that EC2 instance will then be able to access that S3 bucket without you having to manually copy AWS credentials (i.e., access keys) onto that instance.
- Cross account access
-
Another common use case for IAM roles is to grant an IAM entity in one AWS account access to specific resources in another AWS account. For example, if you have an IAM user in account
A, then by default, that IAM user cannot access anything in accountB. However, you could create an IAM role in accountBthat gives access to a specific S3 bucket in accountBand allow that role to be assumed by an IAM user in accountA. That IAM user will then be able to access the contents of the S3 bucket by assuming the IAM role in accountB. This ability to assume IAM roles across different AWS accounts is the critical glue that truly makes a multi AWS account structure possible.
Here are some more details on how IAM roles work:
- IAM policies
-
Just as you can attach IAM policies to an IAM user and IAM group, you can attach IAM policies to an IAM role.
- Trust policy
-
You must define a trust policy for each IAM role, which is a JSON document (very similar to an IAM policy) that specifies who can assume this IAM role. For example, here is a trust policy that allows this IAM role to be assumed by an IAM user named
Bobin AWS account111122223333:{ "Version": "2012-10-17", "Statement": [ { "Effect": "Allow", "Action": "sts:AssumeRole", "Principal": {"AWS": "arn:aws:iam::111122223333:user/Bob"} } ] }Note that a trust policy alone does NOT automatically give Bob the ability to assume this IAM role. Cross-account access always requires permissions in both accounts. So, if Bob is in AWS account
111122223333and you want him to have access to an IAM role calledfooin account444455556666, then you need to configure permissions in both accounts: first, in account444455556666, thefooIAM role must have a trust policy that givessts:AssumeRolepermissions to account111122223333, as shown above; second, in account111122223333, you also need to attach an IAM policy to Bob’s IAM user that allows him to assume thefooIAM role, which might look like this:{ "Version": "2012-10-17", "Statement": [ { "Effect": "Allow", "Action": "sts:AssumeRole", "Resource": "arn:aws:iam::444455556666:role/foo" } ] } - Assuming an IAM role
-
IAM roles do not have a user name, password, or permanent access keys. To use an IAM role, you must assume it by making an
AssumeRoleAPI call (see the AssumeRole API and assume-role CLI command), which will return temporary access keys you can use in follow-up API calls to authenticate as the IAM role. The temporary access keys will be valid for 1-12 hours, depending on IAM role settings, after which you must callAssumeRoleagain to fetch new keys. Note that to make theAssumeRoleAPI call, you must first authenticate to AWS using some other mechanism. For example, for an IAM user to assume an IAM role, the workflow looks like this: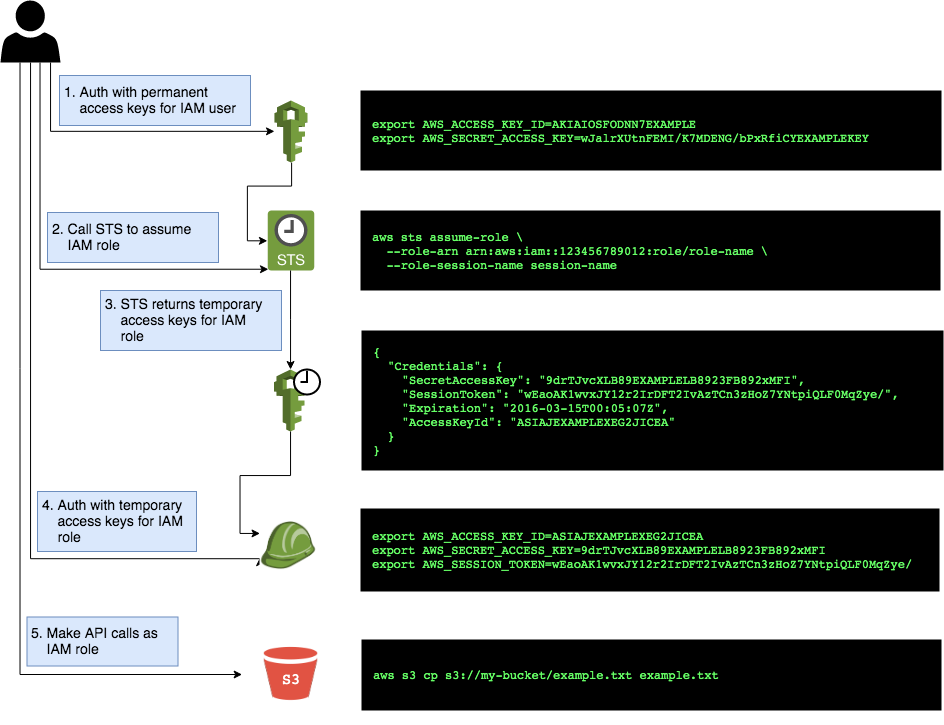 Figure 1. The process for assuming an IAM role
The basic steps are:
-
Authenticate using the IAM user’s permanent AWS access keys
-
Make the
AssumeRoleAPI call -
AWS sends back temporary access keys
-
You authenticate using those temporary access keys
-
Now all of your subsequent API calls will be on behalf of the assumed IAM role, with access to whatever permissions are attached to that role
-
- IAM roles and AWS services
-
Most AWS services have native support built-in for assuming IAM roles. For example, you can associate an IAM role directly with an EC2 instance, and that instance will automatically assume the IAM role every few hours, making the temporary credentials available in EC2 instance metadata. Just about every AWS CLI and SDK tool knows how to read and periodically update temporary credentials from EC2 instance metadata, so in practice, as soon as you attach an IAM role to an EC2 instance, any code running on that EC2 instance can automatically make API calls on behalf of that IAM role, with whatever permissions are attached to that role. This allows you to give code on your EC2 instances IAM permissions without having to manually figure out how to copy credentials (access keys) onto that instance. The same strategy works with many other AWS services: e.g., you use IAM roles as a secure way to give your Lambda functions, ECS services, Step Functions, and many other AWS services permissions to access specific resources in your AWS account.
Federated authentication
Federation allows you to authenticate to your AWS account using an existing identity provider (IdP), such as Google, Active Directory, or Okta, rather than IAM users. Since just about every single company already has all their user accounts defined in an IdP, this allows you to avoid having to:
-
Duplicate all those user accounts in the form of IAM users
-
Maintain and update user accounts in multiple places (e.g., when someone changes teams or leaves the company)
-
Manage multiple sets of credentials
There are several ways to configure your AWS account to support single sign-on (SSO), allowing you to authenticate using the users and credentials from your IdP:
- AWS Single Sign-On
-
AWS Single Sign-On is a managed service that allows you to configure SSO for IdPs that support SAML, such as Active Directory and Google. It provides a simple SSO experience for the AWS web console, although signing in on the command line requires multiple steps, including manually copy/pasting credentials.
- Gruntwork Houston
-
Gruntwork Houston allows you to configure SSO for IdPs that support SAML or OAuth, including Active Directory, Google, Okta, GitHub, and others. It provides a simple SSO experience for the AWS web console, command-line access, VPN access, and SSH access. Houston is currently in private beta, so if you’re interested, please email us to find out how to get access.
AWS Organizations
AWS Organizations gives you a central way to manage multiple AWS accounts. As you’ll see in Production-grade design, it’s a good idea to use multiple separate AWS accounts to manage separate environments, and AWS organizations is the best way to create and manage all of those accounts.
- Root account
-
The first AWS account you create is the root account (sometimes also called the master account). This will be the parent account for your organization. This account has powerful permissions over all child accounts, so you should strictly limit access to this account to a small number of trusted admins.
- Child account
-
You can use AWS Organizations to create one or more child accounts beneath the root account.
- Organization unit
-
You can group child accounts into one or more organization units. This gives you a logical way to group accounts: for example, if your company has multiple business units, then each business unit could be represented by one organization unit, and each organization unit can contain multiple child accounts that can be accessed solely by members of that business unit.
- Consolidated billing
-
All of the billing from the child accounts rolls up to the root account. This allows you to manage all payment details in a single account and to get a breakdown of cost by organization unit, child account, service type, etc.
- IAM roles
-
When creating a child account, you can configure AWS Organizations to create an IAM role within that account that allow users from the root account to access the child account. This allows you to manage the child accounts from the parent account without having to create an IAM user in every single child account.
- Service control policies
-
You can use Service control policies (SCPs) to define the maximum available permissions for a child account, overriding any permissions defined in the child account itself. For example, you could use SCPs to completely block a child account from using specific AWS regions (e.g., block all regions outside of Europe) or AWS services (e.g., Redshift or Amazon Elasticsearch), perhaps because those regions or services do not meet your company’s compliance requirements (e.g., PCI, HIPAA, GDPR, etc).
CloudTrail
AWS CloudTrail is a service you can use to log most of the activity within your AWS account. CloudTrail automatically maintains an audit log of all API calls for supported services in your AWS account, writing these logs to an S3 bucket, and optionally encrypting the data using KMS. It can be a good idea to enable CloudTrail in every AWS account, with the multi-region feature enabled, as the API call data is useful useful for troubleshooting, investigating security incidents, and maintaining audit logs for compliance.
AWS Config
AWS Config is a service that enables you to assess, audit, and evaluate the configurations of your AWS resources. You can use AWS Config to ensure that AWS resources are configured in a manner that is in compliance with your company policies or regulatory requirements. This enables you to simplify compliance auditing, security analysis, change management, and operational troubleshooting.
The way you specify your company’s policies is by using AWS Config Rules which are expressions of a desired configuration state, written in code and executed as Lambda functions. When a resource configuration changes, AWS Config fires the relevant Lambda functions to evaluate whether the configuration changes the state of compliance with the desired configuration. AWS has developed a set of pre-written rules called AWS Config Managed Rules, but you can also author your own custom rules.
GuardDuty
Amazon GuardDuty is a threat detection service that continuously monitors for malicious activity and unauthorized behavior in an AWS account. The service analyzes events across multiple AWS data sources, such as AWS CloudTrail, Amazon VPC Flow Logs, and DNS logs, and uses machine learning, anomaly detection, and integrated threat intelligence to identify and prioritize potential threats.
Production-grade design
With all the core concepts out of the way, let’s now discuss how to configure a production-grade AWS account structure that looks something like this:
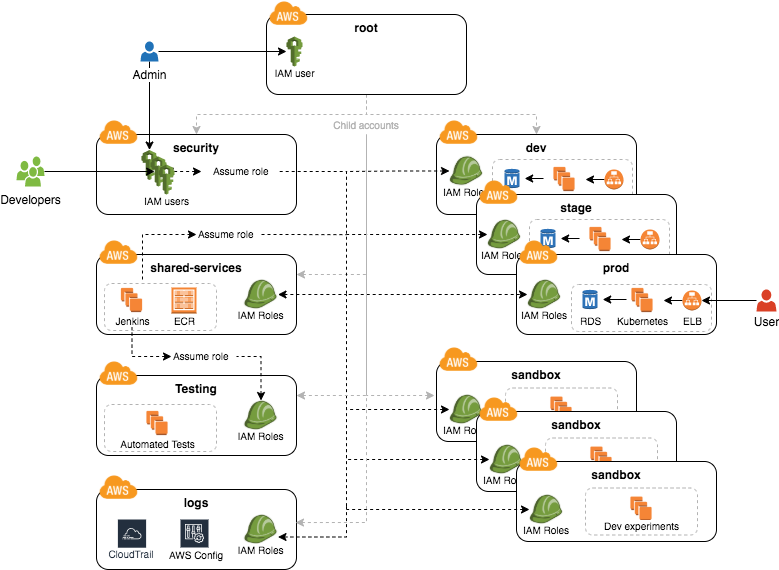
This diagram has many accounts as part of a multi-account security strategy. Don’t worry if it looks complicated: we’ll break it down piece by piece in the next few sections.
The root account
At the top of the design, you have the root account of your AWS organization. This account is not used to run any infrastructure, and only one or a small number of trusted admins should have IAM users in this account, using it solely to create and manage child accounts and billing.
Do NOT attach any IAM policies directly to the IAM users; instead, create a set of IAM groups, with specific IAM
policies attached to each group, and assign all of your users to the appropriate groups. The exact set of IAM groups
you need depends on your company’s requirements, but for most companies, the root account contains solely a
full-access IAM group that gives the handful of trusted users in that account admin permissions, plus a billing
IAM group that gives the finance team access to the billing details.
Child accounts
The admins in the root account can create the following child accounts in your AWS organization:
- Security account
-
You will want a single security account for managing authentication and authorization. This account is not used to run any infrastructure. Instead, this is where you define all of the IAM users and IAM groups for your team (unless you’re using Federated auth, as described later). None of the other child accounts will have IAM users; instead, those accounts will have IAM roles that can be assumed from the security account. That way, each person on your team will have a single IAM user and a single set of credentials in the security account (with the exception of the small number of admins who will also have a separate IAM user in the root account) and they will be able to access the other accounts by assuming IAM roles.
- Application accounts (dev, stage, prod)
-
You can have one or more application accounts for running your software. At a bare minimum, most companies will have a production account ("prod"), for running user-facing software, and a staging account ("stage") which is a replica of production (albeit with smaller or fewer servers to save money) used for internal testing. Some teams will have more pre-prod environments (e.g., dev, qa, uat) and some may find the need for more than one prod account (e.g., a separate account for backup and/or disaster recovery, or separate accounts to separate workloads with and without compliance requirements).
- Shared-services account
-
The shared-services account is used for infrastructure and data that is shared amongst all the application accounts, such as CI servers and artifact repositories. For example, in your shared-services account, you might use ECR to store Docker images and Jenkins to deploy those Docker images to dev, stage, and prod. Since the shared-services account may provide resources to (e.g., application packages) and has access to most of your other accounts (e.g., for deployments), including production, from a security perspective, you should treat it as a production account, and use at least the same level of precaution when locking everything down.
- Sandbox accounts
-
You may want to have one or more sandbox accounts that developers can use for manual testing. The application accounts (e.g., dev and stage) are usually shared by the whole company, so these sandbox accounts are intentionally kept separate so that developers can feel comfortable deploying and undeploying anything they want without fear of affecting someone else (in fact, the gold standard is one sandbox account per developer to keep things 100% isolated).
- Testing accounts
-
One other type of account that often comes in handy is a testing account that is used specifically for automated tests that spin up and tear down lots of AWS infrastructure. For example, at Gruntwork, we use Terratest to test all of our infrastructure code, and when testing something like our Vault modules, we end up spinning up and tearing down a dozen Vault and Consul clusters after every single commit. You don’t want all this infrastructure churn in your application or sandbox accounts, so we recommend having a separate AWS account dedicated for automated tests.
- Logs account
-
You will want a single logs account for aggregating log data. All the other accounts—root, security, application accounts, shared-services, etc.—will send their AWS Config and CloudTrail data to this account so that you have a single, central place where all logs are stored and can be viewed. This account will also contain a KMS customer master key (CMK) that is used to encrypt CloudTrail logs.
Note that for larger organizations with multiple separate business units, you may need to repeat the structure above multiple times. That is, in the root account, you create an Organization Unit for each business unit, and within each Organization Unit, you create a set of application, shared-services, sandbox, and testing accounts (security and logs accounts are usually shared across the entire organization). It’s not unusual for large organizations to have dozens or even hundreds of AWS accounts.
IAM roles for users
Whereas you’ll create IAM users within the security account (something we’ll discuss shortly), in all the other child accounts, you’ll solely create IAM roles that have a trust policy that allows these IAM roles to be assumed from the security account.
The exact set of IAM roles you need in each account depends on your company’s requirements, but here are some common ones:
- OrganizationAccountAccessRole
-
When creating a new child account using AWS Organizations, this is a role you create automatically that allows the admin users in the root account to have admin access to the new child account. This role is useful for initial setup of the new child account (e.g., to create other roles in the account) and as a backup in case you somehow lose access to the child account (e.g., someone accidentally deletes the other IAM roles in the account). Note that the name of this role is configurable, though we generally recommend sticking to a known default such as
OrganizationAccountAccessRole. - allow-full-access-from-other-accounts
-
This IAM role grants full access to everything in the child account. These are essentially admin permissions, so be very thoughtful about who has access to this IAM role.
- allow-read-only-access-from-other-accounts
-
This IAM role grants read-only access to everything in the child account.
- allow-dev-access-from-other-accounts
-
This IAM role grants "developer" access in the child account. The exact permissions your developers need depends completely on the use case and the account: e.g., in pre-prod environments, you might give developers full access to EC2, ELB, and RDS resources, whereas in prod, you might limit that solely to EC2 resources. For larger teams, you will likely have multiple such roles, designing them for specific teams or tasks: e.g.,
allow-search-team-access-from-other-accounts,allow-frontend-team-access-from-other-accounts,allow-dba-access-from-other-accounts, etc. - openvpn-allow-certificate-xxx-for-external-accounts
-
Important
This role only applies to Gruntwork subscribers who have access to package-openvpn. The
openvpn-allow-certificate-requests-for-external-accountsandopenvpn-allow-certificate-revocations-for-external-accountsIAM roles allows users to request and revoke VPN certificates, respectively, for an OpenVPN server running in the child account. This is part of the Gruntwork package-openvpn code, which deploys a production-grade OpenVPN server and allows developers with access to these IAM roles to request VPN certificates (self-service).
IAM users and groups
In the security account, you will need to create all the IAM users for your team. Do NOT attach any IAM policies directly to users; instead, create a set of IAM groups, with specific IAM policies attached to each group, and assign all of your users to the appropriate groups. The exact set of IAM groups you need depends on your company’s requirements, but here are some common ones:
- full-access
-
This IAM group gives users full access to everything in the security account. It should only be used for a small number of trusted admins who need to manage the users and groups within this account.
- _account-<ACCOUNT>-<ROLE>
-
These IAM groups are how you grant IAM users in the security account access to other child accounts. For each AWS account
<ACCOUNT>, and each IAM role<ROLE>in that account, you have a group that grantssts:AssumeRolepermissions for that role: e.g., users you add to the_account-dev-full-accessgroup will getsts:AssumeRolepermissions to theallow-full-access-from-other-accountsIAM role in thedevaccount (so they will have full access to that account) and users you add to the_account-prod-read-onlygroup will getsts:AssumeRolepermissions to theallow-read-only-access-from-other-accountsIAM role in theprodaccount (so they will have read-only access to that account). - ssh-grunt-users and ssh-grunt-sudo-users
-
These IAM groups don’t grant any IAM permissions, but instead are used by ssh-grunt to determine who is allowed to SSH to your EC2 instances. Each EC2 instance you launch can configure
ssh-gruntwith the names of the IAM group(s) that will be allowed to SSH to the instance, with or without sudo permissions. The group names are completely up to you, so you could have many such groups, with whatever names you pick. Once you add an IAM user to that group, that user will be able to SSH to the corresponding EC2 instances using their own IAM user name and the SSH key associated with their IAM user account.ImportantYou must be a Gruntwork subscriber to access ssh-gruntin terraform-aws-security.
MFA policy
MFA should be required to access any of your AWS accounts via the web or any API call. Unfortunately, AWS doesn’t have an easy way to enforce MFA globally, and if you try to enforce it in a naive manner, you’ll run into issues: e.g., you might accidentally block access for your own applications (e.g., those that use IAM roles on EC2 instance, where MFA isn’t possible) or you might accidentally block new IAM users from accessing AWS and setting up an MFA token in the first place.
Therefore, the best way to enforce MFA right now is as follows:
- IAM roles
-
All the IAM roles in your non-security child accounts that are meant to be assumed by users should require an MFA token in the trust policy. Since these IAM roles are the only way to access those child accounts (i.e., there are no IAM users in those child accounts), this ensures that it’s only possible to access those accounts with MFA enabled. Note: the
OrganizationAccountAccessRoleIAM role is created automatically by AWS Organizations, so you’ll need to manually update it in each child account to require MFA. - IAM users and groups
-
The only place you have IAM users and groups are in the root and security account. None of the user accounts should have any IAM policies directly attached, so the only thing to think through is the policies attached to the IAM groups. To enforce MFA, make sure that all of these policies require an MFA token. Note that all of these policies also should attach "self-management" permissions that allow IAM users just enough permissions to access their own user account without an MFA token so they can configure an MFA token in the first place.
Password policy
In any account that has IAM users (which should just be the root and security accounts), configure a password policy that ensures all IAM users have strong passwords. The exact policy you use depends on your company’s requirements (e.g., certain compliance requirements may force you to use a specific password policy), but you may want to consider NIST 800-63 guidelines as a reasonable starting point.
IAM roles for services
In addition to the IAM roles you create for users, you will also need to create IAM roles for services, applications, and automated users in your child accounts. The exact set of IAM roles you need depends on your company’s requirements, but here are some common ones:
- allow-auto-deploy-access-from-other-accounts
-
This is an IAM role that grants permissions for automatically deploying (e.g., as part of a CI / CD pipeline) some specific service. For example, this role may have a trust policy that allows it to be assumed by a Jenkins server in the shared-services account, and gives that server permissions to deploy EC2 Instances and Auto Scaling Groups. Note that anyone who has to your CI server (e.g., anyone who can create/modify/execute Jenkins jobs) can effectively make use of all the permissions in this IAM role, so be very thoughtful about what this role can do.
- allow-ssh-grunt-access-from-other-accounts
-
This is an IAM role that grants permission to look up IAM group membership and the public SSH keys of IAM user accounts. Typically, you’d have this role in your security account to allow the EC2 instances in other accounts to authenticate SSH attempts using ssh-grunt.
ImportantYou must be a Gruntwork subscriber to access ssh-gruntin terraform-aws-security. - Service roles
-
Most EC2 instances, Lambda functions, and other AWS services you launch will have an IAM role that gives that service the permissions it needs to function. For example, the IAM role for the Consul cluster gives the EC2 instances in that cluster
ec2:DescribeInstances,ec2:DescribeTags, andautoscaling:DescribeAutoScalingGroupspermissions so that the instances can look up instance, tag, and auto scaling group information to automatically discover and connect to the other instances in the cluster.
A few important notes on IAM roles for services:
- No MFA
-
The trust policy in service IAM roles cannot require MFA, as automated services can’t use MFA devices. That means you need to take extra care in terms of who can assume this IAM role, what permissions the role has, and locking down the services. For example, if you have Jenkins running on an EC2 instance, and you give that EC2 instance access to an IAM role so it can deploy your apps, you should do your best to minimize the permissions that IAM role has (e.g., to just
ecspermissions if deploying to ECS) and you should ensure that your Jenkins instance runs in private subnets so that it is NOT accessible from the public Internet (see How to deploy a production-grade VPC on AWS). - Use the right Principal
-
The trust policy in service IAM roles will need to specify the appropriate
Principalto allow an AWS service to assume it. For example, if you’re running Jenkins on an EC2 instance, and you want that EC2 instance to be able to assume an IAM role to get specific permissions (e.g., to get permissions to deploy some code in one of your child accounts), you’ll need a trust policy that looks like this:{ "Version": "2012-10-17", "Statement": [ { "Effect": "Allow", "Action": "sts:AssumeRole", "Principal": {"Service": "ec2.amazonaws.com"} } ] }Notice that the
Principalis set to"Service": "ec2.amazonaws.com", whereas previous IAM roles you saw (those intended for IAM users) used the format"AWS": "<ARN>". Each AWS service has its ownPrincipal: e.g., if you want an IAM role that can be assumed by a Lambda function, thePrincipalwill be"lambda.amazonaws.com". - Protecting IAM roles
-
While IAM roles offer a convenient way to give an EC2 instance permissions to make API calls without having to manually copy credentials to the EC2 instance, the default security configuration for them is not particularly secure. That’s because the IAM role is exposed to the code on the EC2 instance through EC2 instance metadata, which is an http endpoint (
http://169.254.169.254) that anyone on the EC2 instance can access. That means that any compromise of that EC2 instance instantly gives an attacker access to all the permissions in that IAM role. We strongly recommend mitigating this by limiting access to the endpoint solely to specific OS users (e.g., solely to the root user), e.g., by usingiptables. You can do this automatically using ip-lockdown# Make EC2 instance metadata only accessible to the root user ip-lockdown "169.254.169.254" "root"ImportantYou must be a Gruntwork subscriber to access ip-lockdownin terraform-aws-security. - Machine users
-
If you need to give something outside of your AWS account access to your AWS account—for example, if you’re using CircleCi as your CI server and need to give it a way to deploy code into your AWS accounts—then you will need to create a machine user. This is an IAM user designed for use solely by an automated service. You create the IAM user in the security account, add the user to specific IAM groups that grant the user the permissions it needs, generate access keys for the user, and provide those access keys to the external system (e.g., by storing the access keys as the
AWS_ACCESS_KEY_IDandAWS_SECRET_ACCESS_KEYenvironment variables in CircleCi). Note that you cannot require MFA for a machine user, so before giving credentials to an external system, think very carefully if that system is worth trusting with access to your AWS account, and limit the machine user’s permissions as much as possible.NoteMachine users are a red flagWhen you come across a 3rd party service that requires you to create an IAM machine user, you should think of that as a red flag. Just about all vendors these days should support using IAM roles instead, as creating an IAM role and giving the vendor permissions to assume that role is significantly more secure than manually copying around sensitive machine user access keys.
CloudTrail
You’ll want to enable CloudTrail in every single AWS account so that you have an audit log of the major activity happening in the account. We typically recommend that you aggregate these logs in the logs account. To do this, you:
-
Create an S3 bucket in the logs account, and grant the CloudTrail service in all accounts permissions to write to this bucket.
-
Create a KMS Customer Master Key (CMK) in the logs account and grant the CloudTrail service in all accounts permissions to encrypt data with this CMK.
-
Enable CloudTrail in all accounts, configuring it to encrypt data with the CMK in the logs account and write data to the S3 bucket in the logs account.
-
(Optional) Configure CloudTrail to also send logs to CloudWatch Logs within each account. This gives you an additional way to quickly view recent CloudTrail data for an account in the account itself, without having to login to the logs account.
AWS Config
You’ll want to enable AWS Config in every one of your AWS accounts, plus any AWS Config Rules that are relevant to your company, so that you can track AWS resource configuration changes over time and enforce company policy. Note that you should enable AWS Config in every AWS region, and not just the region(s) you’re using for the rest of your infrastructure. That way, if an employee (perhaps accidentally), or even worse, an attacker, runs something in a region you don’t typically use, it’ll still be recorded in AWS Config, and your rules will still be enforced.
We typically recommend that you aggregate AWS Config data in the logs account. To do this, you:
-
Create an S3 bucket in the logs account and grant the AWS Config service in all accounts write access to this bucket.
-
Enable AWS Config in all accounts, configuring them to send data to the S3 bucket in the logs account.
-
Create an SNS topic in each region of the logs account, and set up AWS Config in each region of each account to send SNS notifications to the topic in the corresponding region of the logs account. This is because Config cannot send notifications to topics in other regions.
GuardDuty
You’ll want to enable GuardDuty in every one of your AWS accounts, so that you can protect both your accounts and workloads against malicious activity and unauthorized behavior. Note that you should enable GuardDuty in every AWS region, and not just the region(s) you’re using for the rest of your infrastructure. That way, if an employee (perhaps accidentally), or even worse, an attacker, runs something in a region you don’t typically use, you’ll still be notified by GuardDuty. We typically recommend publishing GuardDuty’s findings to a dedicated Amazon SNS topic.
Federated auth
If you are using federated auth—that is, you are going to access AWS using an existing IdP such as Google, Active Directory, or Okta—you should use the same account structure, but with a few changes:
- No IAM users or groups
-
Since all of your users will be managed in the IdP, you do not need to create any IAM users or IAM groups (other than the handful of IAM users in the root account).
- Different IAM role trust policies
-
With federated auth, you will be granting your IdP users access to specific IAM roles in specific accounts. Therefore, your child accounts will need more or less all the same basic IAM roles described earlier. However, the trust policy on those IAM roles will be quite different. For example, if you are using federated auth with SAML, the
Actionyou allow will bests:AssumeRoleWithSAMLrather thansts:AssumeRoleand thePrincipalwill be your SAML provider:{ "Version": "2012-10-17", "Statement": [ { "Effect": "Allow", "Action": "sts:AssumeRoleWithSAML", "Principal": { "Federated": "arn:aws:iam::111122223333:saml-provider/<YOUR_SAML_PROVIDER>" } } ] } - MFA enforced by IdP, not AWS
-
One other big difference with IAM roles for federated auth is that these IAM roles should NOT require an MFA token. That’s because the MFA token check in AWS IAM policies only works with AWS MFA tokens, and not whatever MFA configuration you have with your IdP. With federated auth, AWS fully trusts the IdP to figure out all auth details, so if you want to require MFA, you need to do that in the IdP itself (i.e., in Google, Active Directory, or Okta).
Deployment walkthrough
Let’s now walk through the step-by-step process of how to create a production-grade AWS account structure using the Gruntwork AWS Landing Zone solution.
Pre-requisites
This walkthrough has the following pre-requisites:
- Gruntwork Infrastructure as Code Library
-
This guide uses code from the Gruntwork Infrastructure as Code Library, as it implements most of the production-grade design for you out of the box. Make sure to read How to use the Gruntwork Infrastructure as Code Library.
ImportantYou must be a Gruntwork subscriber to access the Gruntwork Infrastructure as Code Library. - Terraform
-
This guide uses Terraform to define and manage all the infrastructure as code. If you’re not familiar with Terraform, check out A Comprehensive Guide to Terraform, A Crash Course on Terraform, and How to use the Gruntwork Infrastructure as Code Library.
- Terragrunt
-
This guide uses Terragrunt to configure the infrastructure as code. To get familiar with Terragrunt, explore the features, read the guides, or dive into the documentation.
- Code repository
-
You will need to initialize an
infrastructure-liverepository to contain all of the Terragrunt configuration code for your infrastructure. You may use thefor-productionexample code to start with. - Keybase (optional)
-
As part of this guide, you will create IAM users, including, optionally, credentials for those IAM users. If you choose to create credentials, those credentials will be encrypted with a PGP key. You could provide the PGP keys manually, but a more manageable option may be to have your team members to sign up for Keybase, create PGP keys for themselves, and then you can provide their Keybase usernames, and the PGP keys will be retrieved automatically.
Prepare your infrastructure-live repository
|
Note
|
Terragrunt not required
This guide uses Terragrunt and its associated file and folder structure to deploy Terraform modules. Please note that Terragrunt is NOT required for using Terraform modules from the Gruntwork Infrastructure as Code Library. Check out How to use the Gruntwork Infrastructure as Code Library for instructions on alternative options, such as deploying with plain Terraform. |
Now we’re going to make some HCL files that store variables to be used across your modules. You won’t be able to fill
everything out just yet. Your AWS account IDs will be generated after applying the account-baseline-root to the root
account. At that point you can update these files. Create them now to have them ready to use.
For example, assuming us-east-1 is your default region, your directory structure would look like the following, with
_global and <region> directories in each account directory:
infrastructure-live
  └ common.hcl
  └ accounts.json
  └ terragrunt.hcl
  └ dev
  └ logs
  └ stage
  └ security
  └ shared
  └ prod
    └ _global
      └ region.hcl
    └ us-east-1
      └ region.hcl
The Terraform modules in the Service Catalog
do not define some blocks that are required for Terraform to operate (e.g., the provider and terraform
state backend blocks). This is to allow the modules to be flexibly used in different contexts.
We’ll define a root terragrunt.hcl that injects these these required blocks.
Create a terragrunt.hcl at the root of your infrastructure-live repo and insert the following contents. As you can
see, it references common, account, and region HCL files which we’ll create shortly.
# -----------------------------------------------------------------------------
# TERRAGRUNT CONFIGURATION
# -----------------------------------------------------------------------------

locals {
  common_vars  = read_terragrunt_config("${get_terragrunt_dir()}/common.hcl")
  account_vars = read_terragrunt_config(find_in_parent_folders("account.hcl"))
  region_vars  = read_terragrunt_config(find_in_parent_folders("region.hcl"))

  name_prefix    = local.common_vars.locals.name_prefix
  account_name   = local.account_vars.locals.account_name
  account_id     = local.account_vars.locals.account_id
  default_region = local.common_vars.locals.default_region
  aws_region     = local.region_vars["aws_region"]
}

# -----------------------------------------------------------------------------
# GENERATED PROVIDER BLOCK
# -----------------------------------------------------------------------------

generate "provider" {
  path      = "provider.tf"
  if_exists = "overwrite_terragrunt"
  contents  = <<EOF
provider "aws" {
  region = "${local.aws_region}"
  version = ">= 3.13.0"
  # Only these AWS Account IDs may be operated on by this template
  allowed_account_ids = ["${local.account_id}"]
}
EOF
}

# -----------------------------------------------------------------------------
# GENERATED REMOTE STATE BLOCK
# -----------------------------------------------------------------------------

remote_state {
  backend = "s3"
  generate = {
    path      = "backend.tf"
    if_exists = "overwrite_terragrunt"
  }
  config = {
    encrypt        = true
    bucket         = "${local.name_prefix}-${local.account_name}-${local.aws_region}-terraform-state"
    key            = "${path_relative_to_include()}/terraform.tfstate"
    region         = local.default_region
    dynamodb_table = "terraform-locks"
  }
}

# -----------------------------------------------------------------------------
# GLOBAL PARAMETERS
# -----------------------------------------------------------------------------

inputs = {
  # Set commonly used inputs globally to keep child terragrunt.hcl files DRY
  aws_account_id = local.account_id
  aws_region     = local.aws_region
  name_prefix    = local.name_prefix
}
Also create a common.hcl file at the root of your infrastructure-live repo, with the following contents.
locals {
  # TODO: Enter a unique name prefix to set for all resources created in your accounts, e.g., your org name.
  name_prefix = ""
  # TODO: Enter the default AWS region, the same as where the terraform state S3 bucket is currently provisioned.
  default_region = ""

  # TODO: Fill these in after applying the account-baseline-root to the root account.
  config_s3_bucket_name      = ""
  cloudtrail_s3_bucket_name  = ""
  cloudtrail_kms_key_arn     = ""

  # TODO: An accounts map to conveniently store all account IDs.
  # Centrally define all the AWS account IDs. We use JSON so that it can be readily parsed outside of Terraform.
  accounts = jsondecode(file("accounts.json"))
}
This file references an accounts.json, which you should also create at the root of the repo. You will fill out
the account IDs after applying the account-baseline-root to the root account.
{
  "dev": "",
  "logs": "",
  "prod": "",
  "security": "",
  "shared": "",
  "stage": ""
}
In each account folder (e.g., infrastructure-live/dev, infrastructure-live/shared, etc.), add a file named
account.hcl with the following contents. Leave account_id blank until after the account-baseline-root has been
applied to the root account.
locals {
  # TODO: Update with the actual information of each account
  # The user friendly name of the AWS account. Usually matches the folder name.
  account_name = ""
  # The 12 digit ID number of your AWS account.
  account_id = ""
}
Now in each infrastructure-live/<account_name>/_global/ folder, create a region.hcl file.
# Modules in the account _global folder don't live in any specific AWS region, but you still have to send the API calls
# to _some_ AWS region, so here we use the default region for those API calls.
locals {
  aws_region = read_terragrunt_config(find_in_parent_folders("common.hcl")).locals.default_region
}
Do the same in each region folder (e.g., infrastructure-live/dev/us-east-1/). This region.hcl file is a bit different.
locals {
# TODO: Enter the region to use for all resources in this subfolder.
  aws_region = ""
}
Create the root account
Now let’s create your root AWS account. This account will be the parent of all of your other AWS accounts and the central place where you manage billing. You create this initial account manually, via a web browser:
-
Go to https://aws.amazon.com.
-
Click Create an AWS Account.
-
Go through the sign up flow, entering contact and billing details as requested.
-
You will be asked to enter an email address and password to use as the credentials for the root user of this root account.
Lock down the root user
After signing up for an AWS account, you’ll be logged in as the root user. The root user has unrestricted access to just about everything in your AWS account (and any child accounts), so if an attacker compromises your root user, the results can be catastrophic for your company. Therefore, you should lock down the root user as much as possible:
- Use a secrets manager
-
Do NOT store the root user’s password, or secrets of any kind, in plain text. Instead, always use a secrets manager such as 1Password, LastPass, or pass to store the credentials in an encrypted format.
- Use a strong, generated password
-
Do NOT re-use passwords from other websites, or any password that you can remember at all. Instead, generate a random, cryptographically secure, long password (20+ characters) for the root user. All the password managers mentioned above can generate and store passwords for you in one step, so use them!
- Enable MFA
-
Make sure to enable MFA for your root user. Feel free to use a virtual or hardware MFA device—whichever is easier or required by your company—as either one dramatically improves the security of your root user.
- Disable access keys
-
Make sure to delete the root user’s access keys, so that the only way to login as the root user is via the web console, where MFA is required.
- Don’t use the root user again
-
In the next section, you will create an IAM user in the root account with admin permissions. Once you’ve created that IAM user, you should do everything as that IAM user, and more or less never touch the root user account again. The only time you’ll need it is for account recovery situations (e.g., you accidentally deleted the IAM user or lost your credentials) or for the small number of tasks that require root user credentials.
Create an IAM user in the root account
As the last action you do as the root user, you MUST create an IAM user. This is not only a better practice from a
security standpoint, but also, the account-baseline-xxx modules we will use below assume IAM roles, which does not
work with a root user. Later on, we’ll create and manage all IAM users as code, but you should create this very first
IAM user manually by
following these instructions:
-
Enter a username for your IAM user.
-
Select both "programmatic access" and "AWS Management Console access."
-
On the next page, click "Attach existing policies to user directly" and attach the
AdministratorAccesspolicy. -
Click next a few more times to create the IAM user.
-
In a secrets manager, save the IAM sign-in URL, your IAM user’s username, the password, and your Access Keys.
Lock down the root account IAM users
Although IAM users don’t have the same powers as a root user, having an IAM user account compromised can still be a huge problem for your company (especially if that IAM user had admin permissions), so it’s still critical to lock down IAM user accounts as much as possible:
- Use a secrets manager
-
Do NOT store the credentials or any kind of secret in plain text. Instead, always use a secrets manager such as 1Password, LastPass, or pass to store the credentials in an encrypted format.
- Use a strong, generated password
-
Do NOT re-use passwords from other websites, or any password that you can remember at all. Instead, generate a random, cryptographically secure, long password (20+ characters). All the password managers mentioned above can generate and store passwords for you in one step, so use them!
- Enable MFA
-
Always make sure to enable MFA for your IAM user. Feel free to use a virtual or hardware MFA device—whichever is easier or required by your company—as either one dramatically improves the security of your IAM user. Note that using SMS (text messages) for MFA is no longer recommended by NIST due to known vulnerabilities with the cellular system, so using a virtual or hardware MFA device is preferable; that said, MFA with SMS is still better than no MFA at all.
Configure the security baseline for the root account
Next, we’ll configure a security baseline for the root account that is responsible for creating all the child accounts. It will also configure AWS Organizations, IAM Roles, IAM Users, IAM Groups, IAM Password Policies, Amazon GuardDuty, AWS CloudTrail, and AWS Config.
We’ll be using the account-baseline-root module from terraform-aws-service-catalog.
|
Important
|
You must be a Gruntwork subscriber to access terraform-aws-service-catalog.
|
Set up the inputs for account-baseline for the root account
Next, create a terragrunt.hcl file in infrastructure-live. It should go under the file path root/_global/account-baseline:
infrastructure-live
  └ root
    └ _global
      └ account-baseline
        └ terragrunt.hcl
Define the terraform block with the source pointing to the terraform-aws-service-catalog account-baseline-root module.
terraform {
  source = "git::git@github.com:gruntwork-io/terraform-aws-service-catalog.git//modules/landingzone/account-baseline-root?ref=v0.41.4"

  # This module deploys some resources (e.g., AWS Config) across all AWS regions, each of which needs its own provider,
  # which in Terraform means a separate process. To avoid all these processes thrashing the CPU, which leads to network
  # connectivity issues, we limit the parallelism here.
  extra_arguments "parallelism" {
    commands  = get_terraform_commands_that_need_parallelism()
    arguments = ["-parallelism=2"]
  }
}|
Important
|
We strongly recommend setting Terraform parallelism to a low value (i.e., -parallelism=2), as shown above, with the account-baseline-xxx modules. This is because these modules deploy multi-region resources (e.g., GuardDuty, AWS Config, etc), and for each region, Terraform spins up a separate process, so if you don’t limit the parallelism, it may peg all your CPU cores and lead to network connectivity errors.
|
Set the variables for the account-baseline-root module in this environment in the inputs = { … } block.
inputs = {
  # If you've already created an AWS Organization in your root account, you'll be able to import it later in this guide
  create_organization = true

  # The child AWS accounts to create in this AWS organization
  child_accounts = {
    logs = {
      email = "root-accounts+logs@acme.com"

      # Mark this account as the logs account, used to aggregate all AWS Config and CloudTrail data.
      is_logs_account = true
    },
    security = {
      email = "root-accounts+security@acme.com"
    },
    shared = {
      email = "root-accounts+shared@acme.com"
    },
    dev = {
      email = "root-accounts+dev@acme.com"
    },
    stage = {
      email = "root-accounts+stage@acme.com"
    },
    prod = {
      email = "root-accounts+prod@acme.com"
    }
  }

  # The IAM users to create in this account. Since this is the root account, you should only create IAM users for a
  # small handful of trusted admins.
  #
  # NOTE: Make sure to include the IAM user you created manually here! We'll import the user into Terraform state in
  # the next step of this guide, allowing you to manage this user as code going forward.
  users = {
    alice = {
      groups               = ["full-access"]
      pgp_key              = "keybase:alice"
      create_login_profile = true
      create_access_keys   = false
    },
    bob = {
      groups               = ["billing"]
      pgp_key              = "keybase:bob"
      create_login_profile = true
      create_access_keys   = false
    }
  }
}
The example code above does the following:
-
Create 6 child AWS accounts. These are the accounts described in the Child accounts sections.
-
Associate an email address with each of the child accounts. This will be the email address for the root user of each account and AWS requires that the root user’s email address is globally unique, so it cannot be the email address you used for the root account or any of the other child accounts. You’ll have to either create multiple email accounts in your company’s email system, or, if your company uses Gmail (perhaps as part of G Suite), you can take advantage of the fact that Gmail ignores everything after a plus sign in an email address, so that while AWS will see
root-accounts+security@your-company.com,root-accounts+shared@your-company.com, androot-accounts+dev@your-company.comas three unique email addresses, Gmail will see them all as the same email address,root-accounts@your-company.com. -
Mark one of the child accounts as a logs account. We set
is_logs_account = trueon one of the child accounts to indicate it is the logs account where we will aggregate AWS Config and CloudTrail data from all the other accounts. Theaccount-baseline-rootmodule will automatically create an S3 bucket for AWS Config and an S3 bucket and KMS CMK for CloudTrail in this account and configure the root account to send all the AWS Config and CloudTrail data to these S3 buckets. Later on, you’ll configure all the other accounts to send their data to these S3 buckets too. -
Create IAM groups. By default,
account-baseline-rootwill create afull-accessIAM group (for admins) and abillingIAM group (for the finance team). -
Create IAM users. For this example, we create
aliceandbob, andcarol, addingaliceto thefull-accessIAM group andcarolto thebillingIAM group. Note: your own IAM user (the one you created manually) should be in theuserslist; we’ll use theimportcommand to put this user under Terraform management shortly. -
Generate a password for each user. We encrypt this password with that user’s PGP key from Keybase (we’ll come back to how to handle the passwords shortly).
Pull in the backend settings from a root terragrunt.hcl file that you
include in each child terragrunt.hcl. The file you created earlier in infrastructure-live/terragrunt.hcl will be pulled.
include {
  path = find_in_parent_folders()
}
Next, you need to authenticate as your IAM user in the root account. There are multiple ways to authenticate to AWS on the CLI; in this guide, we’ll use the open source tool aws-vault. Install aws-vault and add to it the Access Keys you saved earlier from your IAM user:
$ aws-vault add root-iam-user
Enter Access Key Id: XXXXXXXXXXXX
Enter Secret Key: YYYYYYYYYYYY
Next, install the AWS CLI, and check that authentication is working:
aws-vault exec root-iam-user -- aws sts get-caller-identityYou should get JSON output with information about your IAM user:
{
  "UserId": "AIDAXXXXXXXXXXXX",
  "Account": "<ROOT_ACCOUNT_ID>",
  "Arn": "arn:aws:iam::<ROOT_ACCOUNT_ID>:user/<YOUR_IAM_USER>"
}
You’re now almost ready to deploy the account-baseline module in the root account. But first, let’s import the IAM user
and any other existing resources.
Import existing resources from the root account into Terraform state
Before applying the account-baseline-root module to the root account, we need to import existing resources—including
the IAM user you created manually earlier—into Terraform state, so that Terraform manages those resources instead of
trying to create totally new ones. You can do this using the
import command, which uses the format:
terraform import <ADDRESS> <ID>Where <ADDRESS> is the address of the Terraform
resource you’re importing and <ID> is a resource-specific identifier (e.g., for aws_instance, it’s the instance ID,
whereas for aws_lb, it’s the load balancer’s name—check the docs for the resource to find out what to use).
Let’s import the IAM user you created manually in the root account. IAM users are managed using the
aws_iam_user resource, and the
documentation for that
resource tells us to use the user’s name as the <ID>; we’ll assume for this example that your IAM user’s name was
alice, who is already one of the entries in the users variable in terragrunt.hcl. So now we need the <ADDRESS>.
An easy way to get it is to run plan:
cd infrastructure-live/root/_global/account-baseline
aws-vault exec root-iam-user -- terragrunt plan
You should get a whole bunch of log output, including something that looks like this:
------------------------------------------------------------------------

An execution plan has been generated and is shown below.
Resource actions are indicated with the following symbols:
  + create
 <= read (data resources)

Terraform will perform the following actions:

# ... (ommitting lots of log output for simplicity) ...

# module.root_baseline.module.iam_users.aws_iam_user.user["alice"] will be created
  + resource "aws_iam_user" "user" {
      + arn           = (known after apply)
      + force_destroy = true
      + id            = (known after apply)
      + name          = "alice"
      + path          = "/"
      + unique_id     = (known after apply)
    }

# ... (ommitting lots of log output for simplicity) ...

Plan: 160 to add, 0 to change, 0 to destroy.

------------------------------------------------------------------------

Note: You didn't specify an "-out" parameter to save this plan, so Terraform
can't guarantee that exactly these actions will be performed if
"terraform apply" is subsequently run.
This plan output is telling you that Terraform will create a bunch of resources, including the aws_iam_user named
alice. Of course, this user already exists, so we want to import the user rather than create it again. The text
next to the # gives you the <ADDRESS> to use:
# module.root_baseline.module.iam_users.aws_iam_user.user["alice"] will be created
So the <ADDRESS> you want is module.root_baseline.module.iam_users.aws_iam_user.user["alice"]. Now, normally, you’d
run import right away, but due two Terraform bugs, #13018 and
#26211, import doesn’t work on certain types of modules—namely,
those with nested provider blocks that use dynamic data—and will produce an error like unknown variable accessed:
var.region in:. One of these bugs has been open for over 3 years, so we built a workaround for it in Terragrunt: the
aws-provider-patch command.
The idea behind the workaround is to temporarily hard-code the dynamic data in nested provider blocks. In particular,
we need to temporarily hard-code some of the region and role_arn parameters of the nested provider blocks used by
account-baseline-root as follows:
terragrunt aws-provider-patch \
  --terragrunt-override-attr region="eu-west-1" \
  --terragrunt-override-attr assume_role.role_arn=""
Note: You can use any region you want for the region parameter. It’s just temporary. However, role_arn must be set
to an empty string or Terraform will complain.
After running this command, you can finally import your IAM user:
aws-vault exec root-iam-user -- terragrunt import \
  'module.root_baseline.module.iam_users.aws_iam_user.user["alice"]' \
  'alice'
You should see log output that looks something like this:
[terragrunt] 2020/10/13 14:19:16 Running command: terraform import module.root_baseline.module.iam_users.aws_iam_user.user["alice"] alice
module.root_baseline.module.iam_users.aws_iam_user.user["alice"]: Importing from ID "alice"...
module.root_baseline.module.iam_users.aws_iam_user.user["alice"]: Import prepared!
  Prepared aws_iam_user for import
module.root_baseline.module.iam_users.aws_iam_user.user["alice"]: Refreshing state... [id=alice]

Import successful!

The resources that were imported are shown above. These resources are now in
your Terraform state and will henceforth be managed by Terraform.
You’ll now be able to manage that IAM user as code going forward!
If you created other resources manually in the root account, you may want to import them too, so you can manage
everything as code, and so that Terraform doesn’t try to create any duplicate resources. For example, if you already
manually created an AWS Organization in your root account, you’ll need to import it using a command that looks like
this:
aws-vault exec root-iam-user -- terragrunt import \
  'module.root_baseline.module.organization.aws_organizations_organization.root[0]' \
  '<ORG_ID>'
Where <ORG_ID> is the ID of your AWS Organization. Note that this is NOT the same as the AWS account ID, but a
separate ID you can find by going to the AWS Organizations page in
the AWS console, clicking on your root account (the one with a star to the left of it), and looking at the root
account’s ARN, which will look something like, arn:aws:organizations::<ACCOUNT_ID>:account/<ORG_ID>/<ACCOUNT_ID>. The
<ORG_ID> is the part between slashes, and it’ll look something like o-a2lce3bbqq.
You may also want to import child accounts you created manually. You’ll need to add each of these to the
child_accounts variable in terragrunt.hcl, and you can then import each one as follows:
aws-vault exec root-iam-user -- terragrunt import \
  'module.root_baseline.module.organization.aws_organizations_account.child_accounts["<ACCOUNT_NAME>"]' \
  '<ACCOUNT_ID>'
Where <ACCOUNT_NAME> is the name you used for the account in the child_accounts variable and <ACCOUNT_ID> is the
12-digit ID of that AWS account.
Once you’re done importing, you’ll want to undo the aws-provider-patch workaround. The easiest way to do that is to
delete the .terraform or .terragrunt-cache folders to remove any locally cached modules, as they would’ve been
modified by the aws-provider-patch command.
rm -rf .terragrunt-cacheApply the security baseline to the root account
You’re now ready to apply the security baseline to the root account. You should be authenticated as the same IAM user
in the root account as in the previous two sections. To apply the security baseline, you run terragrunt apply:
cd infrastructure-live/root/_global/account-baseline
aws-vault exec root-iam-user -- terragrunt apply|
Important
|
On some operating systems, such as MacOS, you may also need to increase your open files limit to avoid "pipe: too many open files" errors by running: ulimit -n 10240.
|
Once apply completes, you should see output variables with all of your account IDs, the name of the AWS Config S3
bucket, the name of the CloudTrail S3 bucket, and the ARN of the CloudTrail KMS key:
# (This output has been truncated to be easier to read)
child_accounts = {
  "dev" = {
    "email" = "root-accounts+dev@acme.com"
    "id" = "<DEV_ACCOUNT_ID>"
    # (...)
  }
  "logs" = {
    "email" = "root-accounts+logs@acme.com"
    "id" = "<LOGS_ACCOUNT_ID>"
    # (...)
  }
  "prod" = {
    "email" = "root-accounts+prod@acme.com"
    "id" = "<PROD_ACCOUNT_ID>"
    # (...)
  }
  "security" = {
    "email" = "root-accounts+security@acme.com"
    "id" = "<SECURITY_ACCOUNT_ID>"
    # (...)
  }
  "shared" = {
    "email" = "root-accounts+shared@acme.com"
    "id" = "<SHARED_SERVICES_ACCOUNT_ID>"
    # (...)
  }
  "stage" = {
    "email" = "root-accounts+stage@acme.com"
    "id" = "<STAGE_ACCOUNT_ID>"
    # (...)
  }
}
cloudtrail_kms_key_arn    = "<CLOUDTRAIL_KMS_KEY_ARN>"
cloudtrail_s3_bucket_name = "<CLOUDTRAIL_BUCKET_NAME>"
config_s3_bucket_name     = "<CONFIG_BUCKET_NAME>"
Now, you can update the accounts.json file with the account IDs from the Terraform output! Also account.hcl files
located in each account folder (e.g., infrastructure-live/dev, infrastructure-live/shared, etc.), with the appropriate
account ID shown in the Terraform output.
Also update the entries for cloudtrail_kms_key_arn, cloudtrail_s3_bucket_name, and config_s3_bucket_name into your
infrastructure-live/common.hcl file, because you’ll need these values for every account in the steps below.
One other useful output are the encrypted passwords for IAM users you created:
user_passwords = {
  "alice" = "wcBMA7E6Kn/t1YPfAQgAVSXlUzumcs4UyO8E5q099YnnU="
  "bob" = "wcBMA7E6Kn/t1YPfAQgACgbdb1mYtQx7EL4hnVWtYAi="
}
Send the encrypted password to each user, along with their user name, and the IAM user sign-in URL for the root account. Each user can then decrypt the password on their own computer (which should have their PGP key) as follows:
echo "<PASSWORD>" | base64 --decode | keybase pgp decryptReset the root user password in each child account
When creating the child accounts, you may have noticed that you provided an email address for each root user, but confusingly, not a password. So how do you login as the root user then? It’s not obvious, but the answer is that you reset the root user password, using the "Forgot your password?" prompt on the root user login page. AWS will email you a reset link, which you can click to go to a page that will allow you to configure a password for the root user. Use this process to reset the password for the root user of each child account you created.
Lock down the root user in the child accounts
Once you’re able to access the root user of each child account, you should follow the steps in Lock down the root user for each of those child accounts—including enabling MFA and deleting the root user’s access keys—and (almost) never use those root users again.
Apply the security baseline to the logs account
The next step is to configure the logs account, which is used to aggregate AWS Config and CloudTrail data from all the other accounts.
Create a terragrunt.hcl file in infrastructure-live under the file path logs/_global/account-baseline:
infrastructure-live
  └ root
  └ logs
    └ _global
      └ account-baseline
        └ terragrunt.hcl
Point the source URL in your terragrunt.hcl file to the account-baseline-app service in the Service Catalog.
terraform {
  source = "git::git@github.com:gruntwork-io/terraform-aws-service-catalog.git//modules/landingzone/account-baseline-app?ref=v0.41.4"

  # This module deploys some resources (e.g., AWS Config) across all AWS regions, each of which needs its own provider,
  # which in Terraform means a separate process. To avoid all these processes thrashing the CPU, which leads to network
  # connectivity issues, we limit the parallelism here.
  extra_arguments "parallelism" {
    commands  = get_terraform_commands_that_need_parallelism()
    arguments = ["-parallelism=2"]
  }
}|
Important
|
We strongly recommend setting Terraform parallelism to a low value (e.g., -parallelism=2), as shown above, with the account-baseline-xxx modules. This is because these modules deploy multi-region resources (e.g., GuardDuty, AWS Config, etc), and for each region, Terraform spins up a separate process, so if you don’t limit the parallelism, it may peg all your CPU cores and lead to network connectivity errors.
|
Include all the settings from the root terragrunt.hcl file:
include {
  path = find_in_parent_folders()
}
Set the variables for the account-baseline-app module in this environment in the inputs = { … } block of terragrunt.hcl:
locals {
  # A local for more convenient access to the accounts map.
  accounts = local.common_vars.locals.accounts

  # A local for convenient access to the security account root ARN.
  security_account_root_arn = "arn:aws:iam::${local.accounts.security}:root"
}

inputs = {
  # Use the S3 bucket and KMS key that were already created in the logs account by account-baseline-root
  cloudtrail_s3_bucket_name = "<CLOUDTRAIL_BUCKET_NAME>"
  cloudtrail_kms_key_arn    = "<CLOUDTRAIL_KMS_KEY_ARN>"

  # All of the other accounts send logs to this account.
  cloudtrail_allow_kms_describe_key_to_external_aws_accounts = true
  cloudtrail_external_aws_account_ids_with_write_access = [
    for name, id in local.accounts :
      id if name != "logs"
  ]

  # Use the S3 bucket that was already created in the logs account by account-baseline-root
  config_s3_bucket_name                            = "<CONFIG_BUCKET_NAME>"
  config_aggregate_config_data_in_external_account = false
  config_central_account_id                        = local.accounts.logs
  config_force_destroy                             = false

  # This is the Logs account, so we create the S3 bucket and SNS topic for aggregating Config logs from all accounts.
  config_should_create_s3_bucket = true
  config_should_create_sns_topic = true

  # All of the other accounts send logs to this account.
  config_linked_accounts = [
    for name, id in local.accounts :
      id if name != "logs"
  ]

  # Allow users in the security account to assume IAM roles in this account
  allow_full_access_from_other_account_arns      = [local.security_account_root_arn]
  allow_read_only_access_from_other_account_arns = [local.security_account_root_arn]
  allow_logs_access_from_other_account_arns      = [local.security_account_root_arn]
}
The example above configures the logs account of an AWS Organization as follows:
-
Aggregate CloudTrail Logs: We configure the logs account to use the S3 bucket and KMS CMK for CloudTrail that were already created by
account-baseline-root. -
Aggregate AWS Config: We configure the logs account to use the S3 bucket for AWS Config that was already created by
account-baseline-root. -
Allow access from the security account: We configure IAM roles that IAM users in the security account will be able to assume to get access to the logs account.
You’re now going to use an IAM role to authenticate to the logs account. This IAM role is created automatically in each
child account by account-baseline-root and has a default name of OrganizationAccountAccessRole. There are many ways
to assume an IAM role on the CLI;
for this guide, we’re going to keep using aws-vault.
Open up ~/.aws/config and you should see a profile that was created automatically when you ran
aws-vault add root-iam-user earlier:
[profile root-iam-user]Add a new profile entry in ~/.aws/config for your logs account that uses the root-iam-user as the
source_profile:
[profile logs-from-root]
role_arn=arn:aws:iam::<LOGS_ACCOUNT_ID>:role/OrganizationAccountAccessRole
source_profile=root-iam-user
Check that you’re able to authenticate to the logs account:
aws-vault exec logs-from-root -- aws sts get-caller-identityYou should see JSON output indicating that you’ve successfully assumed an IAM role:
{
  "UserId": "AIDAXXXXXXXXXXXX:1597932316055520000",
  "Account": "<LOGS_ACCOUNT_ID>",
  "Arn": "arn:aws:sts::<LOGS_ACCOUNT_ID>:assumed-role/OrganizationAccountAccessRole/1597932316055520000"
}
You’re now ready to deploy the account-baseline module in the logs account by running terragrunt apply:
cd infrastructure-live/logs/_global/account-baseline
aws-vault exec logs-from-root -- terragrunt apply|
Important
|
On some operating systems, such as MacOS, you may also need to increase your open files limit to avoid "pipe: too many open files" errors by running: ulimit -n 10240.
|
Apply the security baseline to the security account
Now that your logs accounts is fully configured, you need to apply the security baseline to the security account, which is where all your IAM users and groups will be defined and managed.
Create a terragrunt.hcl file in infrastructure-live under the file path security/_global/account-baseline:
infrastructure-live
  └ root
  └ logs
  └ security
    └ _global
      └ account-baseline
        └ terragrunt.hcl
Point the source URL in your terragrunt.hcl file to the account-baseline-security service in the Service Catalog.
terraform {
  source = "git::git@github.com:gruntwork-io/terraform-aws-service-catalog.git//modules/landingzone/account-baseline-security?ref=v0.41.4"

  # This module deploys some resources (e.g., AWS Config) across all AWS regions, each of which needs its own provider,
  # which in Terraform means a separate process. To avoid all these processes thrashing the CPU, which leads to network
  # connectivity issues, we limit the parallelism here.
  extra_arguments "parallelism" {
    commands  = get_terraform_commands_that_need_parallelism()
    arguments = ["-parallelism=2"]
  }
}|
Important
|
We strongly recommend setting Terraform parallelism to a low value (e.g., -parallelism=2), as shown above, with the account-baseline-xxx modules. This is because these modules deploy multi-region resources (e.g., GuardDuty, AWS Config, etc), and for each region, Terraform spins up a separate process, so if you don’t limit the parallelism, it may peg all your CPU cores and lead to network connectivity errors.
|
Include all the settings from the root terragrunt.hcl file:
include {
  path = find_in_parent_folders()
}
Set the variables for the account-baseline-security module in this environment in the inputs = { … } block of terragrunt.hcl:
locals {
  # A local for more convenient access to the accounts map.
  accounts = local.common_vars.locals.accounts

  # A local for convenient access to the security account root ARN.
  security_account_root_arn = "arn:aws:iam::${local.accounts.security}:root"
}

inputs = {
  # Use the S3 bucket and KMS key that were already created in the logs account by account-baseline-root
  cloudtrail_s3_bucket_name = "<CLOUDTRAIL_BUCKET_NAME>"
  cloudtrail_kms_key_arn    = "<CLOUDTRAIL_KMS_KEY_ARN>"

  # Use the S3 bucket that was already created in the logs account by account-baseline-root
  config_s3_bucket_name     = "<CONFIG_BUCKET_NAME>"
  config_central_account_id = local.accounts.logs

  # Enable the IAM groups you want
  should_create_iam_group_full_access    = true
  should_create_iam_group_read_only      = true
  should_create_iam_group_user_self_mgmt = true

  # Configure the names for IAM groups
  iam_group_name_full_access            = "full-access"
  iam_group_name_read_only              = "read-only"
  iam_group_name_iam_user_self_mgmt     = "iam-user-self-mgmt"
  iam_group_names_ssh_grunt_sudo_users  = ["ssh-grunt-sudo-users"]
  iam_group_names_ssh_grunt_users       = ["ssh-grunt-users"]

  # Create IAM groups that grant access to the other AWS accounts
  iam_groups_for_cross_account_access = [
    {
      group_name    = "_account.stage-full-access",
      iam_role_arns = ["arn:aws:iam::${locals.accounts.stage}:role/allow-full-access-from-other-accounts"]
    },
    {
      group_name    = "_account.stage-read-only",
      iam_role_arns = ["arn:aws:iam::${locals.accounts.stage}:role/allow-read-only-access-from-other-accounts"]
    },
    {
      group_name    = "_account.stage-dev",
      iam_role_arns = ["arn:aws:iam::${locals.accounts.stage}:role/allow-dev-access-from-other-accounts"]
    },
    {
      group_name    = "_account.stage-openvpn-admins",
      iam_role_arns = ["arn:aws:iam::${locals.accounts.stage}:role/openvpn-allow-certificate-revocations-for-external-accounts"]
    },
    {
      group_name    = "_account.stage-openvpn-users",
      iam_role_arns = ["arn:aws:iam::${locals.accounts.stage}:role/openvpn-allow-certificate-requests-for-external-accounts"]
    },

    # ... Repeat the same set of groups for each of dev, prod, logs, and shared services account IDs too!
  ]

  # Create all the IAM users for your company and assign them to IAM groups
  users = {
    alice = {
      groups               = ["iam-user-self-mgmt", "ssh-grunt-sudo-users", "_account.dev-full-access"]
      pgp_key              = "keybase:alice_on_keybase"
      create_login_profile = true
      create_access_keys   = false
    }

    bob = {
      groups               = ["iam-user-self-mgmt", "_account.dev-full-access", "_account.prod-read-only"]
      pgp_key              = "keybase:bob_on_keybase"
      create_login_profile = true
      create_access_keys   = false
    }
    carol = {
      groups               = ["iam-user-self-mgmt", "full-access"]
      pgp_key              = "keybase:carol_on_keybase"
      create_login_profile = true
      create_access_keys   = true
    }
  }

  # Allow accounts to have read access to IAM groups and the public SSH keys of users in the group.
  allow_ssh_grunt_access_from_other_account_arns = [
    for name, id in local.accounts :
      "arn:aws:iam::${id}:root" if name != "security"
  ]
}
The code above does the following:
-
Enable CloudTrail. We’ve configured CloudTrail to use the S3 bucket and KMS CMK in the logs account.
-
Enable AWS Config. We’ve configured AWS Config to use the S3 bucket in the logs account.
-
Create IAM groups. We’ve created IAM groups, both for permissions within the security account (e.g.,
full-accessgrants admin permissions in the security account) and for permissions in other accounts (e.g.,_account.stage-full-accessgrants access to an IAM role with admin permissions in the stage account). Be sure to fill out the section for permissions in dev, prod, logs, and shared-services accounts. -
Create IAM users. The example above creates IAM users for
alice,bob, andcarol, and assigns them to the various IAM groups. You should create an IAM user for yourself in thefull-accessgroup, plus IAM users for the rest of your team in the appropriate groups. Like the root account, the code will also generate a password for each user and encrypt it with that user’s PGP key from Keybase (see below for how to handle the passwords).
Just as with the logs account, you’re going to use the OrganizationAccountAccessRole IAM role created by
account-baseline-root to authenticate to the security account. There are many ways to
assume an IAM role on the CLI;
for this guide, we’re going to keep using aws-vault.
Add a new profile entry in ~/.aws/config for your security account that uses the root-iam-user as the
source_profile:
[profile security-from-root]
role_arn=arn:aws:iam::<SECURITY_ACCOUNT_ID>:role/OrganizationAccountAccessRole
source_profile=root-iam-user
Check that you’re able to authenticate to the security account:
aws-vault exec security-from-root -- aws sts get-caller-identityYou should see JSON output indicating that you’ve successfully assumed an IAM role:
{
  "UserId": "AIDAXXXXXXXXXXXX:1597932316055520000",
  "Account": "<SECURITY_ACCOUNT_ID>",
  "Arn": "arn:aws:sts::<SECURITY_ACCOUNT_ID>:assumed-role/OrganizationAccountAccessRole/1597932316055520000"
}
You’re now ready to deploy the account-baseline module in the security account by running terragrunt apply:
cd infrastructure-live/security/_global/account-baseline
aws-vault exec security-from-root -- terragrunt apply|
Important
|
On some operating systems, such as MacOS, you may also need to increase your open files limit to avoid "pipe: too many open files" errors by running: ulimit -n 10240.
|
When apply finishes, the module will output the encrypted passwords for the users defined above. Send the encrypted
password to each user, along with their user name, and the IAM user sign-in URL for the account. Each user can then
decrypt the password on their own computer (which should have their PGP key) as follows:
echo "<PASSWORD>" | base64 --decode | keybase pgp decryptApply the security baseline to the other child accounts
Now that your security account is fully configured, you need to apply the security baseline to the remaining child accounts (i.e., dev, stage, prod, and shared, plus sandbox and testing accounts you might have) as detailed in the Child accounts section. Feel free to adjust this as necessary based on the accounts your company needs.
The account-baseline-app module in the Service Catalog can be used interchangeably between app accounts and log
accounts as they deploy most of the same resources. That means this module can be re-used for all of the child
accounts.
Create terragrunt.hcl files in infrastructure-live under the file paths <ACCOUNT>/_global/account-baseline,
where <ACCOUNT> is one of these other child accounts, such as dev, stage, prod, and shared. In the rest of
this example, we’ll look solely at the stage account, but make sure you follow the analogous steps for EACH of your
child accounts.
infrastructure-live
  └ root
  └ logs
  └ security
  └ stage
    └ _global
      └ account-baseline
        └ terragrunt.hcl
Point the source URL in your terragrunt.hcl file to the account-baseline-app service in the Service Catalog.
terraform {
  source = "git::git@github.com:gruntwork-io/terraform-aws-service-catalog.git//modules/landingzone/account-baseline-app?ref=v0.41.4"

  # This module deploys some resources (e.g., AWS Config) across all AWS regions, each of which needs its own provider,
  # which in Terraform means a separate process. To avoid all these processes thrashing the CPU, which leads to network
  # connectivity issues, we limit the parallelism here.
  extra_arguments "parallelism" {
    commands  = get_terraform_commands_that_need_parallelism()
    arguments = ["-parallelism=2"]
  }
}|
Important
|
We strongly recommend setting Terraform parallelism to a low value (e.g., -parallelism=2), as shown above, with the account-baseline-xxx modules. This is because these modules deploy multi-region resources (e.g., GuardDuty, AWS Config, etc), and for each region, Terraform spins up a separate process, so if you don’t limit the parallelism, it may peg all your CPU cores and lead to network connectivity errors.
|
Include all the settings from the root terragrunt.hcl file:
include {
  path = find_in_parent_folders()
}
Set the variables for the account-baseline-app module in this environment in the inputs = { … } block of terragrunt.hcl:
locals {
  # A local for more convenient access to the accounts map.
  accounts = local.common_vars.locals.accounts

  # A local for convenient access to the security account root ARN.
  security_account_root_arn = "arn:aws:iam::${local.accounts.security}:root"
}

inputs = {
  # Use the S3 bucket and KMS key that were already created in the logs account by account-baseline-root
  cloudtrail_s3_bucket_name = "<CLOUDTRAIL_BUCKET_NAME>"
  cloudtrail_kms_key_arn    = "<CLOUDTRAIL_KMS_KEY_ARN>"

  # Use the S3 bucket that was already created in the logs account by account-baseline-root
  config_s3_bucket_name                            = "<CONFIG_BUCKET_NAME>"
  config_aggregate_config_data_in_external_account = true
  config_central_account_id                        = local.accounts.logs

  # Specify the services the dev IAM role will have access to
  dev_permitted_services = ["ec2", "s3", "rds", "dynamodb", "elasticache", "eks", "ecs"]

  # Specify the services the auto-deploy IAM role will have access to
  auto_deploy_permissions = ["cloudwatch:*", "logs:*", "dynamodb:*", "ecr:*", "ecs:*", "iam:GetPolicy", "iam:GetPolicyVersion", "iam:ListEntitiesForPolicy", "eks:DescribeCluster", "route53:*", "s3:*", "autoscaling:*", "elasticloadbalancing:*", "iam:GetRole", "iam:GetRolePolicy", "iam:PassRole"]

  # Allow users in the security account to access the IAM roles in this account
  allow_read_only_access_from_other_account_arns = [local.security_account_root_arn]
  allow_billing_access_from_other_account_arns   = [local.security_account_root_arn]
  allow_dev_access_from_other_account_arns       = [local.security_account_root_arn]
  allow_full_access_from_other_account_arns      = [local.security_account_root_arn]

  # A list of account root ARNs that should be able to assume the auto deploy role.
  allow_auto_deploy_from_other_account_arns = [
    # External CI/CD systems may use an IAM user in the security account to perform deployments.
    local.security_account_root_arn,

    # The shared-services account contains automation and infrastructure tools, such as CI/CD systems.
    "arn:aws:iam::${local.accounts.shared}:root",
  ]
}
The code above does the following:
-
Enable CloudTrail. We’ve configured CloudTrail to use the S3 bucket and KMS CMK in the logs account.
-
Enable AWS Config. We’ve configured AWS Config to use the S3 bucket in the logs account.
-
Configure the dev IAM role. We create a
devIAM role in this account, which will get read and write access to the services specified indev_permitted_services. -
Configure the Auto Deploy IAM role. We also create an
auto-deployIAM role that can be assumed by a CI server in the shared-services account to do deployments. This role will have the permissions specified inauto_deploy_permissions. -
Configure cross-account IAM roles. We then specify which other accounts are allowed to assume the IAM roles in this account. For the most part, we grant all permissions to the security account, so that by assigning users to IAM groups in that account, you’ll be able to access IAM roles in all the other child accounts.
Just as with the logs and security accounts, you’re going to use the OrganizationAccountAccessRole IAM role created by
account-baseline-root to authenticate to the stage account and all other child accounts. There are many ways to
assume an IAM role on the CLI;
for this guide, we’re going to keep using aws-vault.
Add a new profile entry in ~/.aws/config for your stage account that uses the root-iam-user as the
source_profile:
[profile stage-from-root]
role_arn=arn:aws:iam::<STAGE_ACCOUNT_ID>:role/OrganizationAccountAccessRole
source_profile=root-iam-user
Check that you’re able to authenticate to the stage account:
aws-vault exec stage-from-root -- aws sts get-caller-identityYou should see JSON output indicating that you’ve successfully assumed an IAM role:
{
  "UserId": "AIDAXXXXXXXXXXXX:1597932316055520000",
  "Account": "<STAGE_ACCOUNT_ID>",
  "Arn": "arn:aws:sts::<STAGE_ACCOUNT_ID>:assumed-role/OrganizationAccountAccessRole/1597932316055520000"
}
You’re now ready to deploy the account-baseline module in the stage account by running terragrunt apply:
cd infrastructure-live/stage/_global/account-baseline
aws-vault exec stage-from-root -- terragrunt apply|
Important
|
On some operating systems, such as MacOS, you may also need to increase your open files limit to avoid "pipe: too many open files" errors by running: ulimit -n 10240.
|
Remember to repeat this process in the other child accounts too (i.e., dev, prod, shared, etc)!
Try authenticating as an IAM user to the child accounts
Now that you have IAM users in the security account and IAM roles in the other accounts, it’s time to practice authenticating:
-
Use your IAM user’s user name and password (decrypted using keybase) to log into the web console of the security account (remember to use the IAM user sign-in URL for the security account).
-
Follow the steps in Lock down the root account IAM users to lock down your IAM user in the security account. This includes configuring an MFA device for your IAM user.
-
After configuring an MFA device, log out, and then log back into the security account again, this time providing your MFA token. If you don’t do this, attempting to assume IAM roles in other accounts won’t work, as those roles require an MFA token to be present.
-
Try to switch to a role in one of the other child accounts using the AWS Web Console. For example, authenticate as one of the IAM users in the security account, and then assume the
allow-full-access-from-other-accountsrole in the dev account (you can find the default list of IAM roles created in each account here). -
Alternatively, you can use the
aws-vault login xxxcommand to login to the AWS Web Console for any profilexxxthat you’ve configured inaws-vault. For example,aws-vault login logs-from-rootwill open up your web browser and log you into the logs account using theOrganizationAccountAccessRoleIAM Role.
Next steps
Now that you have your basic AWS account structure set up, the next step is to start deploying infrastructure in those accounts! Usually, the best starting point is to configure your network topology, as described in How to deploy a production-grade VPC on AWS.

Comments