

Intro
This is a complete guide to help you achieve compliance with the CIS AWS Foundations Benchmark. By following this guide, you can launch infrastructure that is compliant with the Benchmark recommendations, and you’ll be set to retain a compliant state over time because all of the infrastructure is defined as code. This guide targets version 1.4.0 of the Benchmark.
Previously, we supported versions 1.3.0 and 1.2.0 of the Benchmark. If you are looking to upgrade from an older version please follow these in order:
-
To upgrade from v1.2.0 to v1.3.0, please follow this upgrade guide;
-
To upgrade from v1.3.0 to v1.4.0, please follow this upgrade guide.
What is the CIS AWS Foundations Benchmark?
The CIS Benchmarks are objective, consensus-driven configuration guidelines developed by security experts to help organizations improve their security posture. The AWS Foundations Benchmark is a set of configuration best practices for hardening AWS accounts to establish a secure foundation for running workloads on AWS. It also provides ongoing monitoring to ensure that the account remains secure.
What you’ll learn in this guide
This guide consists of five main sections:
- Core concepts
-
An overview of the AWS Foundations Benchmark, including its control sections and structure.
- Production-grade design
-
How to use infrastructure as code to achieve compliance with minimal redundancy and maximum flexibility.
- Deployment walkthrough
-
A step-by-step guide to achieving compliance using the Gruntwork Infrastructure as Code Library and the Gruntwork CIS AWS Foundations Benchmark wrapper modules.
- Next steps
-
How to measure and maintain compliance.
- Traceability matrix
-
A reference table that maps each Benchmark recommendation to the corresponding section in the deployment walkthrough.
Feel free to read the guide from start to finish or skip around to whatever part interests you!
|
Note
|
This guide has been last updated on 6th September 2021, and it covers CIS 1.4.0 Benchmark recommendations. We aim to keep it up to date with our infrastructure-as-code modules with the latest CIS Benchmark that has been released. If you need to access older versions, please get in touch with us. |
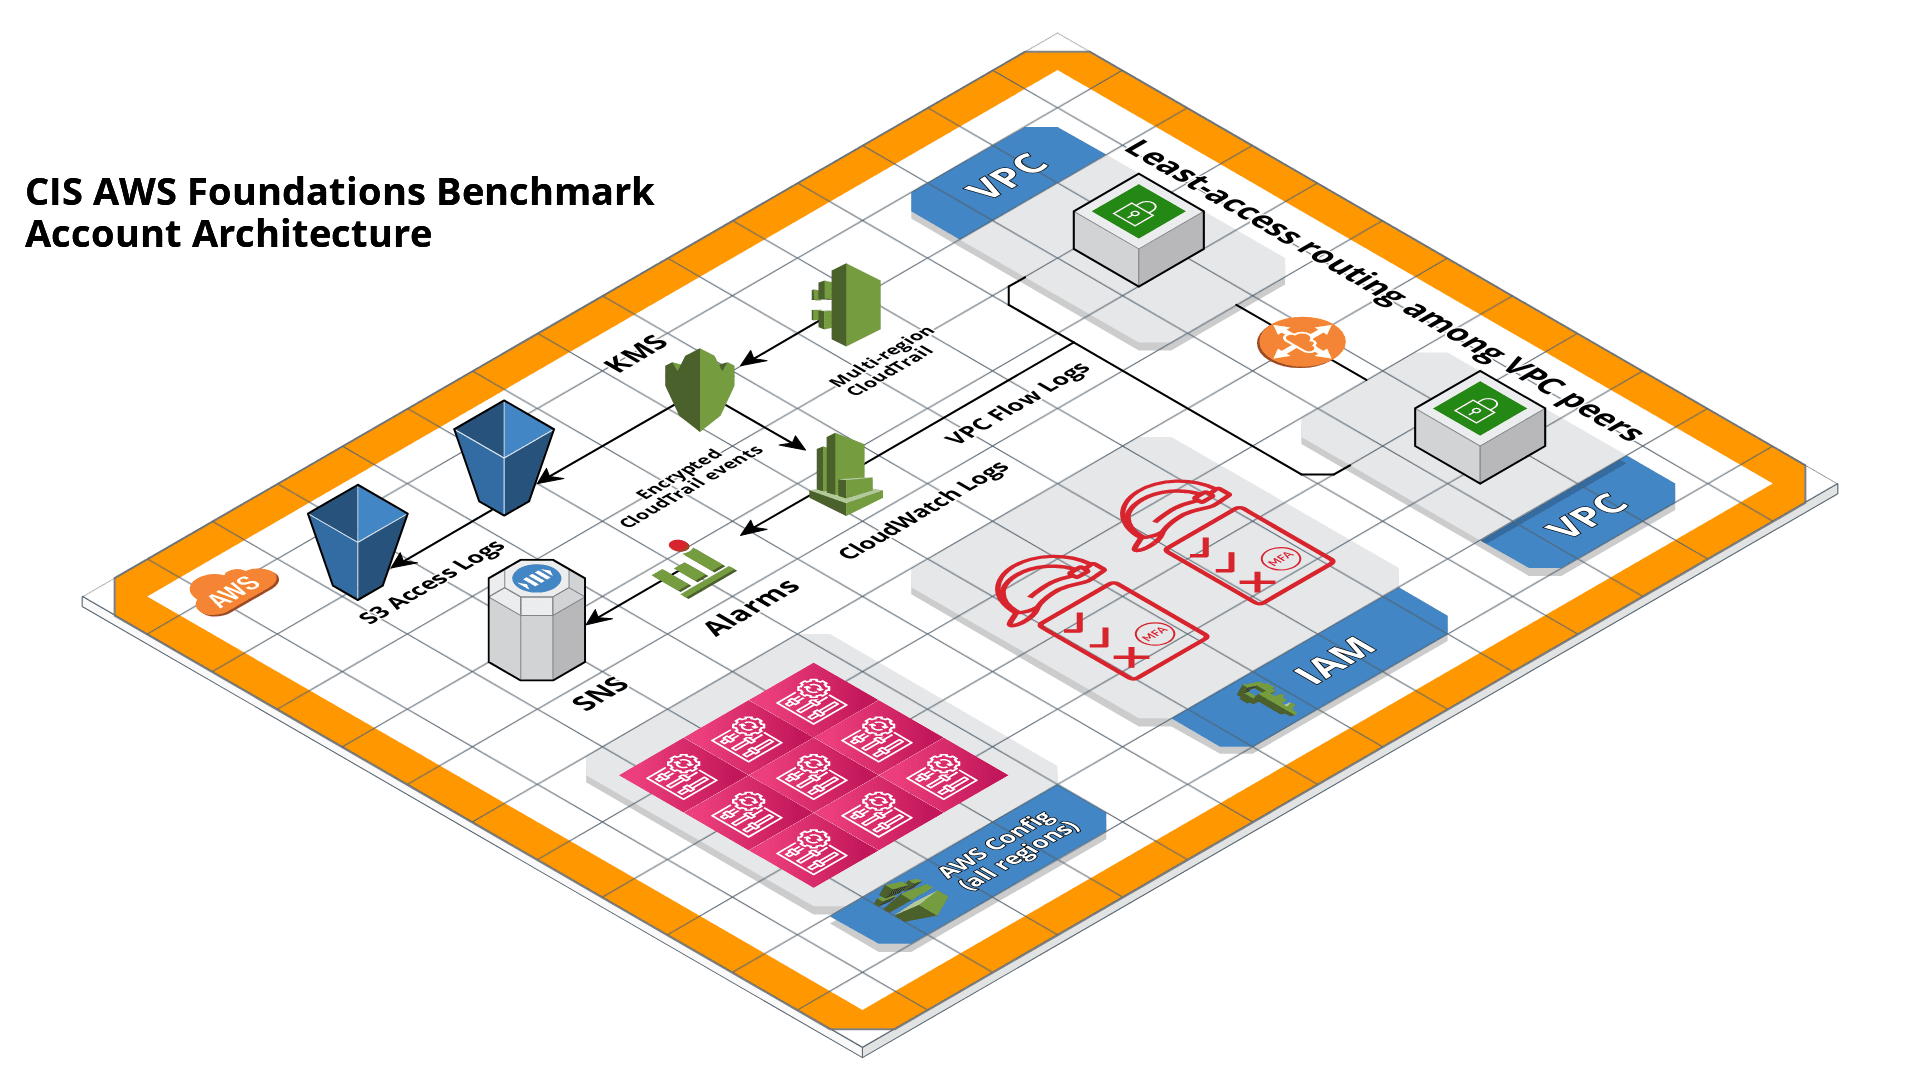
Core concepts
The CIS AWS Foundations Benchmark is organized into the following sections:
-
Identity and Access Management
-
Storage
-
Logging
-
Monitoring
-
Networking
There are multiple recommendations within each section. Note the use of the term recommendation as opposed to control or requirement. This reinforces the point that CIS is a self-imposed, best-practices standard, as opposed to compulsory or regulated and centralized standards such as the PCI DSS for the payment card industry or HIPAA for covered health care entities.
Assessment Status
Each recommendation is classified as either Automated or Manual. Automated recommendations indicate that the check for the recommendation may be accessed programmatically (e.g., an API exists to validate or enable the recommendation). Manual recommendations must be checked and remediated manually.
Profiles
The Benchmark defines two profile levels. Level one recommendations are easier to implement, incur less overhead, but still substantially improve security. Level two recommendations are meant for highly sensitive environments with a lower risk appetite. They may be more difficult to implement and/or cause more overhead in day-to-day usage.
CIS Controls
Each recommendation is also linked to a corresponding CIS Control. The controls are distinct from the Benchmark. They’re described by CIS as "a prioritized set of actions that collectively form a defense-in-depth set of best practices that mitigate the most common attacks against systems and networks". Organizations seeking to implement a comprehensive security program or framework can use the controls to measure their progress and prioritize security efforts. The Foundations Benchmark is just one of several guidelines that can help reach the bar set by the CIS Controls. Refer to the Benchmark document directly to view how the recommendations map to controls.
Recommendation sections
Identity and Access Management
Number of recommendations: 21
The recommendations in this section involve the use of identity, accounts, authentication, and authorization. On AWS, most identity and access control related concerns are managed using the eponymous IAM service. Hence, most (but not all) of the recommendations in this section discuss particular IAM configurations, such as the configuration of the password policy, the use of various groups and roles, and the configuration of multi-factor authentication (MFA) devices.
Storage
Number of recommendations: 7
This section was added originally in the previous CIS version (1.3.0), and now in 1.4.0 the recommendations are enhancements and updates to the use of AWS’s storage capabilities. The relevant services for this section are S3, EC2 and RDS. The recommendations in this section pertain to in-transit and at-rest encryption, access control to the resources, and handling sensitive data.
Logging
Number of recommendations: 11
AWS has a variety of logging, monitoring, and auditing features, and the Benchmark has recommendations for several of them:
-
AWS CloudTrail tracks user activity and API usage
-
AWS Config records and evaluates resource configurations
-
VPC Flow Logs capture network traffic information in VPCs
-
AWS KMS lets you handle keys to encrypt and decrypt your data
AWS has several other logging related features that are not covered directly by the Benchmark. For example, the primary log ingestion and query service, Amazon CloudWatch Logs, is integrated with many other AWS services. The Benchmark recommends that CloudTrail is integratd with CloudWatch Logs. Within the Gruntwork modules we’ve setup CloudWatch with all the integrated services such as AWS Config, CloudTrail and S3.
Monitoring
Number of recommendations: 15
Monitoring is an overloaded term in the industry. In the context of the AWS Foundations Benchmark, the monitoring section is exclusively about monitoring for specific API calls using the CloudTrail service paired with CloudWatch Logs filter metrics. Each recommendation in this section spells out a specific filter and an associated alarm.
Metric filter-related recommendations in this section are dependent on the "Ensure CloudTrail is enabled in all regions" and "Ensure CloudTrail trails are integrated with CloudWatch Logs" recommendation in the "Logging" section.
Networking
Number of recommendations: 4
The Benchmark is uncomfortably light on networking, considering its central role in the security of any
distributed system. The recommendations merely limit traffic from the zero network (0.0.0.0/0) and
suggest limiting routing for VPC peering connections based on the principle of least-privilege.
Production-grade design
In Core concepts we discussed the basics of the AWS Foundations Benchmark. Although it’s possible to achieve
compliance with the Benchmark by manually configuring each setting in the web console or entering the CLI commands, we
strongly discourage this approach. It precludes
the
myriad benefits of using code to manage infrastructure.
Instead, we advise using Terraform (or similar tools, such as CloudFormation or Pulumi) to configure cloud resources programmatically. This section will cover the Terraform resources you can use to implement each of the recommendations. We assume that you’re familiar with the basics of Terraform. If you aren’t, read our Introduction to Terraform blog post, or pick up the 2nd edition of Terraform Up & Running.
Identity and Access Management
The first section of the Benchmark centers on Identity and Access Management, including the following:
-
Avoiding usage of the "root" account
-
Requiring MFA for IAM users and the root account
-
Setting a specific password policy
-
Disabling administrative permissions
-
Limiting the use of API access keys
-
Using IAM roles
-
Removing expired SSL/TLS certificates
-
Enabling IAM Access Analyzer
-
Using AWS Organizations or identity federation to manage multi-account environments
In the subsequent sections, we’ll review the recommendations and discuss how to implement them using Terraform resources and data sources.
Configure authentication
One of main areas of concern in the IAM section relates to authentication. The Benchmark has recommendations for IAM users and the root user account, password policy, and multi-factor authentication. There is more than one way to authenticate to AWS, and the method you choose determines how to implement these recommendations in your code.
Federated authentication using SAML
Perhaps the most robust and secure method for authenticating to AWS is to use federated SAML authentication with an identity provider (IdP) like Okta, Google, or Active Directory. In this configuration, users authenticate to the IdP and assume IAM roles to obtain permissions in AWS. All user management is handled in the IdP, where you can assign roles to users according to their needs. If you use this approach, recommendation 1.21 from the Benchmark is the one relevant to you. However, several of other recommendations including 1.10, 1.15, and 1.11, are not applicable (assuming you have no IAM users at all).
Configuring SAML is a multi-step process that is outside the scope of this guide. Familiarize yourself with the
process by reviewing the AWS
documentation on the matter. You can use the
aws_iam_saml_provider and
aws_iam_policy_document Terraform
resources to manage your SAML provider via code.
IAM user authentication
Another option is to authenticate using IAM users. The accounts are created and managed directly in AWS as opposed to a third-party provider. IAM users log in to AWS with a password and an optional MFA device. IAM users are easier to get started with than SAML, and they’re also free to use. However, to avoid unauthorized access, it’s crucial to configure the IAM user settings securely. IAM users may be more suitable for smaller environments with only a few users.
A few tips on creating IAM users with Terraform:
-
To create IAM users, use the
aws_iam_userandaws_iam_user_login_profileresources. -
As instructed by recommendation 1.11, do not create API access keys for new users automatically. The intent is that users should create them on their own if and when needed.
-
To stay compliant with recommendation 1.15, be sure to never attach IAM policies directly to IAM users. Instead, create IAM groups, attach policies to those groups, and add the user to groups using the
aws_iam_user_group_membership. This helps to avoid scenarios where auditing the exact permissions of IAM users becomes difficult and unmaintainable.
Consider the following example which creates a user with access to AWS Support:
resource "aws_iam_user" "support_user" {
  name = "support"
}

resource "aws_iam_group" "example_group" {
  name = "support-group"
}

resource "aws_iam_group_policy_attachment" "support_group_attach" {
  group      = aws_iam_group.example_group.name
  policy_arn = "arn:aws:iam::aws:policy/AWSSupportAccess"
}

resource "aws_iam_user_group_membership" "example" {
  user = aws_iam_user.example_user.name
  groups = [aws_iam_group.example_group.name]
}
This code creates an IAM user called support, adds them to a new group called support-group, and attaches the
AWSSupportAccess managed policy to the group. It demonstrates how to meet a few of the Benchmark recommendations:
-
The user is created without an API access key (recommendation 1.11). Access keys should only be created by the user later.
-
The policy is attached to an IAM group, not directly to the IAM user (recommendation 1.15).
-
Recommendation 1.17 specifically requires that the Support policy be used. You should attach it to a group, as shown here.
Do not use full administrator privileges
Recommendation 1.16 states that no IAM policies with full administrator privileges be assigned. However, some administrator access is needed to maintain the account on an ongoing basis, and use of the root account is also prohibited. What to do?
One approach is to create an IAM policy with full permissions to IAM and nothing else. Attach the policy to a group, and give access only to trusted users. This allows effective administrator access without an explicit administrator policy. For example, you could use the following Terraform code to create such a policy:
data "aws_iam_policy_document" "iam_admin" {
  statement {
    sid = "iamAdmin"
    actions = [
      "iam:*",
    ]
    resources = ["*"]
    effect = "Allow"
  }
}
You can then attach that policy to a group:
resource "aws_iam_policy" "iam_admin" {
  name   = "iam_admin"
  path   = "/"
  policy = data.aws_iam_policy_document.iam_admin.json
}

resource "aws_iam_group" "iam_admin" {
  name = "iam-admins"
}

resource "aws_iam_group_policy_attachment" "iam_admin_group_attach" {
  group      = aws_iam_group.iam_admin.name
  policy_arn = aws_iam_policy.iam_admin.arn
}
In this example, any IAM user that is a member of the iam-admins group will have has permissions to access all
functionality in the IAM service, make them an effective administrator of the account.
Enabling multi-factor authentication for IAM users
Recommendation 1.10, which requires all IAM users to have MFA enabled, seems straightforward on the surface, but in AWS, there’s no way to explicitly require MFA for log in. Instead, you can make sure that all groups and roles have a conditional IAM policy attached that explicitly denies all actions unless MFA is enabled. This way, whenever a user logs in without MFA, all services will show a permission denied error if the user didn’t use MFA.
The
AWS
documentation has an example of this policy. Create the policy with Terraform, and attach it to every group
you create - including the iam-admins and support groups we created above. Here’s an example:
data "aws_iam_policy_document" "require_mfa_policy" {
  statement {
    sid = "AllowViewAccountInfo"
    effect = "Allow"
    actions = ["iam:ListVirtualMFADevices"]
    resources = ["*"]
  }

  statement {
    sid = "AllowManageOwnVirtualMFADevice"
    effect = "Allow"
    actions = [
      "iam:CreateVirtualMFADevice",
      "iam:DeleteVirtualMFADevice"
    ]
    resources = [
      "arn:aws:iam::${var.aws_account_id}:mfa/$${aws:username}",
    ]
  }

  statement {
    sid = "AllowManageOwnUserMFA"
    effect = "Allow"
    actions = [
      "iam:DeactivateMFADevice",
      "iam:EnableMFADevice",
      "iam:GetUser",
      "iam:ListMFADevices",
      "iam:ResyncMFADevice"
    ]
    resources = [
      "arn:aws:iam::${var.aws_account_id}:user/$${aws:username}",
      "arn:aws:iam::${var.aws_account_id}:mfa/$${aws:username}"
    ]
  }

  statement {
    sid = "DenyAllExceptListedIfNoMFA"
    effect = "Deny"
    not_actions = [
      "iam:CreateVirtualMFADevice",
      "iam:EnableMFADevice",
      "iam:GetUser",
      "iam:ListMFADevices",
      "iam:ListVirtualMFADevices",
      "iam:ResyncMFADevice",
      "sts:GetSessionToken"
    ]
    resources = ["*"]
    condition {
      test     = "Bool"
      variable = "aws:MultiFactorAuthPresent"
      values   = ["false"]
    }
  }
}

resource "aws_iam_group" "support" {
  name  = "support"
}


resource "aws_iam_group_policy" "require_mfa_for_support" {
  name   = "RequireMFA"
  group  = aws_iam_group.support.name
  policy = data.aws_iam_policy_document.require_mfa_policy
}
We’ve created an IAM policy that denies all access accept the necessary permissions to set up an MFA device, then we
attached the policy to the support group. If a user that is a member of the support group logs in without MFA, they
won’t have access to any services, even if the support group or the user had other policies attached. They will have
enough permissions to set up an MFA device, and after doing so, they can log in and will have any permissions granted to
them by other IAM policies.
Attach a policy like this one to every group in your account.
Password policy
The IAM password policy is perhaps the most straightforward and explicit set of recommendations (1.8-1.9 and 1.12) in the entire
Benchmark. You can invoke the
Terraform aws_iam_account_password_policy resource to implement the recommended policy.
For example:
resource "aws_iam_account_password_policy" "aws_foundations_benchmark_policy" {
  minimum_password_length        = 14
  allow_users_to_change_password = true
  hard_expiry                    = true
  max_password_age               = 90
  password_reuse_prevention      = 24
}
Cleanup Expired SSL/TLS certificates
The CIS AWS v1.3 recommendations require that all expired SSL/TLS certificates stored in AWS IAM are automatically removed
(see 1.19). Unfortunately removing expired certificates via AWS Management Console is not currently supported so we must remove
then using the AWS API. To view the current certificates stored in IAM, use the AWS CLI and execute the list-server-certificates
command:
aws iam list-server-certificatesThe command output should return an array that contains all of the SSL/TLS certificates currently stored in IAM and their metadata:
{
	"ServerCertificateMetadataList": [{
		"ServerCertificateId": "EHDGFRW7EJFYTE88D",
		"ServerCertificateName": "MyServerCertificate",
		"Expiration": "2021-07-05T23:59:59Z",
		"Path": "/",
		"Arn": "arn:aws:iam::012345678910:server-certificate/MySSLCertificate",
		"UploadDate": "2018-06-10T11:56:08Z"
	}]
}
The Expiration attribute contains the expiration date for each SSL/TLS certificate which you can use to determine
if it should be removed. To remove the certificate use the delete-server-certificate command, making sure to
substitute <CERTIFICATE_NAME> with the ServerCertificateId attribute from the previous command:
aws iam delete-server-certificate --server-certificate-name <CERTIFICATE_NAME>To automate this process you might decide to implement a Lambda function that runs on a regular schedule and removes
all expired SSL/TLS certificates. Check out the Apply the account-baseline-root baseline to the root account, Apply the account-baseline-app to the logs account and Apply the account-baseline-security to the security account section of the deployment walkthrough
to see how this module is used from the Landing Zone account baselines and is deployed in each of your AWS accounts.
IAM Access Analyzer
In both versions 1.3.0 and 1.4.0, the CIS recommendations stipulate that the AWS IAM Access Analyzer service is enabled across all active regions in a given AWS Account or Organization.
To achieve this compliance requirement, enable the IAM Access Analyzer service for every AWS region you have enabled in
every one of your AWS accounts. Alternatively, you could make use of the iam-access-analyzer-multi-region module
available in the Gruntwork Service Catalog, or if you’re following this guide, refer to Apply the account-baseline-root baseline to the root account, Apply the account-baseline-app to the logs account and Apply the account-baseline-security to the security account sections of the
deployment walkthrough to see how this module is used from the Landing Zone account baselines and is deployed in each of your AWS accounts.
Once enabled, it will scan only within the boundaries of the AWS Account or Organization it has access to. Only specific resources are analyzed and included in the results - e.g. S3 buckets, SQS, etc. (For the full list of resources supported, please visit the relevant AWS docs). This lets you identify unintended access to these resources and data by external entities.
The findings from the IAM Access Analyzer can be found in the AWS web console, and can be archived or resolved. Please visit the AWS guidance on how to do so.
Manual steps
A few of the recommendations in the IAM section are not achievable via API and require a one-time manual configuration. Perform the steps in this section manually.
Enable MFA for the root account
Securing the "root" user, or the first user that is created when you set up an AWS account, is one of the first actions you should take in any new account. It is highly recommended that the user of this account be avoided for everyday tasks. Unfortunately, there is no API or automation available for configuring an MFA device for the root user. Follow the manual steps outlined in the AWS docs. Configuring a virtual MFA device will achieve recommendation 1.5. You can also refer to the production-grade AWS account structure guide.
For the paranoid: configure a hardware MFA device, as suggested by recommendation 1.6. We suggest using a Yubikey due to its reputation for strong security characteristics and multitude of form factors. Refer to the documentation for more information on using a hardware device with the root user.
Subscribe to SNS topic
The Config alerts and CloudWatch Metric Alarms all go to an SNS topic. Unfortunately, there is no way to automate subscribing to the SNS topic as each of the steps require validating the delivery target. Follow the steps outlined in the AWS docs to be notified by Email, Phone, or SMS for each of the alerts.
You can also configure an automated system integration if you have a third party alerting system or central dashboard. Follow the steps in the AWS docs on how to add an HTTPS endpoint as a subscriber to the alerts.
Answer security questions and complete contact details
When setting up a new account, AWS asks for contact information and security questions. Unfortunately, there is no API or automation available for this functionality. In the AWS console, visit the Account settings page and complete the Alternate Contacts and Configure Security Challenge Questions questions.
For further detail, follow the manual steps outlined in the CIS Benchmark document.
Storage
Version 1.3.0 of the Benchmark includes a new storage section that has three recommendations pertaining to the S3 service as well as the EC2 service. These have to do with encryption at rest and in transit.
To comply with recommendation 2.1.1, make sure to enable server side encryption on your S3 buckets. In Terraform, this
is achieved by configuring the server_side_encryption_configuration argument of the aws_s3_bucket resource.
To comply with recommendation 2.1.2, make sure that all access to your S3 buckets is over TLS. In Terraform, you will want to attach a policy to your buckets that includes a statement similar to this:
statement {
  sid     = "AllowTLSRequestsOnly"
  effect  = "Deny"
  actions = ["s3:*"]
  resources = [
    "<YOUR BUCKET ARN>",
    "${<YOUR BUCKET ARN>}/*"
  ]
  principals {
    type        = "*"
    identifiers = ["*"]
  }
  condition {
    test     = "Bool"
    variable = "aws:SecureTransport"
    values   = ["false"]
  }
}
Configure EBS Encryption
To comply with recommendation 2.2.1 be sure to configure EBS volume encryption
in all of the enabled AWS regions within your AWS Account(s). You can invoke the Terraform
aws_ebs_encryption_by_default resource to implement the recommendation.
For example:
resource "aws_ebs_encryption_by_default" "ebs_encryption" {
  enabled = true
}
Configure RDS Encryption
To comply with recommendation 2.3.1, if you use RDS it must be configured with RDS encryption for all instances and in all of the enabled AWS regions within your AWS Account(s). You can set to true the Terraform storage_encrypted attribute for an RDS instance to implement the recommendation.
For example:
resource "aws_db_instance" "your_primary_db" {
  storage_encrypted = true
}
Secure your S3 Data
The CIS 1.4.0 Benchmark recommends a few additional steps to ensure your data is secured and accessible. There are two new recommendations that relate to S3:
-
2.1.3 prescribes that the MFA Delete is enabled on all S3 buckets in your accounts
-
2.1.4 recommends that all data in your S3 buckets be classified, discovered and secured
|
Note
|
The steps below are not the full list of actions needed to configure MFA Delete or Amazon Macie for your account. To follow the steps necessary to configure it according to the CIS 1.4.0 Benchmark, please follow the MFA Delete and Macie section in the the migration guide to CIS 1.4.0, or the deployment guide section in this guide. |
Enable MFA Delete (recommendation 2.1.3)
Enabling MFA Delete in your bucket adds another layer of security by requiring MFA in any request to delete a version or change the versioning state of the bucket.
Unfortunately, the way AWS built the MFA delete feature is currently quite hard to use. Due to AWS API limitations,
Terraform can’t configure MFA delete on S3 buckets; you must first
do it using the aws CLI,
and then, after that, set mfa_delete = true in your Terraform code to
reflect the update.
Moreover, to enable MFA delete, you must authenticate as the root user of the AWS account that owns the bucket, and pass
in a different MFA token value for every single bucket where you enable MFA delete. We’ve tried to make it as easy as we
can, but due to how AWS built this feature, it is still quite tedious.
To make this change you need to use the root user of the account that owns the bucket, and MFA needs to be enabled. Follow the manual steps below to do so:
MFA Delete - manual steps
|
Important
|
We do not recommend having active AWS access keys for the root user, so remember to delete them when you finish this step. |
In order to enable MFA Delete, you need to:
-
Create a bucket with
mfa_delete=false. -
Using the root user, call the AWS CLI to enable MFA Delete. If you are using
aws-vault, it is necessary to use the--no-sessionflag.aws s3api put-bucket-versioning --region <REGION> \ --bucket <BUCKET NAME> \ --versioning-configuration Status=Enabled,MFADelete=Enabled \ --mfa "arn:aws:iam::<ACCOUNT ID>:mfa/root-account-mfa-device <MFA CODE>"
We also created a script to help you enable MFA Delete in all buckets from a single account at once. To learn how to run it and when, please follow the production Deployment Walkthrough guide section below.
Configure Amazon Macie (recommendation 2.1.4)
The new CIS AWS v1.4.0 recommendation 2.1.4 requires that all data in Amazon S3 be discovered, classified and secured.
One way to achieve this is the by leveraging the Amazon Macie service.
Amazon Macie is a fully managed data security and data privacy service that uses machine learning and pattern matching
to discover and protect your sensitive data in AWS. To help you achieve this recommendation, we have created a dedicated
macie service
in our CIS service catalog.
AWS Macie - manual steps
When configuring Macie for each region, you’ll need to specify a few things: * the S3 bucket to be a repository for the sensitive data discovery results; * the KMS key that the data in that bucket will be encrypted with; * and the S3 bucket(s) that you’ll need Macie to analyze for you. The following manual steps are not a comprehensive full setup for Macie. To configure Macie fully and understand the details, please follow
-
Log into the AWS console and for every region where you have enabled Macie, repeat the steps 2 to 9.
-
Go to the Amazon Macie service.
-
In the left pane, under Settings, click on "Discovery results".
-
Click on "Configure now" to configure an S3 bucket for long-term retention of sensitive data discovery results.
-
Choose "Existing bucket".
-
Under "Choose a bucket", select your bucket. This can be either one you already have, or the one that the
maciemodule created (if you set thecreate_macie_bucketvariable totrue). You will use the same bucket for every region. -
Under "KMS encryption" choose "Select a key from your account".
-
Under "KMS key alias" select your KMS key. This can be either one you already have, or the one that the
maciemodule created (if you set thecreate_kms_keyvariable totrue). You will use the same key for every region. -
Click "Save".
Manually maintain buckets to analyze in the buckets_to_analyze variable
To set up Macie to analyze the desired S3 buckets, you’ll need to create a Macie classification job, Typically, you’ll want it to analyze all the buckets in the region. However, the terraform AWS provider does not support specifying all the buckets in a region - it requires that an explicit list of buckets be provided (see related bug
here). Therefore, you’ll need to maintain an
explicit list of buckets per region, namely in the variable buckets_to_analyze. For more details, see the production Deployment Walkthrough guide section below.
Logging
In the Logging section, the Benchmark recommendations target the following services:
We’ll cover each of them in turn.
AWS CloudTrail
The Benchmark has specific requirements for the CloudTrail configuration, described in recommendations 3.1-4, 3.6-7 and 3.10-11. The CloudTrail must have the following characteristics:
-
Collects events in all regions
-
Enables log file integrity validation
-
Ensures that the S3 bucket used by CloudTrail is not publicly accessible
-
Integrates CloudTrail with CloudWatch Logs
-
Enables access logging for the CloudTrail S3 bucket
-
Enables object-level logging for read and write events for the CloudTrail S3 bucket
Use the aws_cloudtrail Terraform resource to create the CloudTrail. Include the following settings in the CloudTrail configuration:
is_multi_region_trail         = true
include_global_service_events = true
enable_log_file_validation    = true
s3_bucket_name                = "<YOUR CLOUDTRAIL BUCKET NAME>"
cloud_watch_logs_group_arn    = "<YOUR CLOUDWATCH LOGS GROUP ARN>"

event_selector {
  read_write_type           = "All"
  include_management_events = true

  data_resource {
    type   = "AWS::S3::Object"
    values = ["<YOUR CLOUDTRAIL BUCKET ARN>"]
  }
}
You’ll also need the aws_s3_bucket,
aws_s3_account_public_access_block
resources to create an S3 bucket for the CloudTrail to send its events to and to disable public access to the bucket;
you wouldn’t want to expose the CloudTrail data publicly!
Finally, you’ll need the
aws_cloudwatch_log_group resource to
create a CloudWatch Log group as another location for CloudTrail to send events. Use this ARN for the aws_cloudtrail
resource cloud_watch_logs_group_arn parameter when creating the CloudTrail.
AWS Config
Benchmark recommendation 3.5 states that AWS Config be enabled in all regions. This is challenging to implement with Terraform because running a particular configuration in all regions is not a feature that Terraform has natively. Terraform has loops, but they aren’t available for the purpose of repeating a resource in many regions. Unfortunately, at the time of writing, there isn’t a way to complete this recommendation without repetitive code.
To proceed, start by creating a Terraform module that takes the following actions:
-
Creates an SNS topic for publishing Config events
-
Creates an S3 bucket for Config events and disables public access
-
Creates an IAM role for the config service to access an S3 bucket and an SNS topic
-
Creates a configuration recorder
-
Creates a delivery channel
When the module is working and sets up AWS Config according to the prescribed configuration, you should invoke it once for each region in the account. One way to do this is to use provider aliases. For example, you could specify one provider for each region, then invoke the module for each provider:
# The default provider configuration
provider "aws" {
  alias  = "us-east-1"
  region = "us-east-1"
}

# Additional provider configuration for west coast region
provider "aws" {
  alias  = "us-west-2"
  region = "us-west-2"
}

# ... repeat the provider for each region in the AWS account

module "aws_config_us_east_1" {
  source = "/path/to/your/config/module"
  providers = {
    aws = aws.us-east-1
  }
}

module "aws_config_us_west_2" {
  source = "/path/to/your/config/module"
  providers = {
    aws = aws.us-west-2
  }
}

# ... repeat the module invocation for each provider
When AWS launches new regions, they are not enabled by default, so you won’t need to add to this list over time.
Alternatively, you could disable the regions you aren’t using and only enable AWS Config for those that you need.
KMS Key rotation
Finally, a simple recommendation! To meet recommendation 3.8, create KMS keys with key rotation enabled. Using Terraform, it looks like this:
resource "aws_kms_key" "example" {
  description         = "Example Key"
  enable_key_rotation = true
}
VPC Flow Logs
Under the Benchmark, all VPCs must have a Flow Log to log network traffic. Use the
aws_flow_log Terraform resource, being sure to use
log_destination_type=cloud-watch-logs.
Because the recommendation is to attach flow logs to every single VPC, you’ll need to repeat the configuration for all
the default VPCs which exist in all regions of the account. You can use the
cloud-nuke defaults-aws command to easily remove all the default VPCs
(and default security groups) from all regions of an account, making it easier to achieve this recommendation.
Monitoring
The Monitoring section has 15 recommendations for creating specific CloudWatch Logs metric filters that send alarms to an SNS topic when a particular condition is met.
The easiest way to achieve this recommendation is to create a Terraform module that creates CloudWatch Logs metrics
filters and CloudWatch Alarms, and then invoke the module once for each recommendation. You’ll need the
aws_cloudwatch_log_metric_filter
and aws_cloudwatch_metric_alarm
Terraform resources.
Networking
The networking section involves a paltry four recommendations. We don’t consider this section to be sufficient to ensure a secure networking configuration. For a deeper dive, refer to Gruntwork’s How to deploy a production-grade VPC on AWS guide, which includes recommendations for segmentation using network ACLs, security groups, and remote access. Moreover, our Reference Architecture can get you up and running with a secure network configuration immediately.
Recommendation 5.1 requires that you use Network ACL rules to block all access to the remote server administration ports, such as SSH to port 22 and Remote
Desktop to port 3389, by default. You can then add additional NACL rules to allow remote admin access, but only from specific CIDR blocks. Recommendation 5.2 similarly allows you to allow remote admin access from specific CIDR blocks in your Security Groups. Note that allowing remote admin access from all IPs (0.0.0.0/0) is NOT allowed, so instead, if you require SSH or Remote Desktop to your cloud resources, provide a more restricted CIDR
range, such as the IP addresses of your offices.
To meet recommendation 5.3, run the cloud-nuke defaults-aws command
to remove the rules from all default security groups. Note that it isn’t possible to actually delete the default
security group, so instead the command deletes the rules, eliminating the risk of something being mistakenly exposed.
Finally, for recommendation 5.4, the guidance is straightforward: when creating peering connections between VPCs, do not create routes for subnets that don’t need them. In other words, only create routes between subnets that need them based on the services running on those subnets. This can help to avoid exposing services between networks unnecessarily.
Deployment walkthrough
The Production-grade design section describes in detail the Terraform resources to use and the approach to take for each recommendation, but we’ve already done that grunt work! This section documents how to achieve compliance using the Infrastructure as Code modules from Gruntwork.
Pre-requisites
This walkthrough has the following pre-requisites:
Gruntwork Infrastructure as Code Library
This guide uses code from the Gruntwork Infrastructure as Code Library, as it implements most of the production-grade design for you out of the box. Make sure to read How to use the Gruntwork Infrastructure as Code Library.
Gruntwork Compliance for CIS AWS Foundations Benchmark
This guide also uses code from the Gruntwork CIS AWS Foundations Benchmark repository, which contains the necessary configurations to achieve compliance.
|
Important
|
You must be a Gruntwork Compliance subscriber to access the Gruntwork Infrastructure as Code Library and the CIS AWS Foundations Benchmark modules. |
How to configure a production-grade AWS account structure
Review the production-grade AWS account structure guide to familiarize yourself with many of the concepts that this walkthrough depends on.
Terraform
This guide uses Terraform to define and manage all the infrastructure as code. If you’re not familiar with Terraform, check out A Comprehensive Guide to Terraform, A Crash Course on Terraform, and How to Use the Gruntwork Infrastructure as Code Library.
Terragrunt
This guide uses Terragrunt to configure the infrastructure as code. To get familiar with Terragrunt, explore the features, read the guides, or dive into the documentation.
Keybase (optional)
As part of this guide, you will create IAM users, including, optionally, credentials for those IAM users. If you choose to create credentials, those credentials will be encrypted with a PGP key. You could provide the PGP keys manually, but a more manageable option may be to have your team members to sign up for Keybase, create PGP keys for themselves, and then you can provide their Keybase usernames, and the PGP keys will be retrieved automatically.
The Gruntwork solution
Gruntwork offers infrastructure-as-code battle-tested modules that will help you create production-grade infrastructure faster and much more efficiently than if you develop your modules from scratch. In the CIS compliance library, there are many core modules, and each one of them is "compliance-ready". They are configured in a way to help you achieve CIS compliance up to the latest supported benchmark, but still allow some flexibility in the setup.
The compliance library is known as "Gruntwork CIS Service Catalog" and it has its own standalone modules, or could be building on top of the existing standard & non-compliant core modules from the "Standard Service Catalog" or "Infrastructure as Code Library". Each of these modules can be used on their own, or within "wrappers" (explained later) by passing in the required inputs and using terraform or terragrunt.
The image below shows the hierarchy between the different levels of modules from the different code libraries Gruntwork offers.
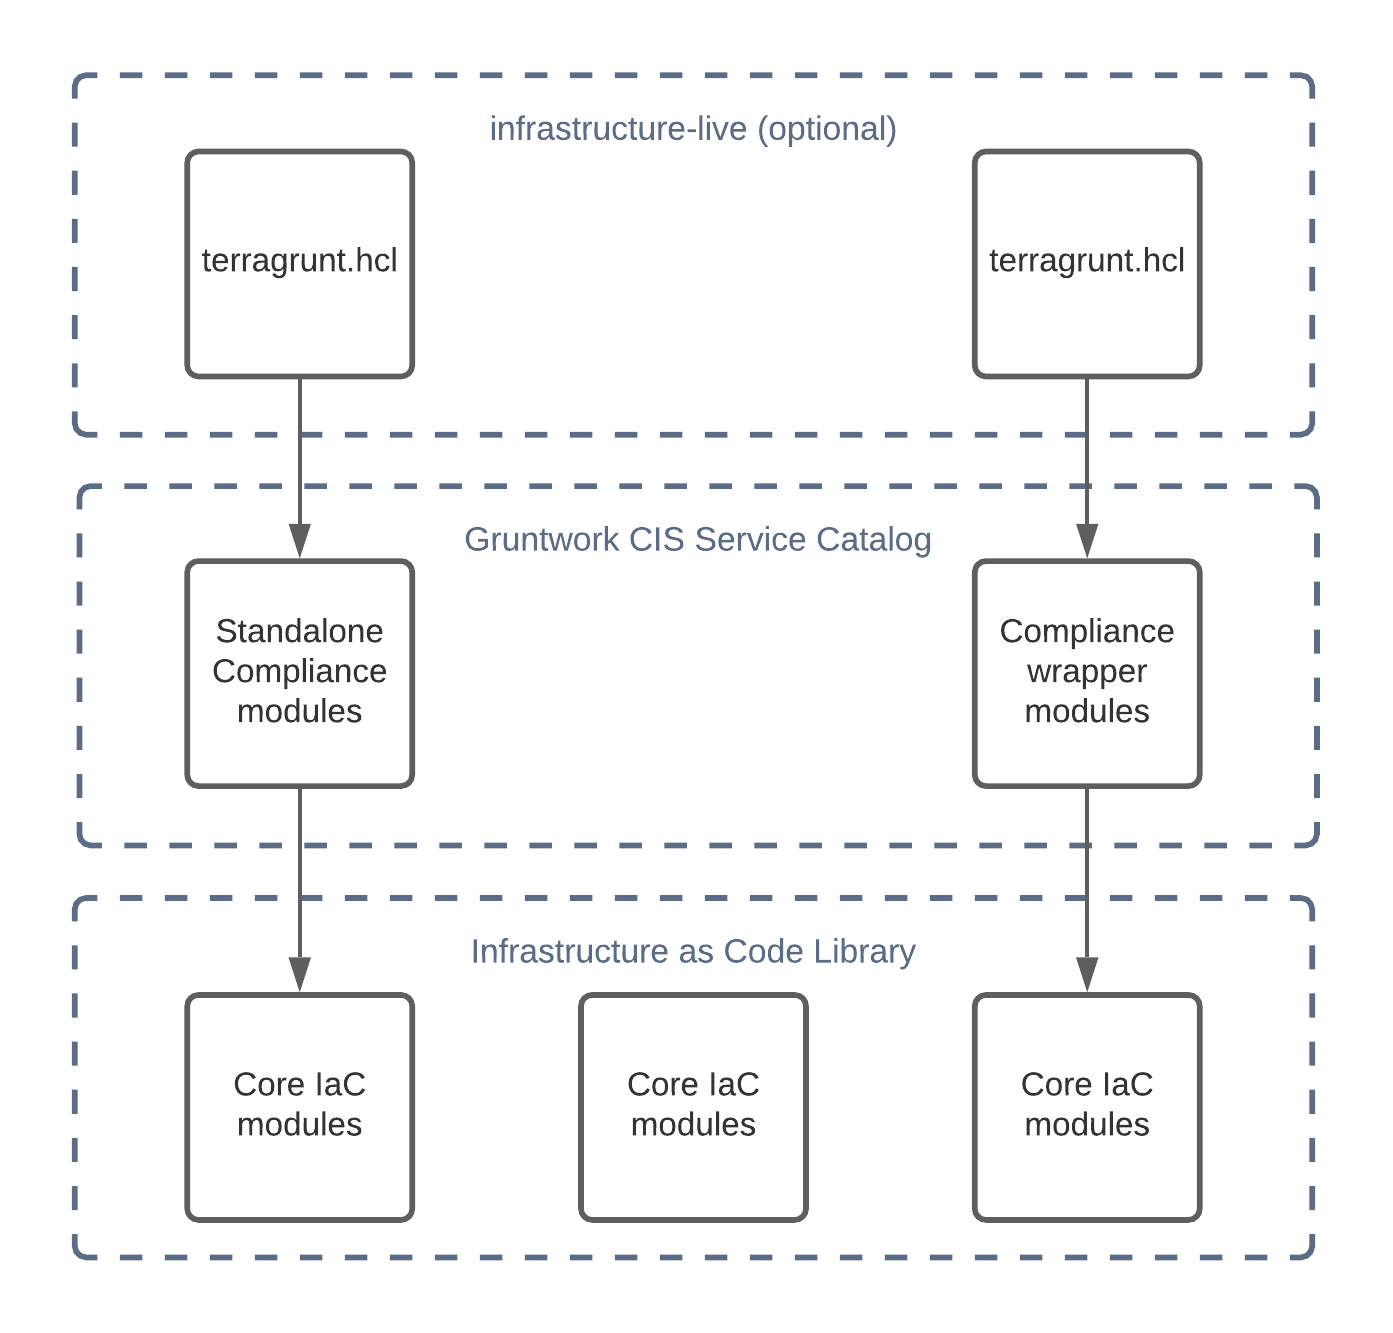
Let’s unpack this a bit.
Core modules
Core modules are broadly applicable and can be used with or without compliance requirements. For example,
the iam-groups
core module creates a best practices set of IAM groups. The groups are configurable according to your needs.
You could, for example, choose to create a group with read-only access, another group with full administrator
access, and no other groups. All Gruntwork subscribers have access to the core modules, which reside in
Gruntwork’s infrastructure as code repositories.
Standalone Compliance modules
The standalone compliance modules complement the modules available in the IaC Library. They have the CIS compliance requirements built right in and may combine multiple modules including Core modules for a
specific use case. For example, the cleanup-expired-certs standalone module deploys a Lambda function that runs regularly and automatically removes all expired SSL/TLS certificates stored in AWS IAM in compliance with recommendation 1.19 of the CIS AWS Foundations Benchmark. These modules are in the terraform-aws-cis-service-catalog
repository (accessible to Gruntwork Compliance subscribers).
Compliance wrapper modules
The compliance wrapper modules are an extension of the IaC Library. They use the
source argument in a Terraform module block to invoke
the core module with a configuration that is customized for compliance with the CIS AWS Foundations Benchmark.
These modules are in the terraform-aws-cis-service-catalog
repository (accessible to Gruntwork Compliance subscribers).
infrastructure-live
infrastructure-live uses Terragrunt to make it easier to
work with Terraform modules in multiple environments. infrastructure-live is optional - you can use all of the modules
with or without Terragrunt.
If you’re not using Terragrunt, you can use Terraform modules to call the compliance wrapper modules directly. Subscribers can refer to the
Create your own service catalog section
in the Gruntwork Service Catalog documentation for more information on how you might use infrastructure-live.
Benefits
This modular, decomposed approach allows for maximum code reuse. The core modules can be used with or without
compliance, depending on how they are configured. The compliance wrappers are like shadows of the core
modules; they pass through most of the variables to the core modules without alteration, but hard code any
settings needed for compliance. When you call the compliance modules from your own code, you only need to set up any variables that are custom for your environment. Often
times the default settings are good enough.
You can use this approach on each AWS account. In many cases, you’ll only need compliance for production accounts, but the
same methodology can be applied to pre-production accounts as well.
If you need to brush up on how the IaC Library works, read the How to use the Gruntwork Infrastructure as Code Library guide.
Prepare your infrastructure-live repository
We’ve previously described exactly how to prepare your repository in the
Gruntwork Landing Zone guide.
Follow the steps in that section to get your infrastructure-live repository set up for the next steps.
Create the root account
The first step is to create your root account. This account will be the parent of all of your other AWS accounts and the central place where you manage billing. You create this initial account manually, via a web browser:
-
Go to https://aws.amazon.com.
-
Click Create an AWS Account.
-
Go through the sign up flow, entering contact and billing details as requested.
-
You will be asked to enter an email address and password to use as the credentials for the root user of this root account.
Lock down the root user
After signing up for an AWS account, you’ll be logged in as the root user. The root user has unrestricted access to just about everything in your AWS account (and any child accounts), so if an attacker compromises your root user, the results can be catastrophic for your company. Therefore, you should lock down the root user as much as possible:
- Use a secrets manager
-
Do NOT store the root user’s password, or secrets of any kind, in plain text. Instead, always use a secrets manager such as 1Password, LastPass, or pass to store the credentials in an encrypted format.
- Use a strong, generated password
-
Do NOT re-use passwords from other websites, or any password that you can remember at all. Instead, generate a random, cryptographically secure, long password (20+ characters) for the root user. All the password managers mentioned above can generate and store passwords for you in one step, so use them!
- Add security questions to your root account
-
The CIS benchmark suggests adding security questions when registering your AWS account so that when somebody contacts AWS support, they will be required to complete a security challenge. To add security questions to the root account, navigate in the AWS web console to
My Accountand then to thePersonal Informationpage. There you should be able to click onConfigure Security Challenge Questionsand add your questions. - Enable MFA
-
Make sure to enable MFA for your root user. Feel free to use a virtual or hardware MFA device, whichever is more straightforward or required by your company, as either one dramatically improves the security of your root user. It is up to your discretion to decide which option is suitable for your use case. The CIS benchmark recommends using a dedicated or company-owned device for MFA and not a personal one. This applies to both virtual and hardware devices.
- Disable access keys
-
Make sure to delete the root user’s access keys, so that the only way to login as the root user is via the web console, where MFA is required.
|
Note
|
The one exception to this rule is when you enable the MFA delete feature as it requires access keys for the root user. Under these circumstances, we recommend creating a set of access keys solely to enable the MFA Delete feature and immediately remove them afterward. |
- Don’t use the root user again
-
In the next section, you will create an IAM user in the root account with admin permissions. Once you’ve created that IAM user, you should do everything as that IAM user, and more or less never touch the root user account again. The only time you’ll need it is for account recovery situations (e.g., you accidentally deleted the IAM user or lost your credentials) or for the small number of tasks that require root user credentials.
Create an IAM user in the root account
As the last action you do as the root user, you MUST create an IAM user. This is not only a better practice from a
security standpoint, but also, the account-baseline-xxx modules we will use below assume IAM roles, which does not
work with a root user. Later on, we’ll create and manage all IAM users as code, but you should create this very first
IAM user manually by
following these instructions:
-
Enter a username for your IAM user.
-
Select both "programmatic access" and "AWS Management Console access."
-
On the next page, click "Attach existing policies to user directly" and attach the
AdministratorAccesspolicy. -
Click next a few more times to create the IAM user.
-
In a secrets manager, save the IAM sign-in URL, your IAM user’s username, the password, and your Access Keys.
Lock down the root account IAM users
Although IAM users don’t have the same powers as a root user, having an IAM user account compromised can still be a huge problem for your company (especially if that IAM user had admin permissions), so it’s still critical to lock down IAM user accounts as much as possible:
- Use a secrets manager
-
Do NOT store the root user’s password, or secrets of any kind, in plain text. Instead, always use a secrets manager such as 1Password, LastPass, or pass to store the credentials in an encrypted format.
- Use a strong, generated password
-
Do NOT re-use passwords from other websites, or any password that you can remember at all. Instead, generate a random, cryptographically secure, long password (20+ characters). All the password managers mentioned above can generate and store passwords for you in one step, so use them!
- Enable MFA
-
Always make sure to enable MFA for your IAM user. Feel free to use a virtual or hardware MFA device—whichever is easier or required by your company—as either one dramatically improves the security of your IAM user. Note that using SMS (text messages) for MFA is no longer recommended by NIST due to known vulnerabilities with the cellular system, so using a virtual or hardware MFA device is preferable; that said, MFA with SMS is still better than no MFA at all.
Deployment approach
Before we dive into the code and deployment for each resource, let’s take a step back and understand how the code is structured. Most of the features explained in the Production-grade design section will be deployed using the Landing Zone solution, and some more standalone modules like the VPC module.
The Landing Zone will be deployed in three steps - the account-baseline-root to set up your organization-wide configurations, create the necessary child AWS accounts, set up the CloudTrail and AWS Config buckets. Next, we’ll need to apply the account-baseline-app against the created logs account, adding more settings that will be used for aggregation of logs and metrics from the whole organization. Then the account-baseline-security will be applied, and that’s responsible to set up your IAM roles and groups that would allow you to access the rest of the accounts within your organization. And finally, the account-baseline-app will be applied to an AWS account with the purpose of hosting an application.
The standalone modules will follow the pattern of referencing the module and providing the necessary input variables for it, then applying with terragrunt.
Deploy Landing Zone solution
Apply the account-baseline-root to the root account
Configure the account-baseline-root for the root account
|
Important
|
You must be a Gruntwork Compliance subscriber to access the Gruntwork Infrastructure as Code Library and the CIS AWS Foundations Benchmark modules. |
First, let’s consider the repository structure that is recommended by this guide. It is available for your reference in the /examples/for-production folder of the terraform-aws-cis-service-catalog repository. Consider the following directory structure for your infrastructure-live repository. It showcases the configuration files for your local variables.
.
└ infrastructure-live
    └ root
        └ account.hcl
        └ _global
            └ region.hcl
        └ us-east-1
            └ region.hcl
    └ common.hcl
    └ accounts.json
Each of the region.hcl, accounts.hcl and common.hcl should contain the relevant information, so in your modules, you’re able to reference the values like this:
locals {
  # Automatically load common variables shared across all accounts
  common_vars = read_terragrunt_config(find_in_parent_folders("common.hcl"))

  # Automatically load account-level variables
  account_vars = read_terragrunt_config(find_in_parent_folders("account.hcl"))

  # Extract the account_name for easy access
  account_name = local.account_vars.locals.account_name

  # Automatically load region-level variables
  region_vars = read_terragrunt_config(find_in_parent_folders("region.hcl"))

  # Extract the region for easy access
  aws_region = local.region_vars.locals.aws_region
}
You’ll need to create these files to be able to follow the code examples following. For examples on what to put in each of these files, refer to the terraform-aws-cis-service-catalog repository. Each of the terragrunt.hcl files will use the above locals configuration to help you avoid repetition. Note that the examples below won’t show this in the interest of clarity.
Next, we’ll configure the account-baseline-root with settings needed for creating all the child accounts - AWS Organizations, IAM Roles, IAM Users, IAM Groups, IAM Password Policies, Amazon GuardDuty, AWS CloudTrail, AWS Config, Security Hub and Amazon Macie.
We’ll be using the landingzone/account-baseline-root module from terraform-aws-cis-service-catalog.
|
Note
|
This guide will use Terragrunt and its associated file and folder structure to deploy Terraform modules. Please note that Terragrunt is NOT required for using Terraform modules from the Gruntwork Infrastructure as Code Library. Check out How to use the Gruntwork Infrastructure as Code Library for instructions on alternative options, such as how to deploying how to use plain terraform. |
Next, create a terragrunt.hcl file in infrastructure-live, under the file path root/_global/account-baseline:
infrastructure-live
  └ root
    └ _global
      └ region.hcl
      └ account-baseline
        └ terragrunt.hcl
Point the source URL in your terragrunt.hcl file to the account-baseline-root module in the terraform-aws-cis-service-catalog
repo, setting the ref param to the version you require:
terraform {
  source = "git::git@github.com:gruntwork-io/terraform-aws-cis-service-catalog.git//modules/landingzone/account-baseline-root?ref=v0.27.0"
}
Set the variables for the account-baseline-root module in this environment in the inputs = { … } block of terragrunt.hcl:
# ---------------------------------------------------------------------------------------------------------------------
# CONFIGURE A PROVIDER FOR EACH AWS REGION
# To deploy a multi-region module, we have to configure a provider with a unique alias for each of the regions AWS
# supports and pass all these providers to the multi-region module in a provider = { ... } block. You MUST create a
# provider block for EVERY one of these AWS regions, but you should specify the ones to use and authenticate to (the
# ones actually enabled in your AWS account) using opt_in_regions.
# ---------------------------------------------------------------------------------------------------------------------

locals {
  common_vars = read_terragrunt_config(find_in_parent_folders("common.hcl"))

  # A local for more convenient access to the accounts map.
  accounts = local.common_vars.locals.accounts

  # Both buckets will be created in the logs account by account-baseline-root
  config_s3_bucket_name     = "acme-config-bucket-logs"
  cloudtrail_s3_bucket_name = "acme-cloudtrail-logs"

  # The following locals are used for constructing multi region provider configurations for the underlying module.
  # A list of all AWS regions
  all_aws_regions = [
    "af-south-1",
    "ap-east-1",
    "ap-northeast-1",
    "ap-northeast-2",
    "ap-northeast-3",
    "ap-south-1",
    "ap-southeast-1",
    "ap-southeast-2",
    "ca-central-1",
    "cn-north-1",
    "cn-northwest-1",
    "eu-central-1",
    "eu-north-1",
    "eu-south-1",
    "eu-west-1",
    "eu-west-2",
    "eu-west-3",
    "me-south-1",
    "sa-east-1",
    "us-east-1",
    "us-east-2",
    "us-gov-east-1",
    "us-gov-west-1",
    "us-west-1",
    "us-west-2",
  ]

  # Creates resources in the specified regions. The best practice is to enable multiregion modules in all enabled
  # regions in your AWS account. To get the list of regions enabled in your AWS account, you can use the AWS CLI: aws
  # ec2 describe-regions.
  opt_in_regions = [
    "eu-north-1",
    "ap-south-1",
    "eu-west-3",
    # ...,
  ]
}

generate "providers" {
  path      = "providers.tf"
  if_exists = "overwrite"
  contents  = <<EOF
%{for region in local.all_aws_regions}
provider "aws" {
  region = "${region}"
  alias  = "${replace(region, "-", "_")}"
  # Skip credential validation and account ID retrieval for disabled or restricted regions
  skip_credentials_validation = ${contains(coalesce(local.opt_in_regions, []), region) ? "false" : "true"}
  skip_requesting_account_id  = ${contains(coalesce(local.opt_in_regions, []), region) ? "false" : "true"}
}
%{endfor}
EOF
}

inputs = {
  # Prefix all resources with this name
  name_prefix = "<SOME_UNIQUE_IDENTIFIER>-root"

  # If you've already created an AWS Organization in your root account, set this to false
  create_organization = false

  # The child AWS accounts to create in this AWS organization
  child_accounts = {
    logs = {
      email = "root-accounts+logs@acme.com"

      # Mark this account as the logs account, used to aggregate all AWS Config and CloudTrail data.
      is_logs_account = true
    },
    security = {
      email = "root-accounts+security@acme.com"
    },
    shared-services = {
      email = "root-accounts+shared-services@acme.com"
    },
    dev = {
      email = "root-accounts+dev@acme.com"
    },
    stage = {
      email = "root-accounts+stage@acme.com"
    },
    prod = {
      email = "root-accounts+prod@acme.com"
    }
  }

  # The IAM users to create in this account. Since this is the root account, you should only create IAM users for a
  # small handful of trusted admins.
  #
  # NOTE: Make sure to include the IAM user you created manually here! We'll import the user into Terraform state in
  # the next step of this guide, allowing you to manage this user as code going forward.
  users = {
    alice = {
      groups               = ["support"]
      pgp_key              = "keybase:alice"
      create_login_profile = true
      create_access_keys   = false
    },
    bob = {
      groups               = ["billing"]
      pgp_key              = "keybase:bob"
      create_login_profile = true
      create_access_keys   = false
    }
  }

  ################################
  # Parameters for AWS Config
  ################################
  # Send Config logs to the common S3 bucket.
  config_s3_bucket_name = local.config_s3_bucket_name

  # Send Config logs and events to the logs account.
  config_central_account_id = local.accounts.logs

  # This account sends logs to the Logs account.
  config_aggregate_config_data_in_external_account = true

  ################################
  # Parameters for CloudTrail
  ################################

  # Send CloudTrail logs to the common S3 bucket.
  cloudtrail_s3_bucket_name = local.cloudtrail_s3_bucket_name

  # The ARN is a key ID. This variable prevents a perpetual diff when using an alias.
  cloudtrail_kms_key_arn_is_alias = false

  ##################################
  # Cross-account IAM role permissions
  ##################################

  # By granting access to the root ARN of the Security account in each of the roles below,
  # we allow administrators to further delegate access to other IAM entities

  # Assuming the developers role will grant access to these services.
  dev_permitted_services = [
    "ec2",
    "ecs",
    "lambda",
    "rds",
    "elasticache",
    "route53",
  ]

  # Assuming the auto-deploy role will grant access to these services.
  auto_deploy_permissions = [
    "iam:GetRole",
    "iam:GetRolePolicy",
  ]

  # Join this account to the root account's Security Hub
  security_hub_associate_to_master_account_id = local.accounts.root

  # Configure opt in regions for each multi region service based on locally configured setting.
  config_opt_in_regions              = local.opt_in_regions
  guardduty_opt_in_regions           = local.opt_in_regions
  kms_cmk_opt_in_regions             = local.opt_in_regions
  iam_access_analyzer_opt_in_regions = local.opt_in_regions
  ebs_opt_in_regions                 = local.opt_in_regions
  security_hub_opt_in_regions        = local.opt_in_regions

  # Configures Amazon Macie
  create_macie_bucket      = true
  macie_bucket_name        = "<your-macie-bucket-name>-root-macie-results"
  macie_create_kms_key     = true
  macie_kms_key_name       = "<your-macie-kms-key-name>-macie"
  macie_kms_key_users      = ["arn:aws:iam::${local.accounts.root}:root"]
  macie_opt_in_regions     = local.opt_in_regions

  # The variable below for Amazon Macie needs to be manually maintained. Please ensure you change the defaults.
  macie_buckets_to_analyze = {
    "us-east-1": ["<FILL_IN_BUCKET_1_NAME>", "<FILL_IN_BUCKET_2_NAME>"],
    "<another-region>": ["<FILL_IN_BUCKET_3_NAME>", "<FILL_IN_BUCKET_4_NAME>"]
  }
}
The example code above does the following:
-
Create 6 child AWS accounts. These accounts are described in more detail in the How to configure a production-grade AWS account structure using Gruntwork AWS Landing Zone child accounts section.
-
Associate an email address with each of the child accounts. This will be the email address for the root user of each account and AWS requires that the root user’s email address is globally unique, so it cannot be the email address you used for the root account or any of the other child accounts. You’ll have to either create multiple email accounts in your company’s email system, or, if your company uses Gmail (perhaps as part of G Suite), you can take advantage of the fact that Gmail ignores everything after a plus sign in an email address, so that while AWS will see
root-accounts+security@acme.com,root-accounts+shared@acme.com, androot-accounts+dev@acme.comas three unique email addresses, Gmail will see them all as the same email address,root-accounts@acme.com. -
Mark one of the child accounts as a logs account. We set
is_logs_account = trueon one of the child accounts to indicate it is the logs account where we will aggregate AWS Config, CloudTrail, IAM Access Analyzer, Security Hub and Amazon Macie data from all the other accounts. Theaccount-baseline-rootmodule will automatically create an S3 bucket for AWS Config and an S3 bucket and KMS CMK = for CloudTrail in this account and configure the root account to send all the AWS Config and CloudTrail data to these S3 buckets. Later on, you’ll configure all the other accounts to send their data to these S3 buckets too. -
Create IAM groups. By default,
account-baseline-rootwill not create afull-accessIAM group as CIS requirement 1.16 guides. It will create asupportand abillingIAM group (for the support and finance teams). -
Create IAM users. For this example, we create
aliceandbob, addingaliceto thefull-accessIAM group andbobto thebillingIAM group. Note: your own IAM user (the one you created manually) should be in theuserslist; we’ll use theimportcommand to put this user under Terraform management shortly. -
Generate a password for each user. We encrypt this password with that user’s PGP key from Keybase (we’ll come back to how to handle the passwords shortly).
Pull in the backend settings from a root terragrunt.hcl file that you
include in each child terragrunt.hcl:
include {
  path = find_in_parent_folders()
}
Next, you need to authenticate as your IAM user in the root account. There are multiple ways to authenticate to AWS on the CLI; in this guide, we’ll use the open source tool aws-vault. Install aws-vault and add to it the Access Keys you saved earlier from your IAM user:
$ aws-vault add root-iam-user
Enter Access Key Id: XXXXXXXXXXXX
Enter Secret Key: YYYYYYYYYYYY
You should also enable MFA for the IAM user (see the AWS docs on enabling a virtual MFA device) and add the configuration to your profile as follows:
mfa_serial=arn:aws:iam::${local.accounts.root}:mfa/<YOUR_IAM_USER>Next, install the AWS CLI, and check that authentication is working:
aws-vault exec root-iam-user -- aws sts get-caller-identityYou should get JSON output with information about your IAM user:
{
  "UserId": "AIDAXXXXXXXXXXXX",
  "Account": "${local.accounts.root}",
  "Arn": "arn:aws:iam::${local.accounts.root}:user/<YOUR_IAM_USER>"
}
You’re now almost ready to deploy the account-baseline module in the root account. But first, you may need to import
some existing resources.
Import existing resources from the root account into Terraform state
Before applying the security baseline to the root account, we need to import any existing resources—including the IAM
user you created manually earlier—into Terraform state, so that Terraform manages those existing resources instead of
trying to create totally new ones. You can do this using the
import command, which uses the format:
terraform import <ADDRESS> <ID>Where <ADDRESS> is the address of the Terraform
resource you’re importing and <ID> is a resource-specific identifier (e.g., for aws_instance, it’s the instance ID,
whereas for aws_lb, it’s the load balancer’s name—check the docs for the resource to find out what to use).
Let’s import the IAM user you created manually in the root account. IAM users are managed using the
aws_iam_user resource, and the
documentation for that
resource tells us to use the user’s name as the <ID>; we’ll assume for this example that your IAM user’s name was
alice, who is already one of the entries in the users variable in terragrunt.hcl. So now we need the <ADDRESS>.
An easy way to get it is to run plan:
cd infrastructure-live/root/_global/account-baseline
aws-vault exec root-iam-user -- terragrunt plan
You should get a whole bunch of log output, including something that looks like this:
------------------------------------------------------------------------

An execution plan has been generated and is shown below.
Resource actions are indicated with the following symbols:
  + create
 <= read (data resources)

Terraform will perform the following actions:

# ... (ommitting lots of log output for simplicity) ...

# module.root_baseline.module.iam_users.aws_iam_user.user["alice"] will be created
  + resource "aws_iam_user" "user" {
      + arn           = (known after apply)
      + id            = (known after apply)
      + name          = "alice"
      + path          = "/"
      + unique_id     = (known after apply)
    }

# ... (ommitting lots of log output for simplicity) ...

Plan: 160 to add, 0 to change, 0 to destroy.

------------------------------------------------------------------------

Note: You didn't specify an "-out" parameter to save this plan, so Terraform
can't guarantee that exactly these actions will be performed if
"terraform apply" is subsequently run.
This plan output is telling you that Terraform will create a bunch of resources, including the aws_iam_user named
alice. Of course, this user already exists, so we want to import the user rather than create it again. The text
next to the # gives you the <ADDRESS> to use:
# module.root_baseline.module.iam_users.aws_iam_user.user["alice"] will be created
So the <ADDRESS> you want is module.root_baseline.module.iam_users.aws_iam_user.user["alice"]. Next, import your IAM user:
aws-vault exec root-iam-user -- terragrunt import \
  'module.root_baseline.module.iam_users.aws_iam_user.user["alice"]' \
  'alice'
You should see log output that looks something like this:
[terragrunt] 2021/05/13 14:19:16 Running command: terraform import module.root_baseline.module.iam_users.aws_iam_user.user["alice"] alice
module.root_baseline.module.iam_users.aws_iam_user.user["alice"]: Importing from ID "alice"...
module.root_baseline.module.iam_users.aws_iam_user.user["alice"]: Import prepared!
  Prepared aws_iam_user for import
module.root_baseline.module.iam_users.aws_iam_user.user["alice"]: Refreshing state... [id=alice]

Import successful!

The resources that were imported are shown above. These resources are now in
your Terraform state and will henceforth be managed by Terraform.
You’ll now be able to manage that IAM user as code going forward!
If you created other resources manually in the root account, you may want to import them too, so you can manage
everything as code, and so that Terraform doesn’t try to create any duplicate resources.
Apply the account-baseline-root baseline to the root account
You’re now ready to apply the security baseline to the root account. You should be authenticated as the same IAM user
in the root account as in the previous two sections. To apply the security baseline, you run terragrunt apply:
cd infrastructure-live/root/_global/account-baseline
aws-vault exec root-iam-user -- terragrunt apply|
Important
|
On some operating systems, such as MacOS, you may also need to increase your open files limit to avoid "pipe: too many open files" errors by running: ulimit -n 1024.
|
Once apply completes, you should see output variables with all of your account IDs, the name of the AWS Config S3
bucket, the name of the CloudTrail S3 bucket, and the ARN of the CloudTrail KMS key:
# (this output has been edited to be easier to read)
child_accounts = {
  "dev" = {
    "email" = "root-accounts+dev@acme.com"
    "id" = "<DEV_ACCOUNT_ID>"
    # (...)
  }
  "logs" = {
    "email" = "root-accounts+logs@acme.com"
    "id" = "<LOGS_ACCOUNT_ID>"
    # (...)
  }
  "prod" = {
    "email" = "root-accounts+prod@acme.com"
    "id" = "<PROD_ACCOUNT_ID>"
    # (...)
  }
  "security" = {
    "email" = "root-accounts+security@acme.com"
    "id" = "<SECURITY_ACCOUNT_ID>"
    # (...)
  }
  "shared-services" = {
    "email" = "root-accounts+shared-services@acme.com"
    "id" = "<SHARED_SERVICES_ACCOUNT_ID>"
    # (...)
  }
  "stage" = {
    "email" = "root-accounts+stage@acme.com"
    "id" = "<STAGE_ACCOUNT_ID>"
    # (...)
  }
}
cloudtrail_kms_key_arn          = "<CLOUDTRAIL_KMS_KEY_ARN>"
cloudtrail_s3_bucket_name       = "<CLOUDTRAIL_BUCKET_NAME>"
config_s3_bucket_name           = "<CONFIG_BUCKET_NAME>"
cloudtrail_cloudwatch_group_arn = "<CLOUDWATCH_GROUP_ARN>"
If you followed the steps for preparing your infrastructure-live repo, now you can update the account.hcl with the account IDs from the Terraform output! If you are instead making use of account.hcl files (located in each account folder (e.g., infrastructure-live/dev, infrastructure-live/shared, etc.), update them too with the
appropriate account ID shown in the Terraform output, so they look like:
locals {
  account_name = "<REPLACE_WITH_NAME_OF_ACCOUNT>"
  account_id = "<REPLACE_WITH_ID_OF_ACCOUNT>"
}
{
"account_name": "<REPLACE_WITH_ID_OF_ACCOUNT>"
}Note that we haven’t specified any region here so far. If you’re following the guide on how to prepare your infrastructure-live repo, you might have created previously files called region.hcl like below:
# Common variables for this region
locals {
  # Automatically load common variables shared across all accounts
  common_vars = read_terragrunt_config(find_in_parent_folders("common.hcl"))

  # Automatically load account-level variables
  account_vars = read_terragrunt_config(find_in_parent_folders("account.hcl"))

  aws_region   = "us-west-2"
  state_bucket = "${local.common_vars.locals.name_prefix}-${local.account_vars.locals.account_name}-${local.aws_region}-tf-state"
}
Alternatively, you can add to your locals where necessary the following line, containing your choice of AWS regions:
aws_region = "us-west-2"Similarly, you will need to use the common.hcl file to store some terraform output values too. We will be needing throughout the rest of this guide the following values: cloudtrail_s3_bucket_name, config_s3_bucket_name, cloudtrail_kms_key_arn, cloudtrail_cloudwatch_group_arn, and the encrypted passwords for IAM users you created:
user_passwords = {
  "alice" = "wcBMA7E6Kn/t1YPfAQgAVSXlUzumcs4UyO8E5q099YnnU="
  "bob" = "wcBMA7E6Kn/t1YPfAQgACgbdb1mYtQx7EL4hnVWtYAi="
}
Send the encrypted password to each user, along with their user name, and the IAM user sign-in URL for the root account. Each user can then decrypt the password on their own computer (which should have their PGP key) as follows:
echo "<PASSWORD>" | base64 --decode | keybase pgp decryptReset the root user password in each child account
When creating the child accounts, you may have noticed that you provided an email address for each root user, but confusingly, not a password. So how do you login as the root user then? It’s not obvious, but the answer is that you reset the root user password, using the "Forgot your password?" prompt on the root user login page. AWS will email you a reset link, which you can click to go to a page that will allow you to configure a password for the root user. Use this process to reset the password for the root user of each child account you created.
Lock down the root user in the child accounts
Once you’re able to access the root user of each child account, you should follow the steps in Lock down the root user for each of those child accounts—including enabling MFA and deleting the root user’s access keys—and (almost) never use those root users again.
Apply the account-baseline-app to the logs account
The next step is to configure the logs account, which is used to aggregate AWS Config, CloudTrail, IAM Access Analyzer, Security Hub and Amazon Macie data from all the other accounts.
Create a terragrunt.hcl file in infrastructure-live under the file path logs/_global/account-baseline:
infrastructure-live
  └ root
  └ logs
    └ _global
      └ account-baseline
        └ terragrunt.hcl
Point the source URL in your terragrunt.hcl file to the account-baseline-app module in the terraform-aws-cis-service-catalog
repo, setting the ref param to the version you require:
terraform {
  source = "git::git@github.com:gruntwork-io/terraform-aws-cis-service-catalog.git//modules/landingzone/account-baseline-app?ref=v0.27.0"
}
Set the variables for the account-baseline-app module in this environment in the inputs = { … } block of terragrunt.hcl:
locals {
  aws_region = local.region.aws_region

  # A local for more convenient access to the accounts map.
  accounts = local.common_vars.locals.accounts

  # Both buckets are created in the logs account by account-baseline-root
  config_s3_bucket_name     = local.common_vars.locals.config_s3_bucket_name
  cloudtrail_s3_bucket_name = local.common_vars.locals.cloudtrail_s3_bucket_name

  # The Cloudtrail KMS Key is deployed at the logs account but it's value is an output from the root account.
  cloudtrail_kms_key_arn = local.common_vars.locals.cloudtrail_kms_key_arn

  # A local for convenient access to the security account root ARN.
  security_account_root_arn = "arn:aws:iam::${local.accounts.security}:root"

 # The following locals are used for constructing multi region provider configurations for the underlying module.
  # A list of all AWS regions
  all_aws_regions = [
    "af-south-1",
    "ap-east-1",
    "ap-northeast-1",
    "ap-northeast-2",
    "ap-northeast-3",
    "ap-south-1",
    "ap-southeast-1",
    "ap-southeast-2",
    "ca-central-1",
    "cn-north-1",
    "cn-northwest-1",
    "eu-central-1",
    "eu-north-1",
    "eu-south-1",
    "eu-west-1",
    "eu-west-2",
    "eu-west-3",
    "me-south-1",
    "sa-east-1",
    "us-east-1",
    "us-east-2",
    "us-gov-east-1",
    "us-gov-west-1",
    "us-west-1",
    "us-west-2",
  ]

  # Creates resources in the specified regions. The best practice is to enable multiregion modules in all enabled
  # regions in your AWS account. To get the list of regions enabled in your AWS account, you can use the AWS CLI: aws
  # ec2 describe-regions.
  opt_in_regions = [
    "eu-north-1",
    "ap-south-1",
    "eu-west-3",
    # ...,
  ]
}


# ---------------------------------------------------------------------------------------------------------------------
# CONFIGURE A PROVIDER FOR EACH AWS REGION
# To deploy a multi-region module, we have to configure a provider with a unique alias for each of the regions AWS
# supports and pass all these providers to the multi-region module in a provider = { ... } block. You MUST create a
# provider block for EVERY one of these AWS regions, but you should specify the ones to use and authenticate to (the
# ones actually enabled in your AWS account) using opt_in_regions.
# ---------------------------------------------------------------------------------------------------------------------

generate "providers" {
  path      = "providers.tf"
  if_exists = "overwrite"
  contents  = <<EOF
%{for region in local.all_aws_regions}
provider "aws" {
  region = "${region}"
  alias  = "${replace(region, "-", "_")}"
  # Skip credential validation and account ID retrieval for disabled or restricted regions
  skip_credentials_validation = ${contains(coalesce(local.opt_in_regions, []), region) ? "false" : "true"}
  skip_requesting_account_id  = ${contains(coalesce(local.opt_in_regions, []), region) ? "false" : "true"}
}
%{endfor}
EOF
}

inputs = {
  # Prefix all resources with this name
  name_prefix = "<SOME_UNIQUE_IDENTIFIER>-logs"

  # Provide the opt_in_regions for all multi-region modules
  config_opt_in_regions              = local.opt_in_regions
  guardduty_opt_in_regions           = local.opt_in_regions
  kms_cmk_opt_in_regions             = local.opt_in_regions
  ebs_opt_in_regions                 = local.opt_in_regions
  iam_access_analyzer_opt_in_regions = local.opt_in_regions
  security_hub_opt_in_regions        = local.opt_in_regions

 ################################
  # Parameters for AWS Config
  ################################
  # Send Config logs to the common S3 bucket.
  config_s3_bucket_name = local.config_s3_bucket_name

  # Send Config logs and events to the logs account.
  config_central_account_id = local.accounts.logs

  #  This is the Logs account, so we create the SNS topic for aggregating Config logs from all accounts.
  config_should_create_sns_topic = true

  # All of the other accounts send logs to this account.
  config_linked_accounts = [
  for name, id in local.accounts :
    id if name != "logs"
  ]

  ################################
  # Parameters for CloudTrail
  ################################

  # Send CloudTrail logs to the common S3 bucket.
  cloudtrail_s3_bucket_name = local.cloudtrail_s3_bucket_name

  # All of the other accounts send logs to this account.
  cloudtrail_allow_kms_describe_key_to_external_aws_accounts = true
  cloudtrail_external_aws_account_ids_with_write_access = [
  for name, id in local.accounts :
    id if name != "logs"
  ]

  # The ARN is a key ID. This variable prevents a perpetual diff when using an alias.
  cloudtrail_kms_key_arn_is_alias = false

  # By granting access to the root ARN of the Logs account, we allow administrators to further delegate to access
  # other IAM entities
  cloudtrail_kms_key_administrator_iam_arns = ["arn:aws:iam::${local.accounts.logs}:root"]
  cloudtrail_kms_key_user_iam_arns          = ["arn:aws:iam::${local.accounts.logs}:root"]

  ##################################
  # Benchmark SNS alarms configuration
  ##################################

  # Create the alarms topic in the logs account
  cloudtrail_benchmark_alarm_sns_topic_already_exists = false
  cloudtrail_benchmark_alarm_sns_topic_name           = "BenchmarkAlarmTopic"

  ##################################
  # Cross-account IAM role permissions
  ##################################

  # A role to allow users that can view and modify AWS account billing information.
  allow_billing_access_from_other_account_arns = [local.security_account_root_arn]

  # A role that allows read only access.
  allow_read_only_access_from_other_account_arns = [local.security_account_root_arn]

  # A role that allows access to support only.
  allow_support_access_from_other_account_arns = [local.security_account_root_arn]

  # Join this account to the root account's Security Hub
  security_hub_associate_to_master_account_id = local.accounts.root

  # Join this account to the root account's Amazon Macie
  macie_administrator_account_id = local.accounts.root

  # Configure Amazon Macie
  create_macie_bucket            = true
  macie_bucket_name              = "<your-macie-bucket-name>-security-macie-results"
  macie_create_kms_key           = true
  macie_kms_key_name             = "<your-macie-kms-key-name>-macie"
  macie_kms_key_users            = ["arn:aws:iam::${local.accounts.root}:root"]
  macie_opt_in_regions           = local.opt_in_regions
  macie_administrator_account_id = local.accounts.root

  # The variable below for Amazon Macie needs to be manually maintained. Please ensure you change the defaults.
  macie_buckets_to_analyze = {
    "us-east-1": ["<FILL_IN_BUCKET_1_NAME>", "<FILL_IN_BUCKET_2_NAME>"],
    "<another-region>": ["<FILL_IN_BUCKET_3_NAME>", "<FILL_IN_BUCKET_4_NAME>"]
  }
}
The example above configures the logs account of an AWS Organization as follows:
-
Aggregate CloudTrail Logs: We configure the logs account to use the S3 bucket and KMS CMK for CloudTrail that were already created by
account-baseline-root. -
Aggregate AWS Config: We configure the logs account to use the S3 bucket for AWS Config that was already created by
account-baseline-root. -
Allow access from the security account: We configure IAM roles that IAM users in the security account will be able to assume to get access to the logs account.
Configure your Terraform backend:
include {
  path = find_in_parent_folders()
}
You’re now going to use an IAM role to authenticate to the logs account. This IAM role is created automatically in each
child account by account-baseline-root and has a default name of OrganizationAccountAccessRole. There are many ways
to assume an IAM role on the CLI;
for this guide, we’re going to keep using aws-vault.
Open up ~/.aws/config and you should see a profile that was created automatically when you ran
aws-vault add root-iam-user earlier:
[profile root-iam-user]Add a new profile entry in ~/.aws/config for your logs account that uses the root-iam-user as the
source_profile:
[profile logs-from-root]
role_arn=arn:aws:iam::${local.accounts.logs}:role/OrganizationAccountAccessRole
source_profile=root-iam-user
Check that you’re able to authenticate to the logs account:
aws-vault exec logs-from-root -- aws sts get-caller-identityYou should see JSON output indicating that you’ve successfully assumed an IAM role:
{
  "UserId": "AIDAXXXXXXXXXXXX:1111111111111111111",
  "Account": "${local.accounts.logs}",
  "Arn": "arn:aws:sts::${local.accounts.logs}:assumed-role/OrganizationAccountAccessRole/1111111111111111111"
}
You’re now ready to deploy the account-baseline-app in the logs account by running terragrunt apply:
cd infrastructure-live/logs/_global/account-baseline
aws-vault exec logs-from-root -- terragrunt apply|
Important
|
On some operating systems, such as MacOS, you may also need to increase your open files limit to avoid "pipe: too many open files" errors by running: ulimit -n 1024.
|
Apply the account-baseline-security to the security account
Now that your logs accounts is fully configured, you need to apply the security baseline to the security account, which is where all your IAM users and groups will be defined and managed.
Create a terragrunt.hcl file in infrastructure-live under the file path security/_global/account-baseline:
infrastructure-live
  └ root
  └ logs
  └ security
    └ _global
      └ account-baseline
        └ terragrunt.hcl
Point the source URL in your terragrunt.hcl file to the account-baseline-security module in the terraform-aws-cis-service-catalog
repo, setting the ref param to the version you require:
terraform {
  source = "git::git@github.com:gruntwork-io/terraform-aws-cis-service-catalog.git//modules/landingzone/account-baseline-security?ref=v0.27.0"
}
Set the variables for the account-baseline-security module in this environment in the inputs = { … } block of terragrunt.hcl:
locals {
  aws_region = local.region.aws_region

  # A local for more convenient access to the accounts map.
  accounts = local.common_vars.locals.accounts

  # Both buckets are created in the logs account by account-baseline-root
  config_s3_bucket_name     = local.common_vars.locals.config_s3_bucket_name
  cloudtrail_s3_bucket_name = local.common_vars.locals.cloudtrail_s3_bucket_name

  # The Cloudtrail KMS Key is deployed at the logs account but it's value is an output from the root account.
  cloudtrail_kms_key_arn = local.common_vars.locals.cloudtrail_kms_key_arn

  # A local for convenient access to the security account root ARN.
  security_account_root_arn = "arn:aws:iam::${local.accounts.security}:root"

  # This input will be generated for you with the Ref Arch or you can set it yourself too
  cross_account_groups = [
    {
      group_name    = "${local.accounts.logs}-billing-only-access",
      iam_role_arns = ["arn:aws:iam::${local.accounts.logs}:role/allow-billing-only-access-from-other-accounts"]
    },
    {
      group_name    = "${local.accounts.logs}-read-only-access",
      iam_role_arns = ["arn:aws:iam::${local.accounts.logs}:role/allow-read-only-access-from-other-accounts"]
    },
    {
      group_name    = "${local.accounts.logs}-support-access",
      iam_role_arns = ["arn:aws:iam::${local.accounts.logs}:role/allow-support-access-from-other-accounts"]
    }
  ]

  # The following locals are used for constructing multi region provider configurations for the underlying module.
  # A list of all AWS regions
  all_aws_regions = [
    "af-south-1",
    "ap-east-1",
    "ap-northeast-1",
    "ap-northeast-2",
    "ap-northeast-3",
    "ap-south-1",
    "ap-southeast-1",
    "ap-southeast-2",
    "ca-central-1",
    "cn-north-1",
    "cn-northwest-1",
    "eu-central-1",
    "eu-north-1",
    "eu-south-1",
    "eu-west-1",
    "eu-west-2",
    "eu-west-3",
    "me-south-1",
    "sa-east-1",
    "us-east-1",
    "us-east-2",
    "us-gov-east-1",
    "us-gov-west-1",
    "us-west-1",
    "us-west-2",
  ]

  # Creates resources in the specified regions. The best practice is to enable multiregion modules in all enabled
  # regions in your AWS account. To get the list of regions enabled in your AWS account, you can use the AWS CLI: aws
  # ec2 describe-regions.
  opt_in_regions = [
    "eu-north-1",
    "ap-south-1",
    "eu-west-3",
    # ...,
  ]
}

# ---------------------------------------------------------------------------------------------------------------------
# CONFIGURE A PROVIDER FOR EACH AWS REGION
# To deploy a multi-region module, we have to configure a provider with a unique alias for each of the regions AWS
# supports and pass all these providers to the multi-region module in a provider = { ... } block. You MUST create a
# provider block for EVERY one of these AWS regions, but you should specify the ones to use and authenticate to (the
# ones actually enabled in your AWS account) using opt_in_regions.
# ---------------------------------------------------------------------------------------------------------------------

generate "providers" {
  path      = "providers.tf"
  if_exists = "overwrite"
  contents  = <<EOF
%{for region in local.all_aws_regions}
provider "aws" {
  region = "${region}"
  alias  = "${replace(region, "-", "_")}"
  # Skip credential validation and account ID retrieval for disabled or restricted regions
  skip_credentials_validation = ${contains(coalesce(local.opt_in_regions, []), region) ? "false" : "true"}
  skip_requesting_account_id  = ${contains(coalesce(local.opt_in_regions, []), region) ? "false" : "true"}
}
%{endfor}
EOF
}

input = {
  # You might need to provide these separately, or reference/import a file containing the values
  # account_id =
  # aws_region =

  # Prefix all resources with this name
  name_prefix = "<SOME_UNIQUE_IDENTIFIER>-security"

  # Provide the opt_in_regions for all multi-region modules
  config_opt_in_regions              = local.opt_in_regions
  guardduty_opt_in_regions           = local.opt_in_regions
  kms_cmk_opt_in_regions             = local.opt_in_regions
  ebs_opt_in_regions                 = local.opt_in_regions
  iam_access_analyzer_opt_in_regions = local.opt_in_regions
  security_hub_opt_in_regions        = local.opt_in_regions

  ################################
  # Parameters for AWS Config
  ################################
  # Send Config logs to the common S3 bucket.
  config_s3_bucket_name = local.config_s3_bucket_name

  # Send Config logs and events to the logs account.
  config_central_account_id = local.accounts.logs

  # This account sends logs to the Logs account.
  config_aggregate_config_data_in_external_account = true

  ################################
  # Parameters for CloudTrail
  ################################

  # Send CloudTrail logs to the common S3 bucket.
  cloudtrail_s3_bucket_name = local.cloudtrail_s3_bucket_name

  # The CloudTrail bucket is created in the logs account, so don't create it here.
  cloudtrail_s3_bucket_already_exists = true

  # Encrypt CloudTrail logs using a common KMS key.
  cloudtrail_kms_key_arn = local.cloudtrail_kms_key_arn

  # The ARN is a key ID. This variable prevents a perpetual diff when using an alias.
  cloudtrail_kms_key_arn_is_alias = false

  ##################################
  # Benchmark SNS alarms configuration
  ##################################

  # The ARN of an SNS topic for sending alarms about CIS Benchmark compliance issues.
  # The topic exists in the logs account
  cloudtrail_benchmark_alarm_sns_topic_arn = "arn:aws:sns:${local.aws_region}:${local.accounts.logs}:BenchmarkAlarmTopic"
  ##################################
  # Cross-account IAM role permissions
  ##################################

  # Create groups that allow IAM users in this account to assume roles in your other AWS accounts.
  iam_groups_for_cross_account_access = local.cross_account_groups

  # Allow these accounts to have read access to IAM groups and the public SSH keys of users in the group.
  allow_ssh_grunt_access_from_other_account_arns = [
    for name, id in local.accounts :
      "arn:aws:iam::${id}:root" if name != "security"
  ]

  # A list of account root ARNs that should be able to assume the auto deploy role.
  allow_auto_deploy_from_other_account_arns = [
    # External CI/CD systems may use an IAM user in the security account to perform deployments.
    "arn:aws:iam::${local.accounts.security}:root",

    # The shared account contains automation and infrastructure tools, such as CI/CD systems.
    "arn:aws:iam::${local.accounts.shared}:root",
  ]
  auto_deploy_permissions = [
    "iam:GetRole",
    "iam:GetRolePolicy",
  ]

  # Create the IAM groups according to the CIS 1.4.0 Benchmark recommendations
  should_create_iam_group_user_self_mgmt = true
  should_create_iam_group_billing = true
  should_create_iam_group_read_only = true

  # IAM users
  users = {
    alice = {
      groups               = ["${local.accounts.logs}-billing-only-access"]
      pgp_key              = "keybase:alice_on_keybase"
      create_login_profile = true
      create_access_keys   = false
    }

    bob = {
      groups               = ["${local.accounts.logs}-read-only-access"]
      pgp_key              = "keybase:bob_on_keybase"
      create_login_profile = true
      create_access_keys   = false
    }
  }

  # Join this account to the root account's Security Hub
  security_hub_associate_to_master_account_id = local.accounts.root

  # Join this account to the root account's Amazon Macie

  # Configure Amazon Macie
  create_macie_bucket            = true
  macie_bucket_name              = "<your-macie-bucket-name>-security-macie-results"
  macie_create_kms_key           = true
  macie_kms_key_name             = "<your-macie-kms-key-name>-macie"
  macie_kms_key_users            = ["arn:aws:iam::${local.accounts.root}:root"]
  macie_opt_in_regions           = local.opt_in_regions
  macie_administrator_account_id = local.accounts.root

  # The variable below for Amazon Macie needs to be manually maintained. Please ensure you change the defaults.
  macie_buckets_to_analyze = {
    "us-east-1": ["<FILL_IN_BUCKET_1_NAME>", "<FILL_IN_BUCKET_2_NAME>"],
    "<another-region>": ["<FILL_IN_BUCKET_3_NAME>", "<FILL_IN_BUCKET_4_NAME>"]
  }
}
The code above does the following:
-
Enable Guard Duty. We’ve configured AWS Guard Duty for all enabled regions in compliance with CIS.
-
Enable CloudTrail. We’ve configured CloudTrail across all enabled regions to use the S3 bucket and KMS CMK in the logs account.
-
Enable AWS Config. We’ve configured AWS Config for all enabled regions and set it up to use the S3 bucket in the logs account.
-
Create IAM groups. We’ve created IAM groups, both for permissions within the security account (e.g.,
iam-admingrants IAM admin permissions in the security account) and for permissions in other accounts (e.g.,ssh-grunt-usersenables users to ssh into an EC2 instance runningssh-gruntin a any AWS Account). -
Create IAM users. The example above creates IAM users for
alice,boband assigns them to the various IAM groups. You should create an IAM user for yourself in thefull-accessgroup, plus IAM users for the rest of your team in the appropriate groups. Like the root account, the code will also generate a password for each user and encrypt it with that user’s PGP key from Keybase (see below for how to handle the passwords). -
Create IAM Cross Account IAM roles. We’ve configured IAM cross account IAM roles that will allow you to authenticate using the IAM users and roles in other AWS Accounts that have been configured with the Landing Zone setup shown in this guide.
-
Create IAM User Password Policy. We’ve configured the IAM user password policy to be compliant with CIS 1.3.
-
Create a function to cleanup expired TLS certificates. We’ve setup a lambda function to monitor your SSL/TLS certificates and clean them up when they’ve expired. This is enforced by CIS requirement 1.19.
-
Enable Security Hub. We’ve enabled Security Hub across all enabled regions. For this feature to work, the
administratorSecurity Hub account (usually the Account that has the AWS Organizations, in this caseroot) will have to invite thememberaccounts, and thememberaccounts also have to accept the invitation. -
Enable Amazon Macie. We’ve enabled Amazon Macie across all enabled regions. For this feature to work, the
administratorAmazon Macie account (usually the Account that has the AWS Organizations, in this caseroot) will have to invite thememberaccounts, and thememberaccounts also have to accept the invitation.
Configure your Terraform backend:
include {
  path = find_in_parent_folders()
}
Just as with the logs account, you’re going to use the OrganizationAccountAccessRole IAM role created by
account-baseline-root to authenticate to the security account. There are many ways to
assume an IAM role on the CLI;
for this guide, we’re going to keep using aws-vault.
Add a new profile entry in ~/.aws/config for your security account that uses the root-iam-user as the
source_profile:
[profile security-from-root]
role_arn=arn:aws:iam::${local.accounts.security}:role/OrganizationAccountAccessRole
source_profile=root-iam-user
Check that you’re able to authenticate to the security account:
aws-vault exec security-from-root -- aws sts get-caller-identityYou should see JSON output indicating that you’ve successfully assumed an IAM role:
{
  "UserId": "AIDAXXXXXXXXXXXX:1111111111111111111",
  "Account": "${local.accounts.security}",
  "Arn": "arn:aws:sts::${local.accounts.security}:assumed-role/OrganizationAccountAccessRole/1111111111111111111"
}
You’re now ready to deploy the account-baseline module in the security account by running terragrunt apply:
cd infrastructure-live/security/_global/account-baseline
aws-vault exec security-from-root -- terragrunt apply|
Important
|
On some operating systems, such as MacOS, you may also need to increase your open files limit to avoid "pipe: too many open files" errors by running: ulimit -n 1024.
|
When apply finishes, the module will output the encrypted passwords for the users defined above. Send the encrypted
password to each user, along with their user name, and the IAM user sign-in URL for the account. Each user can then
decrypt the password on their own computer (which should have their PGP key) as follows:
echo "<PASSWORD>" | base64 --decode | keybase pgp decryptApply the account-baseline-app to the other child accounts
Now that your security account is fully configured, you need to apply the security baseline to the remaining child
accounts (e.g., dev, stage, prod, shared-services). Feel free to adjust this as necessary based on the accounts your
company needs.
Create terragrunt.hcl files in infrastructure-live under the file paths <ACCOUNT>/_global/account-baseline,
where <ACCOUNT> is one of these other child accounts, such as dev, stage, prod, and shared-services. In the rest of
this example, we’ll look solely at the stage account, but make sure you follow the analogous steps for EACH of your
child accounts.
infrastructure-live
  └ root
  └ logs
  └ security
  └ stage
    └ _global
      └ account-baseline
        └ terragrunt.hcl
Point the source URL in your terragrunt.hcl file to the account-baseline-app module in the terraform-aws-cis-service-catalog
repo, setting the ref param to the version you require:
terraform {
  source = "git::git@github.com:gruntwork-io/terraform-aws-cis-service-catalog.git//modules/landingzone/account-baseline-app?ref=v0.27.0"
}
Set the variables for the account-baseline-app module in this environment in the inputs = { … } block of terragrunt.hcl:
locals {
  aws_region = local.region.aws_region

  # A local for more convenient access to the accounts map.
  accounts = local.common_vars.locals.accounts

  # Both buckets are created in the logs account by account-baseline-root
  config_s3_bucket_name     = local.common_vars.locals.config_s3_bucket_name
  cloudtrail_s3_bucket_name = local.common_vars.locals.cloudtrail_s3_bucket_name

  # The Cloudtrail KMS Key is deployed at the logs account but it's value is an output from the root account.
  cloudtrail_kms_key_arn = local.common_vars.locals.cloudtrail_kms_key_arn

  # A local for convenient access to the security account root ARN.
  security_account_root_arn = "arn:aws:iam::${local.accounts.security}:root"

  # The following locals are used for constructing multi region provider configurations for the underlying module.
  # A list of all AWS regions
  all_aws_regions = [
    "af-south-1",
    "ap-east-1",
    "ap-northeast-1",
    "ap-northeast-2",
    "ap-northeast-3",
    "ap-south-1",
    "ap-southeast-1",
    "ap-southeast-2",
    "ca-central-1",
    "cn-north-1",
    "cn-northwest-1",
    "eu-central-1",
    "eu-north-1",
    "eu-south-1",
    "eu-west-1",
    "eu-west-2",
    "eu-west-3",
    "me-south-1",
    "sa-east-1",
    "us-east-1",
    "us-east-2",
    "us-gov-east-1",
    "us-gov-west-1",
    "us-west-1",
    "us-west-2",
  ]

  # Creates resources in the specified regions. The best practice is to enable multiregion modules in all enabled
  # regions in your AWS account. To get the list of regions enabled in your AWS account, you can use the AWS CLI: aws
  # ec2 describe-regions.
  opt_in_regions = [
    "eu-north-1",
    "ap-south-1",
    "eu-west-3",
    # ...,
  ]
}

# ---------------------------------------------------------------------------------------------------------------------
# CONFIGURE A PROVIDER FOR EACH AWS REGION
# To deploy a multi-region module, we have to configure a provider with a unique alias for each of the regions AWS
# supports and pass all these providers to the multi-region module in a provider = { ... } block. You MUST create a
# provider block for EVERY one of these AWS regions, but you should specify the ones to use and authenticate to (the
# ones actually enabled in your AWS account) using opt_in_regions.
# ---------------------------------------------------------------------------------------------------------------------

generate "providers" {
  path      = "providers.tf"
  if_exists = "overwrite"
  contents  = <<EOF
%{for region in local.all_aws_regions}
provider "aws" {
  region = "${region}"
  alias  = "${replace(region, "-", "_")}"
  # Skip credential validation and account ID retrieval for disabled or restricted regions
  skip_credentials_validation = ${contains(coalesce(local.opt_in_regions, []), region) ? "false" : "true"}
  skip_requesting_account_id  = ${contains(coalesce(local.opt_in_regions, []), region) ? "false" : "true"}
}
%{endfor}
EOF
}

inputs = {
  # Prefix all resources with this name
  name_prefix = "<SOME_UNIQUE_IDENTIFIER>-logs"

 ################################
  # Parameters for AWS Config
  ################################
  # Send Config logs to the common S3 bucket.
  config_s3_bucket_name = local.config_s3_bucket_name

  # Send Config logs and events to the logs account.
  config_central_account_id = local.accounts.logs

  # This account sends logs to the Logs account.
  config_aggregate_config_data_in_external_account = true

  ################################
  # Parameters for CloudTrail
  ################################

  # Send CloudTrail logs to the common S3 bucket.
  cloudtrail_s3_bucket_name = local.cloudtrail_s3_bucket_name

  # Encrypt CloudTrail logs using a common KMS key.
  cloudtrail_kms_key_arn = local.cloudtrail_kms_key_arn

  # The ARN is a key ID. This variable prevents a perpetual diff when using an alias.
  cloudtrail_kms_key_arn_is_alias = false

  ##################################
  # Benchmark SNS alarms configuration
  ##################################

  # The ARN of an SNS topic for sending alarms about CIS Benchmark compliance issues.
  # The topic exists in the logs account
  cloudtrail_benchmark_alarm_sns_topic_arn = "arn:aws:sns:${local.aws_region}:${local.accounts.logs}:BenchmarkAlarmTopic"

  ##################################
  # Cross-account IAM role permissions
  ##################################
  # A role to allow users that can view and modify AWS account billing information.
  allow_billing_access_from_other_account_arns = [local.security_account_root_arn]

  # A role that allows read only access.
  allow_read_only_access_from_other_account_arns = [local.security_account_root_arn]

  # A role that allows access to support only.
  allow_support_access_from_other_account_arns = [local.security_account_root_arn]

  service_linked_roles = ["autoscaling.amazonaws.com"]

  ##################################
  # KMS grants
  ##################################

  # These grants allow the autoscaling service-linked role to access to the AMI encryption key so that it
  # can launch instances from AMIs that were shared from the `shared-services` account.
  kms_grant_regions = {
    ami_encryption_key = local.aws_region
  }
  kms_grants = {
    ami_encryption_key = {
      kms_cmk_arn       = "arn:aws:kms:${local.aws_region}:${local.accounts.shared}:alias/ami-encryption"
      grantee_principal = "arn:aws:iam::${local.accounts[local.account_name]}:role/aws-service-role/autoscaling.amazonaws.com/AWSServiceRoleForAutoScaling"
      granted_operations = [
        "Encrypt",
        "Decrypt",
        "ReEncryptFrom",
        "ReEncryptTo",
        "GenerateDataKey",
        "DescribeKey"
      ]
    }
  }

  # Join this account to the root account's Security Hub
  security_hub_associate_to_master_account_id = local.accounts.root

  # Join this account to the root account's Amazon Macie
  macie_administrator_account_id = local.accounts.root
}
The code above does the following:
-
Enable CloudTrail. We’ve configured CloudTrail to use the S3 bucket and KMS CMK in the logs account.
-
Enable AWS Config. We’ve configured AWS Config to use the S3 bucket in the logs account.
-
Configure the dev IAM role. We create a
devIAM role in this account, which will get read and write access to the services specified indev_permitted_services. -
Configure the Auto Deploy IAM role. We also create an
auto-deployIAM role that can be assumed by a CI server in theshared-servicesaccount to do deployments. This role will have the permissions specified inauto_deploy_permissions. -
Configure cross-account IAM roles. We then specify which other accounts are allowed to assume the IAM roles in this account. For the most part, we grant all permissions to the security account, so that by assigning users to IAM groups in that account, you’ll be able to access IAM roles in all the other child accounts.
Configure your Terraform backend:
include {
  path = find_in_parent_folders()
}
Just as with the logs and security accounts, you’re going to use the OrganizationAccountAccessRole IAM role created by
account-baseline-root to authenticate to the stage account and all other child accounts. There are many ways to
assume an IAM role on the CLI;
for this guide, we’re going to keep using aws-vault.
Add a new profile entry in ~/.aws/config for your stage account that uses the root-iam-user as the
source_profile:
[profile stage-from-root]
role_arn=arn:aws:iam::${local.accounts.stage}:role/OrganizationAccountAccessRole
source_profile=root-iam-user
Check that you’re able to authenticate to the stage account:
aws-vault exec stage-from-root -- aws sts get-caller-identityYou should see JSON output indicating that you’ve successfully assumed an IAM role:
{
  "UserId": "AIDAXXXXXXXXXXXX:1111111111111111111",
  "Account": "${local.accounts.stage}",
  "Arn": "arn:aws:sts::${local.accounts.stage}:assumed-role/OrganizationAccountAccessRole/1111111111111111111"
}
You’re now ready to deploy the account-baseline-app in the stage account by running terragrunt apply:
cd infrastructure-live/stage/_global/account-baseline
aws-vault exec stage-from-root -- terragrunt apply|
Important
|
On some operating systems, such as MacOS, you may also need to increase your open files limit to avoid "pipe: too many open files" errors by running: ulimit -n 1024.
|
dev, prod, shared-services, etc)!Next, try authenticating as an IAM user to the child accounts:
-
Use your IAM user’s user name and password (decrypted using keybase) to log into the web console of the security account (remember to use the IAM user sign-in URL for the security account).
-
Follow the steps in Lock down the root account IAM users to lock down your IAM user in the security account. This includes configuring an MFA device for your IAM user.
-
After configuring an MFA device, log out, and then log back into the security account again, this time providing your MFA token. If you don’t do this, attempting to assume IAM roles in other accounts won’t work, as those roles require an MFA token to be present.
-
Try to switch to a role in one of the other child accounts using the AWS Web Console. For example, authenticate as one of the IAM users in the security account, and then assume the
allow-full-access-from-other-accountsrole in the dev account (you can find the default list of IAM roles created in each account here). -
Alternatively, you can use the
aws-vault login xxxcommand to login to the AWS Web Console for any profilexxxthat you’ve configured inaws-vault. For example,aws-vault login logs-from-rootwill open up your web browser and log you into thelogsaccount using theOrganizationAccountAccessRoleIAM Role.
Configure AWS Security Hub in the root account
Next, we’ll configure AWS Security Hub in the root account. AWS Security Hub is deployed by the account baselines in every enabled region of an AWS account to check your account for compliance with the AWS CIS Foundations Benchmark. The Security Hub runs the exact audit steps specified in the Benchmark using AWS Config managed rules. Note: Security Hub is not explicitly required by the Benchmark, however we suggest enabling it, so you can track your compliance efforts and be notified if any recommendations have not been implemented.
|
Tip
|
In order to ensure the Security Hub dashboard shows a positive score, you will need to follow these Manual Steps to complete CIS compliance. These steps cannot be automated using AWS APIs. Additionally, in the AWS Console UI, AWS Security Hub will show a low security score for the CIS AWS Foundations Benchmark v1.2.0. This is due to AWS limitations on checking compliance standards for cross-region/cross-account rules. This does not indicate that the accounts are not in compliance; it is a failure of the AWS audit tool. Note also that the accounts are configured for the latest version of the benchmark, v1.3.0; the AWS Security Hub does not support this version at the current time. |
Use IAM roles for EC2 instances
All Gruntwork modules that require AWS API access use roles rather than an IAM user with static API credentials for authentication. For example:
-
terraform-aws-serveris used to manage a single EC2 instance with an IAM role attached. -
terraform-aws-asgapplies IAM roles to instances in auto-scaling group. -
terraform-aws-eksuses IAM roles for EKS cluster workers. -
ecs-clustercreates IAM roles for ECS instances -
lambdacreates IAM roles for Lambda functions
Use these modules whenever possible. You should always use IAM roles in your own modules any time you need to provide access to the AWS API. Using static API credentials should be avoided whenever possible.
Maintaining compliance by following IAM best practices
We conclude the IAM section with a few parting words of wisdom for maintaining compliance over time:
-
Do not attach any policies without requiring MFA.
-
Never use the
AdministratorAccessAWS managed policy with any users, groups, or roles. -
Refrain from granting inline permissions or attaching managed policies directly to IAM users. Permissions should be granted exclusively via IAM groups and roles.
-
Never use static IAM user access keys to allow an application to access AWS, whether that application is hosted on an EC2 instance or anywhere else!
-
Avoid logging in as the root user. Unfortunately, there is nothing built-in to AWS to prevent use of the root user. It cannot be locked or removed from the account. In fact, there are several tasks that require the use of root. Fortunately, most of these activities are rare, so usage of the root account can be kept to a minimum.
Maintaining compliance by following Storage best practices
S3 Buckets
To make sure your S3 buckets are compliant with the benchmark, use the
private-s3-bucket module
to create and manage all of your S3 buckets. This module blocks public access and enforces encryption by default. Note
that all Gruntwork modules that create S3 buckets use this module under the hood.
You can either use the private-s3-bucket module in your own modules, or, if you wish to deploy a standalone S3 bucket,
use the s3-bucket service
from the Gruntwork Service Catalog.
To ensure that all the data in your S3 buckets has been discovered, classified and secured, use the
macie module
to monitor all your S3 buckets. Note that all the Gruntwork account baseline modules include the macie module under
the hood.
Maintaining compliance by following Logging best practices
The logging section of the Benchmark includes configurations for CloudTrail, AWS Config, KMS keys, and VPC flow logs.
Enable key rotation for KMS keys
To make sure your KMS keys are compliant with the benchmark, use the
kms-master-key module
to create KMS keys with key rotation enabled by default.
Create VPC flow logs
The Benchmark recommends enabling VPC Flow Logs
for all VPCs in all regions. You can use the
vpc service
in the AWS CIS Service Catalog to create your VPCs. This service is configured for CIS compliance, and as such has VPC flow
logs enabled. See the examples below:
# ---------------------------------------------------------------------------------------------------------------------
# MODULE PARAMETERS
# These are the variables we have to pass in to use the module specified in the terragrunt configuration above
# ---------------------------------------------------------------------------------------------------------------------
inputs = {
  vpc_name         = "app"
  num_nat_gateways = 1
  cidr_block       = local.cidr_block
  kms_key_user_iam_arns = [
    "arn:aws:iam::${local.common_vars.locals.accounts[local.account_name]}:root",
  ]
  eks_cluster_names    = ["${local.name_prefix}-${local.account_name}"]
  tag_for_use_with_eks = true

  allow_administrative_remote_access_cidrs_public_subnets = merge(
    {
      for cidr in local.common_vars.locals.ip_allow_list
      : index(local.common_vars.locals.ip_allow_list, cidr) => cidr
    },
    { length(local.common_vars.locals.ip_allow_list) = local.cidr_block }
  )
}
In here you’ll still need to reference the locals configuration, and ensure that you’re setting the right source to the module, so add this to your terragrunt.hcl file too:
# Terragrunt will copy the Terraform configurations specified by the source parameter, along with any files in the
# working directory, into a temporary folder, and execute your Terraform commands in that folder. If you're iterating
# locally, you can use --terragrunt-source /path/to/local/checkout/of/module to override the source parameter to a
# local check out of the module for faster iteration.
terraform {
  # We're using a local file path here just so our automated tests run against the absolute latest code. However, when
  # using these modules in your code, you should use a Git URL with a ref attribute that pins you to a specific version:
  # source = "git::git@github.com:gruntwork-io/terraform-aws-cis-service-catalog.git//modules/networking/vpc?ref=v0.20.0"
  source = "${get_parent_terragrunt_dir()}/../../..//modules/networking/vpc"
}

# Include all settings from the root terragrunt.hcl file
include {
  path = find_in_parent_folders()
}

# ---------------------------------------------------------------------------------------------------------------------
# Locals are named constants that are reusable within the configuration.
# ---------------------------------------------------------------------------------------------------------------------
locals {
  # Automatically load common variables shared across all accounts
  common_vars = read_terragrunt_config(find_in_parent_folders("common.hcl"))

  # Extract the name prefix for easy access
  name_prefix = local.common_vars.locals.name_prefix

  # Automatically load account-level variables
  account_vars = read_terragrunt_config(find_in_parent_folders("account.hcl"))

  # Extract the account_name for easy access
  account_name = local.account_vars.locals.account_name

  # Automatically load region-level variables
  region_vars = read_terragrunt_config(find_in_parent_folders("region.hcl"))

  # Extract the region for easy access
  aws_region = local.region_vars.locals.aws_region

  cidr_block = local.common_vars.locals.app_vpc_cidrs[local.account_name]
}
To limit the number of flow logs, you may want to use the
cloud-nuke defaults-aws command. It will remove the default VPC from
all regions in an account, saving you the hassle of creating flow logs in each default VPC.
Maintaining compliance by following Monitoring best practices
The Monitoring section of the Benchmark centers on a collection of
CloudWatch Logs Metric
Filters. Gruntwork has simplified this section to a single module: the
cloudwatch-logs-metric
-filters
wrapper module. It will create and configure all the CloudWatch Logs metric filters necessary for
compliance with the Benchmark. Note that when you deploy the CIS account baseline modules, the CloudWatch Logs metric
filters will be created and configured automatically, so that you don’t have to do anything special to enable the metric filters on the
deployed CloudTrail configuration.
Note that you must have a subscriber on the SNS topic to be compliant. Refer to Subscribe to SNS topic for details on how to setup a subscriber to the SNS topics that are created.
Maintaining compliance by following Networking best practices
To ensure all the networking recommendations are satisfied, use the
vpc (and/or
vpc-mgmt)
service from Gruntwork’s AWS CIS Service Catalog to create all your VPCs. These services are specifically configured for
CIS compliance, and as such they don’t allow security groups to access ports 22 or 3389 from the world. In addition,
our architecture has a least-privileges-based routing configuration by default.
To meet the 5.1 recommendation, you’ll need to provide values for the allow_administrative_remote_access_* variables
when creating VPCs. These variables are used to create appropriate Network ACL Rules. For example, you might create a
VPC using the vpc service from terraform-aws-cis-service-catalog:
infrastructure-live
└── root
    └── us-east-1
        └── prod
            └─ networking
                └─ vpc
                    └─ terragrunt.hcl
terraform { # We're using a local file path here just so our automated tests run against the absolute latest code. However, when
  # using these modules in your code, you should use a Git URL with a ref attribute that pins you to a specific version:
  # source = "git::git@github.com:gruntwork-io/terraform-aws-cis-service-catalog.git//modules/networking/vpc-mgmt?ref=v0.20.0"
  source = "${get_parent_terragrunt_dir()}/../../..//modules/networking/vpc-mgmt"
}
inputs = {
vpc_name = "mgmt"
num_nat_gateways = 1
cidr_block = local.cidr_block
kms_key_user_iam_arns = [
"arn:aws:iam::${local.common_vars.locals.accounts[local.account_name]}:root",
]
# Next, pass values for the allow_administrative_remote_access_* variables, thus creating the NACL rules under the hood
allow_administrative_remote_access_cidrs_private_app_subnets = { all_app_vpc_cidrs = module.vpc.vpc_cidr_block }
allow_administrative_remote_access_cidrs_private_persistence_subnets = { all_app_vpc_cidrs = module.vpc.vpc_cidr_block }
allow_administrative_remote_access_cidrs_public_subnets = merge(
{
for cidr in local.common_vars.locals.ip_allow_list
: index(local.common_vars.locals.ip_allow_list, cidr) => cidr
},
{ length(local.common_vars.locals.ip_allow_list) = local.cidr_block }
)
}Refer to the terraform-aws-cis-service-catalog repo for a more comprehensive example.
Finally, run the cloud-nuke defaults-aws command to remove all
default security groups from all VPCs in all regions.
Next steps
Congratulations! If you’ve made it this far, you should have achieved compliance with the CIS AWS Foundations Benchmark. This guide is meant to help you get your AWS infrastructure compliant with the latest CIS Benchmark, using our dedicated and up-to-date modules.
If you’ve got any feedback or you think something’s missing from the guide, please get in touch via Github, or our dedicated Contact Us page.
Now it’s time to confirm that your configurations are correct and you didn’t miss any steps.
Traceability matrix
Use the table below as a quick reference to map the CIS AWS Foundations Benchmark recommendations to the sections above.
# |
Section |
Description |
1.1 |
Complete the contact details on the AWS account page |
|
1.2 |
Complete the security contact information on the AWS account page |
|
1.3 |
Answer the security questions on the AWS account page |
|
1.4 |
Apply the |
Use the |
1.5 |
Manually configure MFA for the root user |
|
1.6 |
Use a Yubikey (or other hardware MFA) for the root user |
|
1.7 |
Take manual steps to complete this recommendation |
|
1.8-9 |
Use the |
|
1.10 |
Configure authentication using SAML or IAM |
|
1.11 |
Use the |
|
1.12 |
Apply the |
Use the |
1.13 |
Apply the |
Use the |
1.14 |
Apply the |
Use the |
1.15 |
Use the |
|
1.16 |
Use the |
|
1.17 |
Use the |
|
1.18 |
Use Gruntwork modules to ensure EC2 instances use roles for access |
|
1.19 |
Use Gruntwork modules to automatically remove expired certificates from IAM |
|
1.20 |
Use Gruntwork modules to enable IAM Access Analyzer across regions |
|
1.21 |
Apply the |
Use the |
2.1.1-2.1.2 |
Use the |
|
2.1.3 |
Use the |
|
2.1.4 |
Apply the |
Use the |
2.1.5 |
Use the |
|
2.2.1 |
Use Gruntwork modules to configure AWS EBS encryption |
|
2.3.1 |
Use Gruntwork modules to configure AWS RDS encryption |
|
3.1-3.4 |
Use the |
|
3.5 |
Use the |
|
3.6 |
Use the |
|
3.7 |
Use the |
|
3.8 |
Use the KMS module |
|
3.9 |
Use the Gruntwork CIS-compliant |
|
3.10-3.11 |
Use the |
|
4.1-4.15 |
Maintaining compliance by following Monitoring best practices |
The CloudWatch Logs metrics filters wrapper module will satisfy each recommendation |
5.1 |
Maintaining compliance by following Networking best practices |
Use the Gruntwork CIS-compliant |
5.2 |
Maintaining compliance by following Networking best practices |
Use the Gruntwork CIS-compliant |
5.3 |
Maintaining compliance by following Networking best practices |
Use the |
5.4 |
Maintaining compliance by following Networking best practices |
Use the Gruntwork CIS-compliant |

Comments