

Intro
This is a comprehensive guide of how to design, configure, and implement a Continuous Integration and Continuous Delivery pipeline for your infrastructure code. This guide will walk you through the steps to set up a secure CI/CD pipeline for your favorite infrastructure as code tools (e.g., Terraform) using your favorite CI/CD platform (e.g., Jenkins, Circle, GitLab, etc).
TLDR: If you follow this guide, you’ll be able to set up a pipeline that works like this:

What is Continuous Integration and Continuous Delivery?
Continuous Integration and Continuous Delivery (also widely known as CI/CD) are software development practices that involve developers merging their work together and deploying it to production on a regular basis (oftentimes as frequent as multiple times per day). The goal of a Continuous Integration process is to integrate the features developed independently by engineers often enough such that you can identify problems with the design earlier in the process, allowing you to improve the design incrementally. Similarly, by deploying the software more frequently to production, the Continuous Delivery process enables you to keep software packages small enough to reduce the risk and impact of each deployment.
While CI/CD for application code is well understood in the software industry, CI/CD for infrastructure code is a nascent practice. This guide focuses on providing an overview of the background info, design, and implementation of a production-ready CI/CD pipeline for infrastructure code.
What you’ll learn in this guide
This guide consists of four main sections:
- Core Concepts
-
An overview of the core concepts you need to understand what a typical CI/CD pipeline entails for infrastructure code, including a comparison with CI/CD for application code, a sample workflow, infrastructure to support CI/CD, and threat models to consider to protect your infrastructure.
- Production-grade design
-
An overview of how to configure a secure, scalable, and robust CI/CD workflow that you can rely on for your production application and infrastructure code. To get a sense of what production-grade means, check out The production-grade infrastructure checklist.
- Deployment walkthrough
-
A step-by-step guide to deploying a production-grade CI/CD pipeline in AWS using code from the Gruntwork Infrastructure as Code Library.
- Next steps
-
What to do once you’ve got your CI/CD pipeline set up.
What this guide will not cover
CI/CD for infrastructure code is a large topic and a single guide cannot cover everything. There are several items that this guide will not cover, including:
- A pipeline for setting up new environments
-
This guide will focus on a CI/CD workflow for making changes to infrastructure in an environment that is already set up. In other words, the design and implementation of the pipeline covered in this guide intentionally does not solve the use case of infrastructure code for setting up an environment from scratch. Setting up new environments typically require complex deployment orders and permissions modeling that complicate the task. This makes it hard to automate in a reasonable fashion that still respects the threat model we cover here.
- Automated testing and feature toggling strategies for infrastructure code
-
An important factor of CI/CD pipelines is the existence of automated testing and feature toggles. Automated tests give you confidence in the code before it is deployed to production. Similarly, feature toggles allow you to partially integrate and deploy code for a feature without enabling it. By doing so, you are able to continuously integrate new developments over time. This guide will briefly introduce automated testing and feature toggles for infrastructure code, but will not do a deep dive on the subject. You can learn more about best practices for automated testing in our talk Automated testing for Terraform, Docker, Packer, Kubernetes, and More and blog post Agility requires safety.
Core Concepts
Why is it important to have CI/CD?
To understand the benefits of CI/CD, it is worth exploring the opposite: late integration and late delivery (LI/LD). We will explain LI/LD using a thought experiment about building the International Space Station (ISS).
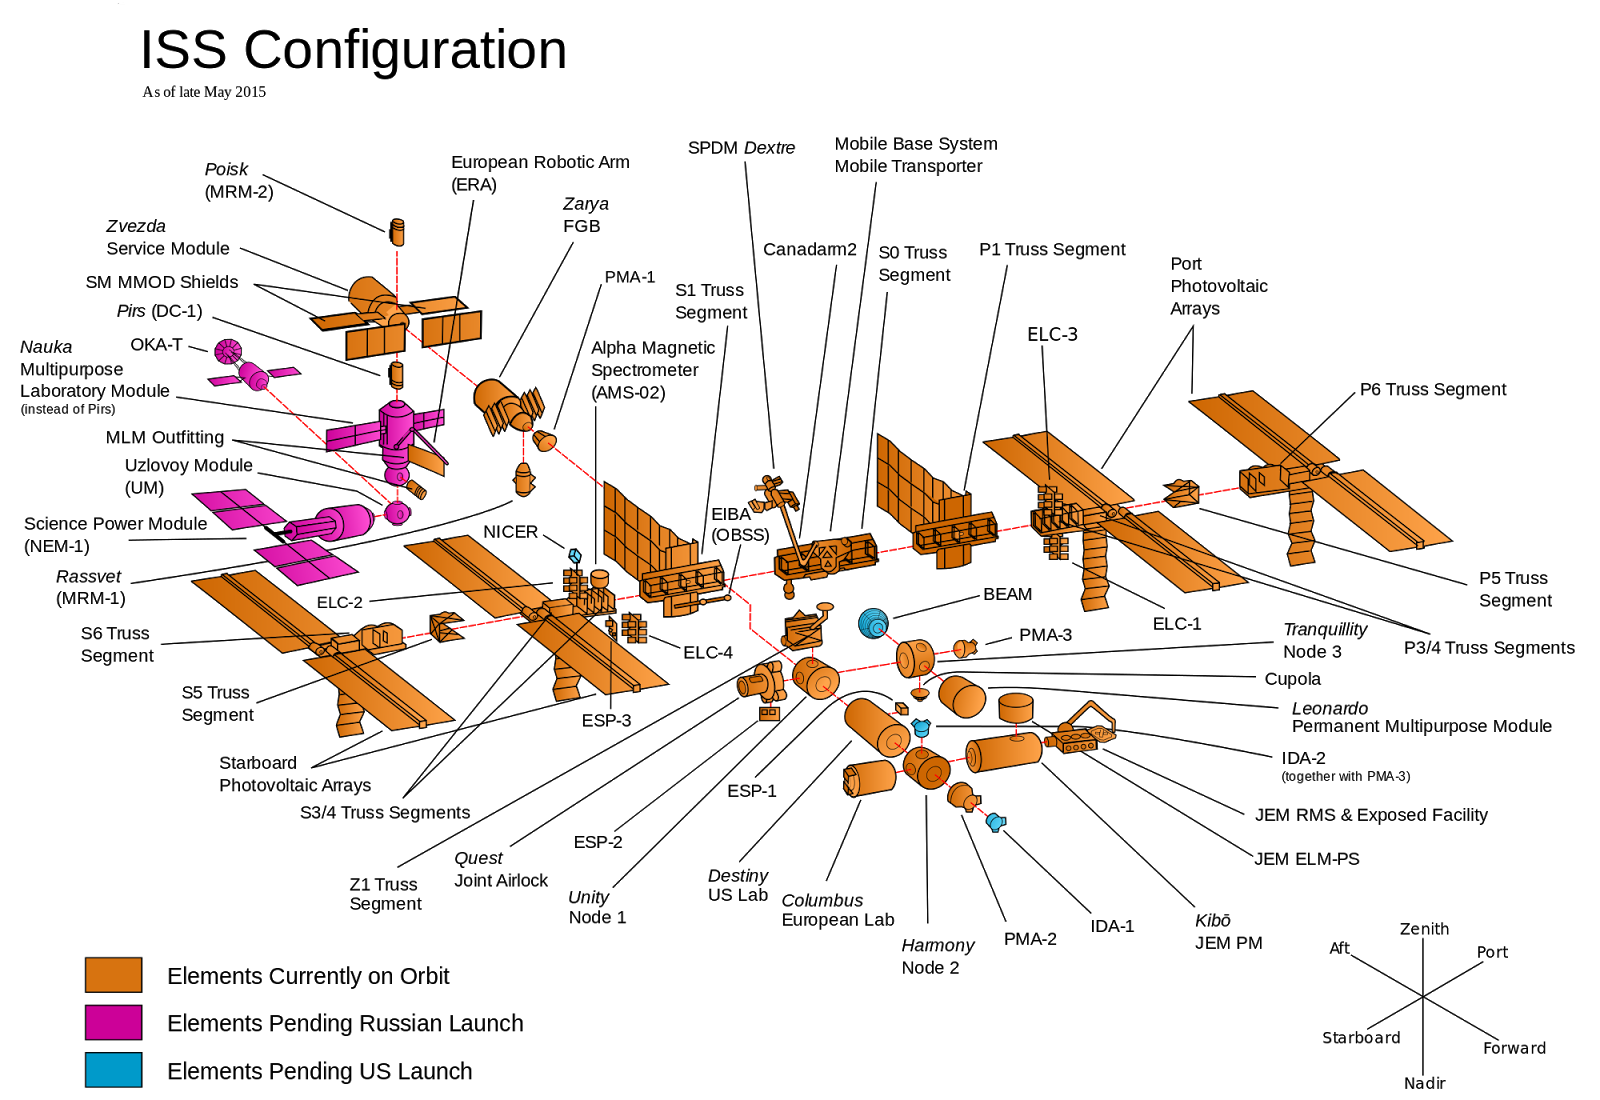
The ISS consists of dozens of components, as shown in the image above. Each component is built by a team from a different country, with a central team responsible for organizing development. In LI/LD, you would organize the development by designing all the components in advance, and then have each team go off and work on their component in total isolation. There is complete trust in the design and the teams such that there is no need to check in and integrate the components along the way. When all the teams are done, each team launches the component into space and then put all the components together at the same time in space, for the first time.
It isn’t hard to imagine that this could be disastrous: one team would think the other team was responsible for wiring while that team thought everything would be wireless; all the teams would use the metric system except one; everyone cut toilets from the scope thinking some other team is sure to include it. Finding all of this out once everything has already been built and is floating in outer space means that fixing the problems will be very difficult and expensive.
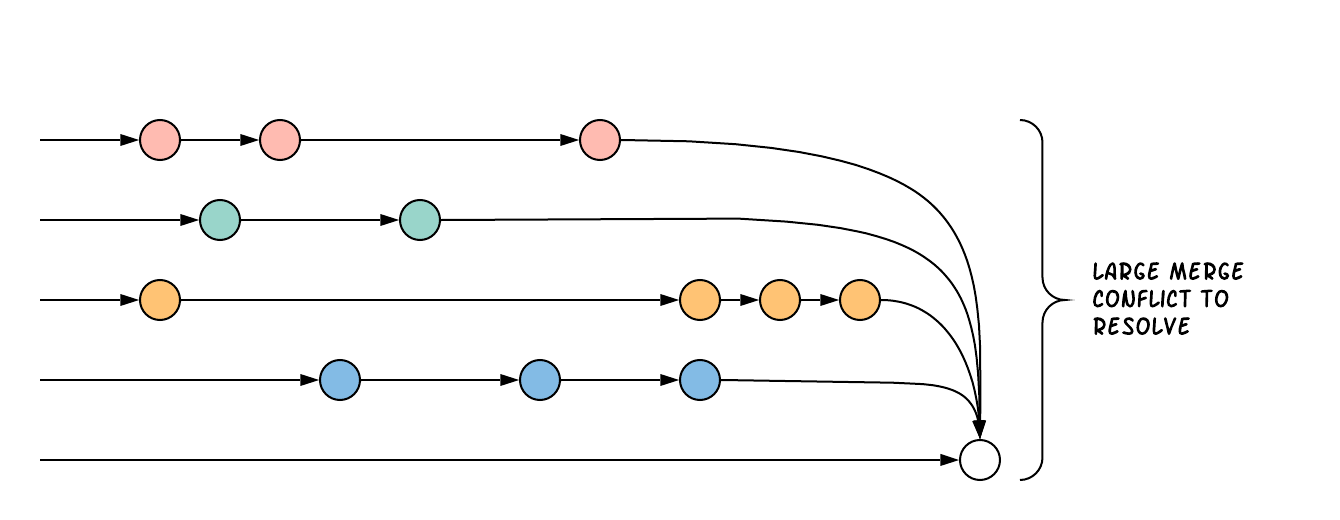
While it is hard to imagine that anyone would build the ISS in this way, unfortunately this model of development is fairly common in the software industry. Developers work in total isolation for weeks or months at a time on feature branches without integrating their work with other teams, and then try to merge all the work together at the last minute moments before release. As a result, the integration process is very expensive and takes days or weeks fixing merge conflicts, tracking down subtle bugs, and trying to stabilize release branches.
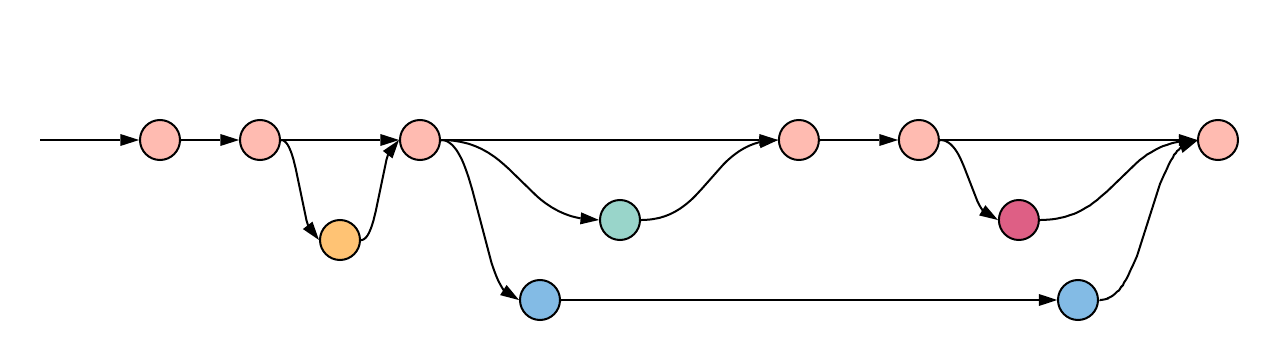
In contrast, the Continuous Integration and Continuous Delivery model of development promotes more cross team communication and integration work as development progresses. Going back to the ISS thought experiment, a CI/CD style of building the ISS would work by collaborating on a design. Rather than each team working in isolation, there would be regular checkpoints throughout the process where the teams come together to try to test and integrate all the components, and update the design if there are problems. As components are completed and integration tests validate the design, they are launched into space and assembled incrementally as new components arrive.
Rather than integrating at the last moment, CI/CD encourages development teams to integrate their work together regularly, with smaller deltas between each change. This exposes problems with the design earlier in the process, ensuring that there is ample time for improvements and corrections.
Trunk-based development model
The most common way to implement CI/CD is to use a trunk-based development model. In trunk-based development, all the
work is done on the same branch, called trunk or master depending on the Version Control System (VCS). You would
still have feature branches that developers work on to facilitate review processes, but typically these are tiny and
short-lived containing only a handful of commits. Everyone actively merges their work back into trunk on a regular
basis, oftentimes multiple times per day (Continuous Integration). Then, as trunk or master is updated, the work is
immediately deployed into the active environments so that they can be tested further (Continuous Delivery).
Can having all developers work on a single branch really scale? It turns out that trunk-based development is used by thousands of developers at LinkedIn, Facebook, and Google. How are these software giants able to manage active trunks on the scale of billions of lines of code with 10s of thousands of commits per day?
There are three factors that make this possible:
- Small, frequent commits reduce the scope of each integration
-
It turns out that if you’re integrating small amounts of code on a regular basis, the number of conflicts that arise is also fairly small. Instead of having big, monolithic merge conflicts, each conflict that arises will be in a tiny portion of the work being integrated. In fact, these conflicts can be viewed as helpful as it is a sign that there is a design flaw. These integration challenges are part and parcel to distributed software development projects. You’ll have to deal with conflicts no matter what, and it is going to be easier to deal with conflicts that arise from one or two days of work than with conflicts that represents months of work.
- Automated testing
-
When frequent development happens on
trunk/master, naturally it can make the branch unstable. A brokentrunk/masteris something you want to avoid at all costs in trunk-based development as it could block all development. To prevent this, it is important to have a self-testing build with a solid automated testing suite. A self-testing build is a fully automated build process that is triggered on any work being committed to the repository. The associated test suite should be complete enough that when they pass, you can be confident the code is stable. Typically code is only merged into the trunk when the self-testing build passes. - Feature toggles
-
One potential problem with continuous integration is that it can be difficult to break down your work to bite-sized units. Major features cannot be implemented in a day. How can you ship parts of your feature without breaking the overall functionality of the application? Feature toggles are constructs in your code that allow you to disable or enable entire features in the application. This allows you to continuously develop, integrate, and ship partially working features without compromising the overall functionality. Examples of feature toggles include tags on users such that only those users can see the new feature, or configuration in the code that avoid the feature path when disabled.
CI/CD requires all of these factors to implement successfully and at scale.
Now that we have observed the benefits of CI/CD, let’s take a look at what it means to implement CI/CD with infrastructure code.
Types of infrastructure code
Before diving into infrastructure CI/CD workflows, it is important to understand the different types of infrastructure code that is available. There are two distinct types of infrastructure code:
- Infrastructure Modules
-
Modules are bundles of infrastructure code that can be used to deploy a specific component of your architecture. For example, many companies have modules for deploying private networks using Virtual Private Clouds (VPCs), databases, docker clusters (e.g., Elastic Container Service, Kubernetes, Nomad), etc. Think of modules as the "blueprints" that define the way your company configures infrastructure.
- Live Infrastructure Configurations
-
Live infrastructure configurations are specific parameters for each component in your architecture. The live configurations are the frontend for your infrastructure deployments. For example, you might define your dev environment as a series of configuration files for the modules that specify the various parameters specific to development (e.g., small instance sizes, naming instances with a
devprefix, using cloud provider accounts that are accessible to all developers, etc). If the modules are "blueprints" then the live configuration contain the "houses" that were built using the "blueprints." Each "house" may have slightly different features or customizations, even though they share a common blueprint.
Typically you would have separate repositories for each of these (e.g., infrastructure-modules for modules and
infrastructure-live for live configuration). Organizing your infrastructure code in this way makes it easier to test
the module code, promote immutable versions across environments, and keep it DRY.
There are distinct differences in the way the code is tested, used, and deployed between the two flavors of infrastructure code. These differences are important to consider when designing CI/CD workflows, as they lead to many differences in the implementation of the pipeline. In the next section, we will walk through a typical CI/CD workflow and compare and contrast the pipeline between the three flavors of code we’ve talked about so far: application code, infrastructure modules, and live infrastructure configuration.
CI/CD workflows
Now that we have gone over what, why, and how CI/CD works, let’s take a look at a more concrete example walking through the workflow.
The following covers the steps of a typical CI/CD workflow. Most code will go through this workflow, whether it be for infrastructure code or application code. However, the details of the steps may differ significantly due to the properties of infrastructure code.
In this section, we will compare each step of the workflow for application code, infrastructure modules, and live infrastructure config side by side. Application code refers to code to run an application written in a general purpose programming language (e.g., Ruby, Java, Python, etc), while infrastructure modules and live infrastructure config refer to infrastructure code (e.g., Terraform, CloudFormation, Ansible, etc) organized as described in the previous section. CI/CD for application code is well understood in the industry, so we show it side by side with infrastructure code here as a reference point to make it easier to understand the workflow for infrastructure code.
For the purposes of illustrating this workflow, we will assume the following:
-
The code lives in version control.
-
We are using a trunk-based development model.
-
The code has already been in development for a while and there is a version running in production.
Here are the steps:
Clone a copy of the source code and create a new branch
Typically the first step in making changes to any code base is to clone the repository locally and begin development on a new branch. Having a local copy makes it easier to iterate on the changes, and using an isolated branch allows you to push code back to the central repository without breaking the main line of code (trunk) that everyone else is working on.
If you are using git, this step translates to:
git clone $REPO_URL
git checkout -b $NEW_BRANCH_NAME
Whether you are developing application code, infrastructure modules, or live infrastructure config, making changes on a separate branch is a good idea. However, what you do to test that code will be vastly different, as we’ll cover in the next section.
Run the code locally
Before making any code changes, you want to make sure that you are working off of a clean slate. If you start off of broken code, you won’t know if the feature isn’t working because of a bug in the trunk, or if it is your code. It is always a good idea to run the code locally to sanity check the current state of trunk to make sure you are starting from working code.
How to run the code locally will be very different depending on the type of code you are working with:
- Application Code
-
You can typically spin up a local environment for application code to test it out. For example, if you had a simple web server written in a general purpose programming language such as Ruby, you can run the server code to bring up a local copy of the application that you can interact with (e.g.,
ruby web-server.rb). You can then manually test it by loading the web server in the browser. Alternatively, you could run the automated test suite associated with your application (e.g.,ruby web-server-test.rb). The point is that (almost) everything can be done locally for fast iteration. - Infrastructure Modules
-
You will need to bring up real infrastructure to test infrastructure code. Unlike with application code, there is no way to have a true and complete local copy of a cloud. Therefore, the only way to know for sure your infrastructure code works is by making the actual API calls to the cloud to deploy it. With infrastructure modules, this involves deploying the module into a sandbox environment. For example, to test a terraform module, you can define example code that sets up the necessary resource dependencies that the module needs, and then deploy that into your sandbox with
terraform apply. You can then inspect the deployed resources to make sure they are functioning as expected. For convenience, this process could be captured in an automated test using a framework such as Terratest. - Live Infrastructure Config
-
Locally testing live infrastructure config is more difficult than either application code or infrastructure modules. Unlike with infrastructure modules, it is difficult to deploy the live infrastructure config temporarily as the code is tied to a specific live environment by nature of the code. After all, this is the configuration to manage live infrastructure.
To illustrate this point, consider a scenario where you are working on updating the cross account IAM roles to access your environments, and you are at the point of reflecting your changes to prod. Would you want to deploy that code to your live production environment off of an unreviewed branch?
The only real test you can do for live infrastructure config is to do a dry run of your infrastructure code. Most Infrastructure as Code tools support a dry run of the code to check what it would do against your environment. For example, with Terraform, you could runterraform planto sanity check the planned actions Terraform will take. This is especially useful for sanity checking a fresh clone of the code. The trunk should be a true reflection of the live environment, so you should expect there to be no changes to make on a fresh clone of trunk.
Make code changes
Now that you have a working local copy, you can start to make changes to the code. This process is done iteratively while checking for validity of the changes along the way with manual or automated testing. It is important to invest some time and effort in making the feedback cycle short, as it directly translates to your development speed. The faster you can iterate, the more tests you can run, and the better your code will be.
How you make changes to the code will be largely the same for the three flavors of code we covered, although how you test your changes and the test cycles will be different. Typically, testing application code can be done in seconds (because everything is local), and testing live infrastructure config can be done in minutes (because you are only doing a dry run). However, testing infrastructure modules can take a long time since you need to deploy infrastructure (on the order of 10s of minutes). For ideas on how to improve the test cycles for infrastructure modules, take a look at Iterating locally using test stages in the Terratest documentation.
Submit changes for review
Once the code implementation is done and the testing passes, the next step is to submit it for review. You want to focus your review process on things that are hard to check through automated testing, such as checking security flaws, reviewing general code design, enforcing style guides, or identifying potential performance issues on larger data sets. Code review processes are also a great way to share knowledge across the team. The reviewer will oftentimes share valuable insights on the code that you might not have thought of.
Run automated tests
To help with code review, you should also set up a CI server (such as Jenkins or CircleCI) with commit hooks that automatically trigger testing of any branch that is submitted for review. Running the automated tests in this fashion not only ensures that the code passes all the tests, but also ensures that you can have a consistent build process on a repeatable and isolated platform. This is also a good way to run an extensive test suite that takes a long time to run. Most developers will run a subset of the tests that relate to the feature work being done, as it leads to faster feedback cycles.
The tests that the CI server runs will be different across the three flavors of code:
- Application Code
-
The CI server should run the entire automated test suite for the application code, and report the results as a summary. Since automated testing has clear results (whether it failed or passed), you can usually summarize the report down to a single icon (a green check mark to indicate success or a red "X" for failure). For reporting failures, most CI servers has first class support for consuming the results of the test framework to display cleanly in the UI.
- Infrastructure Modules
-
Like with application code, the CI server should run automated tests for infrastructure modules. However, since tests for infrastructure modules can cost money and can take a long time to run, it is recommended to only run the tests for the modules that changed instead of doing a regression test for all the modules on every commit. You can run a nightly build that runs the whole suite on a regular interval that is less frequent than developers updating the code. Like with application code, automated infrastructure testing is also very clear when it comes to results so you can use the same reporting mechanisms to share results back to the PR.
- Live Infrastructure Config
-
For live infrastructure config, the CI server should perform the dry run of the infrastructure and post the entire log of the run. Analyzing a plan is hard to automate since the rules surrounding what changes are ok and what changes are not is potentially limitless. Therefore, the only way to review the results is by looking at the entire dry run. Note that this has potential security issues as the logs for a dry run would typically include secrets. You will want to be sensitive to who has access to the logs, and potentially encrypt the results before it is posted.
Merge and release
Once the code passes automated checks and goes through the review process, it is ready to be integrated into the trunk. Once you merge the code into trunk, you will also want to generate a new, immutable, versioned release artifact that can be deployed (see Mutable infrastructure vs Immutable infrastructure). What the release artifact looks like depends on the type of code you are working with:
- Application Code
-
The release artifact will vary widely from project to project for application code. This could be anything from a source file tarball or a
jarfile executable to a docker image or a VM image. Whatever format the artifact is in, make sure the artifact is immutable (i.e., you never change it), and that it has a unique version number (so you can distinguish this artifact from all the others). - Infrastructure Modules
-
Infrastructure modules are typically consumed as a library in the tool. Most infrastructure as code tools consume libraries directly from a Git repository. For example, with Terraform you can consume modules through module blocks that reference a Git repository (see the official documentation for more details). In this case, using a Git tag to mark a revision with a human friendly name is sufficient to generate the release artifact.
- Live Infrastructure Config
-
For live infrastructure config, there is typically no release artifact. Live infrastructure code doesn’t need to be packaged to deploy as it is directly consumable. For example, for Terraform or Terragrunt live config, you can directly run
terraform applyorterragrunt applyon the repo. In general, it is not necessary to tag your commits for live infrastructure config because in practice you will end up deploying every commit off trunk.
It is worth expanding a bit on the reason why live infrastructure config does not have any release artifact. To understand this, consider what it means to have a working trunk on live infrastructure config. If you recall from Run the code locally, the only way to test live infrastructure config is by doing a dry run of the code. If the only way to test live infrastructure config is with dry runs, then you would want to make sure that there are no new changes to make to the live environments when you start. This is so that you get an accurate representation of the changes that are being introduced, since you don’t want to be differentiating between existing changes that will be applied from trunk and the changes that will be applied with your new code.
Given that, the definition of a "clean build" for the trunk with live infrastructure config is that a dry run returns no changes to make. This in turn means that the latest state of trunk that you are working off of should be a representation of what is actually deployed in your environments. Therefore, to ensure the trunk is clean, you will need to make sure that you continuously deploy and apply the trunk as new code is merged in.
This leads to what we call The Golden Rule of Infrastructure Code:
The master branch of the live repository should be a 1:1 representation of what’s actually deployed.
You will want to do everything that is in your power to maintain this representation to streamline your development.
Deploy
Now that you have a release artifact, the final stage of the process is to deploy the code.
What it means to "deploy the code" is significantly different across the three flavors. In fact, deploying your application code and infrastructure modules require changing and deploying live infrastructure config. After all, your live infrastructure config is a reflection of what’s actually deployed, so deploying application or infrastructure changes require updating the live infrastructure config.
Let’s take a look at how to deploy each flavor of code:
- Application Code
-
Deploying the release artifact to your environment depends on how the code is packaged. If it is a library, then it will be deployed when the application that consumes it updates the library version. In this case, nothing needs to be done to deploy it to the application. For services, you would need to deploy the application onto live servers so that it is running. For docker images, this might mean updating your service definitions for the docker cluster (e.g., ECS or Kubernetes). For machine images, this might mean updating your autoscaling group to deploy instances with the new image. Regardless of how your application is deployed, it is important to reflect the changes in your live infrastructure config to perform the deployment. Note that there are various strategies for deploying application code, such as canary and blue-green deployments. We will not get into details here, but you can refer to our post How to use Terraform as a team for an overview of various rollout strategies. In terms of automation, you should be able to automate the entire deployment as the surface area of each change should be fairly small and localized to just the application.
- Infrastructure Modules
-
To deploy your infrastructure modules, you need to create or update references to the modules in your live infrastructure config. If the module is already deployed, this may be as simple as bumping the ref tag in your live config. However, if the module is being deployed for the first time, then this will require creating a new configuration in your live infrastructure config to deploy the module. In either case, the only way to deploy infrastructure modules is by making the corresponding edits to the live infrastructure config to roll out the changes across your environments. In terms of automation, an automated deployment of infrastructure modules may be risky as a simple change could destroy your database.
With that said, it is not practical to always manually roll out deployments even for infrastructure modules, and in some circumstances that can be more risky from a security perspective (e.g., increasing attack surface by passing out admin credentials to all your developers). To handle this, we impose human verification to the automated steps of the workflow. That is, we do automated deployments like with application code, but include a human approval step of theplanbefore proceeding. - Live Infrastructure Config
-
For live infrastructure config, deploying the code is the act of applying the code to the live environment. This depends on the tool. For example, your terraform code can be applied with
terraform applyorterragrunt apply, while Kubernetes manifests requirekubectl apply. In terms of automation, since live infrastructure config changes include both modules and application code, what you automate should depend on the nature of the change. Which deployments to automated depend on the nature of the change, so typically the pipeline differs based on which configurations were updated.
Summary
To summarize, here is a table highlighting each step of a typical CI/CD workflow and how it is implemented with each flavor of code:
| Workflow Step | Application Code | Infrastructure Modules | Live Infrastructure Config |
|---|---|---|---|
Clone local copy |
git clone $REPO git checkout -b $NAME |
git clone $REPO git checkout -b $NAME |
git clone $REPO git checkout -b $NAME |
Run the code locally |
|
|
|
Make code changes |
|
|
|
Submit changes for review |
|
|
|
Run automated tests |
|
|
|
Merge and release |
|
|
No release artifact |
Deploy |
|
|
|
The rest of the document will discuss how we can implement the automated pieces of the workflow in a secure manner that is ready for production.
To start, let’s take a step back and define a threat model for CI/CD. This threat model will help us ensure that we implement the necessary security controls in these CI/CD pipelines so that we cover the common types of attack vectors for this type of workflow.
Threat model of CI/CD
The threat model of CI/CD is different between application code, infrastructure modules, and live infrastructure config. This largely stems from the amount of permissions required to implement each workflow. For a limited deployment workflow like application code, you only need a limited set of permissions to the infrastructure environments to conduct a deployment. However, for infrastructure modules and live infrastructure config, where you handle arbitrary infrastructure changes (including permissions changes, like a new AWS IAM role), you will need full access to all the environments, including production.
Given the potential consequences of leaked credentials from CI/CD, it is important to evaluate the threats and mitigation tactics for those threats. This is where threat modeling helps.
A threat model explicitly covers what attacks are taken into consideration in the design, as well as what attacks are not considered. The goal of the threat model is to be realistic about the threats that are addressable with the tools available. By explicitly focusing attention on more likely and realistic threats, we can avoid over-engineering and compromising the usability of the solution against threats that are unlikely to exist (e.g., a 5 person startup with 100 end users is unlikely to be the subject of a targeted attack by a government agency).
In this guide, the following threat assumptions are made:
-
Attackers' goals are to gain access to an environment that they do not already have access to. Access to an environment includes but is not limited to:
-
The ability to read secrets that grant access to potentially sensitive data (e.g., the database in prod environment).
-
Full access over all resources to cause damage to the business (e.g., ability to delete the database and all its backups in prod).
-
-
Attackers can originate from both external and internal sources (in relation to the organization).
-
External attacks are limited to those that can get full access to a CI environment, but not the underlying source code. Note that any CI/CD solution can likely be compromised if an attacker has access to your source code.
-
Internal attackers are limited to those with restricted access to the environments. This means that the threat model does not consider highly trusted insiders who abuse their privileges with malicious intent (e.g internal ops admin with full access to the prod environment). However, an internal attacker with permissions in the dev environment trying to elevate their access to the prod environment is considered.
-
Similarly, internal attackers are limited to those with restricted access in the CI environment and git repository. A threat where the internal attackers can bypass admin approval in a CI pipeline or can force push deployment branches is not considered.
-
Internal attackers can have (limited) access to the CI environment and the underlying code of the infrastructure (e.g the git repository).
With this threat model in mind, let’s take a look at the different CI/CD platforms.
CI/CD platforms
Over the years, as practices for CI/CD for application code developed, many platforms emerged to support CI/CD workflows triggered from source control. Here we will list out a few of the major CI/CD platforms that exist to support these workflows. Note that this isn’t an exhaustive list or an endorsement of the platforms that are listed here. The goal of this section is to give a few examples of existing platforms and solutions, and cover the trade offs that you should consider when selecting a platform to implement your workflow on. The production-grade design that we cover in the guide is compatible with almost any generic CI/CD platform that you select, but is an alternative to the specialized platforms for infrastructure code.
In general, CI/CD platforms fit one of two categories: self-hosted or SaaS. Self-hosted CI/CD platforms are designed as infrastructure that you run in your data center and cloud for managing the infrastructure in your account, while SaaS CI/CD platforms are hosted by the vendor that provides the platform. In most cases, SaaS platforms are preferred to self-hosted platforms to avoid the overhead of maintaining additional infrastructure to enable developer workflows, which not only cost money but also time from your operations team to maintain the infrastructure with patches, upgrades, uptime, etc. However, in certain fields with strict compliance requirements, it is unavoidable to have self-hosted CI/CD platforms due to the threat model and the amount of permissions that are granted to the platform to ensure the software can be deployed. These fields manage sensitive data that make it hard to entrust third-party platforms that are publicly accessible with the "keys to the kingdom" that hold that data.
Additionally, CI/CD platforms can be further divided into generic platforms for any code, and specialized platforms for application code or infrastructure code. Depending on your use case, it may be desirable to use a specialized platform that accelerates the implementation of specific workflows as opposed to configuring a generic platform.
Here are a few examples of well-known platforms, the general category that they fit in, major features that the platform provides, as well as how they mitigate the threat model that we cover:
| Jenkins | CircleCI | BuildKite | GitLab | Atlantis | TFE and TFC | |
|---|---|---|---|---|---|---|
Hosting |
Self-hosted |
SaaS |
Hybrid (SaaS control plane, Self-hosted workers) |
SaaS or Self-hosted |
Self-hosted |
SaaS or Self-hosted |
Purpose |
Generic CI/CD tool |
Generic CI/CD tool |
Generic CI/CD tool |
Generic CI/CD tool |
Specialized to terraform |
Specialized to terraform |
VCS integration |
Yes, with plugins |
Yes |
Yes |
Yes |
Yes |
Yes |
Provides static IP addresses for IP whitelisting |
Yes |
No |
Yes (for workers) |
Yes (self-hosted) |
Yes |
Yes (TFE) |
Built-in workflows |
None |
None |
None |
Kubernetes Workflows |
Terraform Workflows |
Terraform Workflows |
Custom workflows |
Yes |
Yes |
Yes |
Yes |
No (Only supports a fixed Terraform-based workflow) |
No (Only supports a fixed Terraform-based workflow) |
Credentials storage |
Managed by you |
Shared with 3rd party |
Managed by you |
Shared with 3rd party (SaaS); Managed by you (Self-hosted) |
Managed by you |
Shared with 3rd party (TFC); Managed by you (TFE) |
Update commit statuses |
Yes |
Yes |
Yes |
Yes |
Yes |
Yes |
Annotate pull requests |
Requires custom scripting |
Requires custom scripting |
Requires custom scripting |
Yes |
Yes |
Supports multiple infrastructure tools |
Production-grade design
With all the core concepts out of the way, let’s now discuss how to configure a production-grade CI/CD workflow for infrastructure code, using a platform that looks something like this:
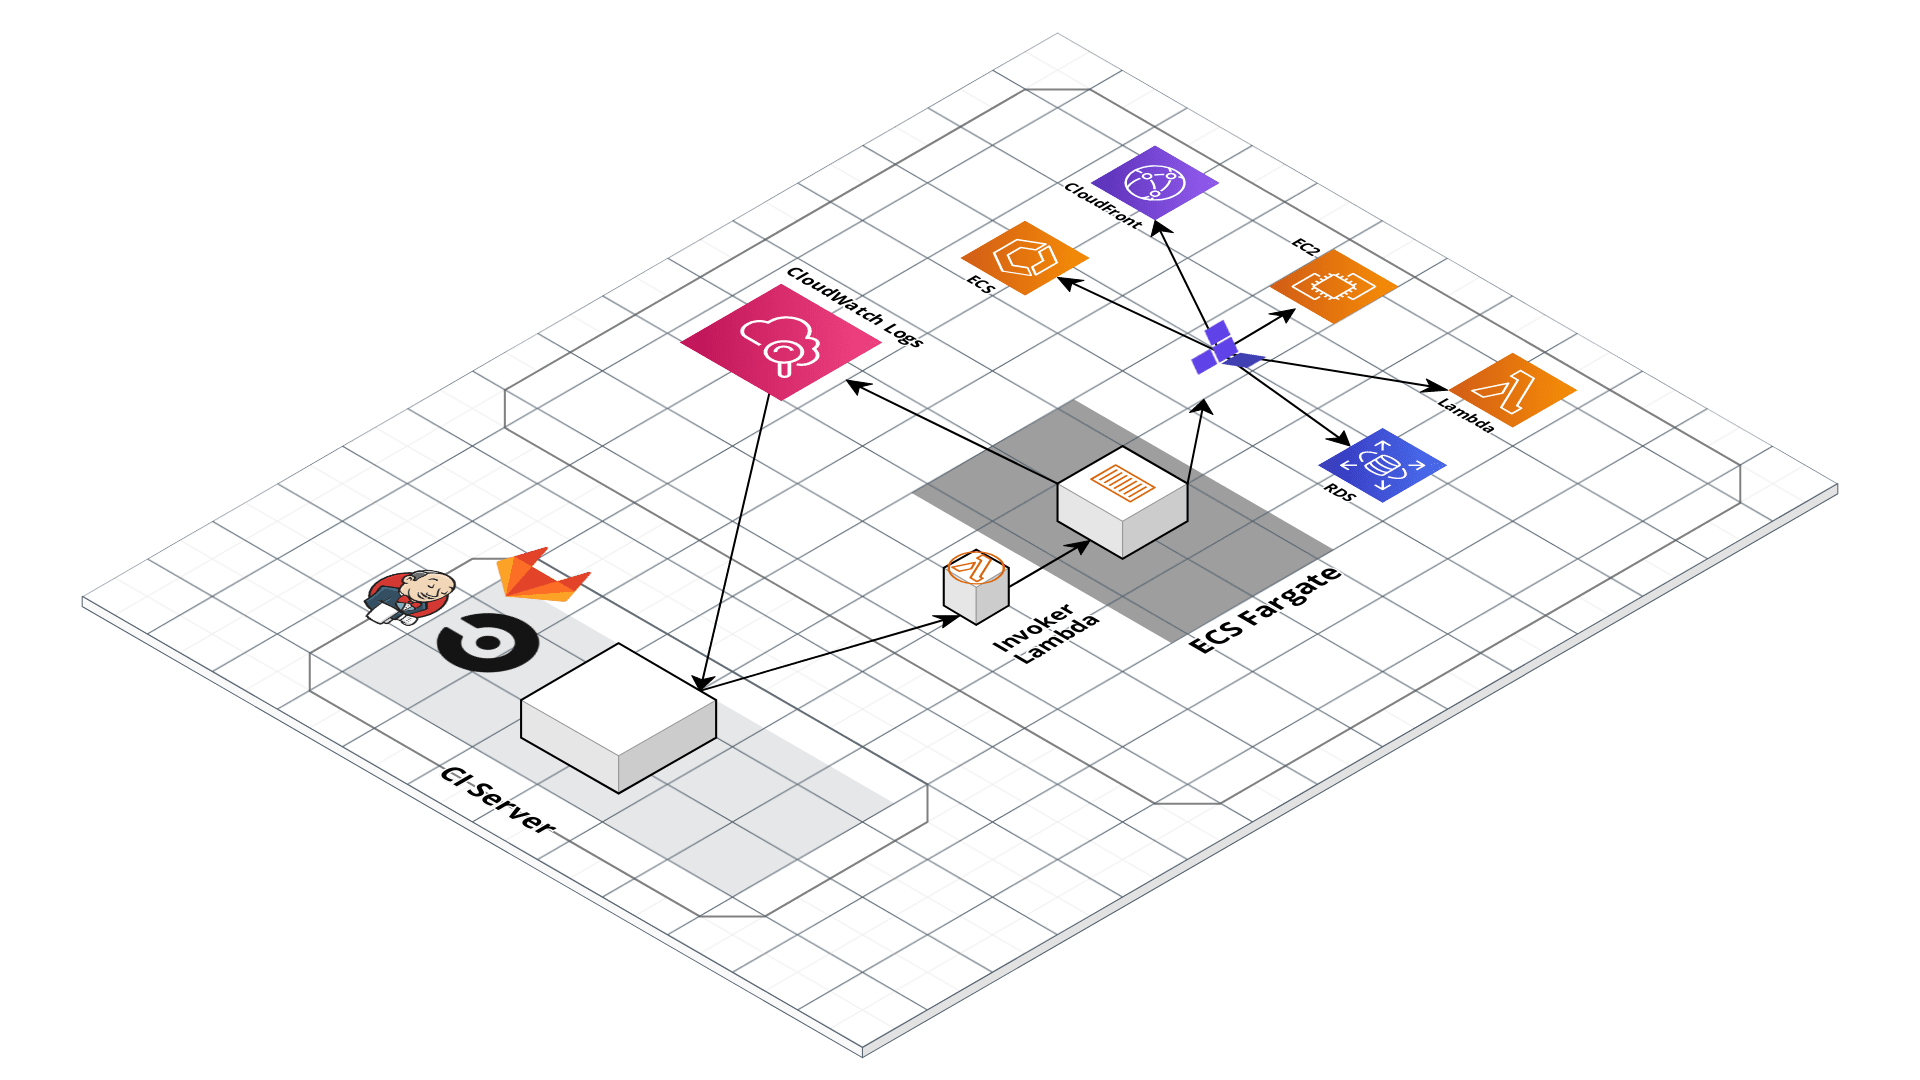
Use generic CI/CD platforms as a workflow engine but run infrastructure deployments from within your account
Given the limitations and tradeoffs of the various platforms we covered in CI/CD platforms, we don’t recommend relying on a single platform for implementing the entire workflow. Instead, we recommend a hybrid solution that takes advantage of the strengths of each platform, and cover the weaknesses. The design looks as follows:
-
Deploy a self-hosted deploy server within your AWS account that has the permissions it needs to run infrastructure deployments and is locked down so it is only accessible via a trigger that can be used to run pre-defined commands (e.g.,
terraform planandterraform apply) in pre-defined repos (e.g.,infrastructure-live). -
Use any generic CI/CD server (e.g., Jenkins, CircleCI, GitLab) to implement a CI/CD workflow where you trigger a dry-run in the deploy server (e.g.,
terraform plan), get approval to proceed from an admin on your team (e.g., via a Slack notification), and then trigger a deployment in the deploy server (e.g.,terraform apply). -
Define your CI workflows so that the CI/CD server triggers deployments against the deploy server.
This design implements separation of the concerns so that we take full advantage of the strengths of each platform, while covering the weaknesses: relying on the CI/CD platforms to manage the workflow/pipeline, but having it trigger infrastructure deployments on self-hosted systems that are more locked down.
We don’t want to give the CI/CD servers permissions to deploy and manage arbitrary infrastructure. CI/CD servers are typically not secure enough to handle sensitive information, and you don’t want a server that is used for executing arbitrary code and regularly used (and written to) by your entire dev team to have admin permissions.
Instead, we delegate this responsibility to an isolated, closed off system in the AWS account that only exposes a limited set of actions that can be triggered. That way, if anyone gets access to your CI server, they can at most kick off builds on existing code, but they don’t get arbitrary admin access.
Options for deploy server
The deploy server needs to be a self-hosted platform in order to satisfy the requirement for isolation. It should also avoid executing arbitrary workflows. Finally, it should support configurations options that limit what code can run on the server. This limits the options for what you can use as your deploy server. Here is a list of platforms that satisfy these constraints, and their strengths and weaknesses:
- Gruntwork ECS Deploy Runner Stack
-
This is a stack you can deploy in your AWS account that sets up an ECS task with a customizable docker container for running
terraform validate,terraform plan, andterraform apply, or the Terragrunt equivalent. It is also extensible to support other commands as well, such as runninggo testfor Terratest orpacker buildfor building images. To limit the ability to run arbitrary code, the stack includes a Lambda function that can be used as a trigger which exposes a limited set of options and additional checks for source repository. It relies on serverless technologies to limit the amount of overhead required for maintaining the system. - Terraform Enterprise
-
Terraform enterprise provides an API for triggering runs manually (as opposed to Atlantis which only supports VCS webhook based triggers). In addition, Terraform Enterprise supports Sentinel Policies, a feature to enforce that the Terraform code are in compliance with company policies (e.g., it has the appropriate tags). As a self hosted solution, it supports running in your own account. However, being a stateful server, there is a high maintenance cost to keeping it up and running, in addition to licensing cost for using the service.
Depending on your needs, you may choose to use either option. For example, large enterprise organizations may have a risk profile that requires the automated validation you get from the sentinel policies of Terraform Enterprise such that the overhead of maintaining TFE is well worth the cost. On the other hand, a small startup may not have a high enough risk profile from internal threats such that the simpler infrastructure of the ECS Deploy Runner Stack may be sufficient.
In this guide, we will use the ECS Deploy Runner Stack as the deploy server. Note that although we will not explicitly cover it, the design is compatible with using Terraform Enterprise as the deploy server.
Limit triggers for deploy server
The deploy server should only expose a limited set of options for triggering deployments. That is, it should not allow
arbitrary deployments on arbitrary code. For example, the default configuration of Atlantis allows webhooks from any
repository. This means that any public repo can cause your Atlantis server to run terraform plan and terraform apply
on custom code you do not control using the permissions granted to that server. Instead, you will want to configure it
so that only certain repositories, branches, and users can trigger the workflow.
The Gruntwork ECS Deploy Runner stack mitigates this concern by only allowing triggers from a Lambda function that exposes a limited set of actions against the deploy runner task. The lambda function:
-
Requires a single repository to trigger deployments by default.
-
Can be configured to limit deployments to specific branches.
-
Requires explicit IAM permissions to trigger.
You can find similar mechanisms for limiting deployments in the various deploy server options.
Use a VPC to lock down deploy server
Run your infrastructure deployment workloads in a Virtual Private Cloud (VPC) to isolate the workloads in a restricted network topology (see How to deploy a production-grade VPC on AWS for more information on VPCs). Configure it to run all workloads in private subnets that are not publicly accessible. Make sure to block all inbound internet access and consider blocking all outbound access except for the minimum required (e.g, allow access to AWS APIs).
Use minimal IAM permissions for a deployment
Avoid having a single system with admin permissions for running a deployment. Instead, deploy specialized versions of the deployment platforms with varying permissions for handling specific workflows. By separating out the concerns for each pipeline, you can reduce the blast radius of the damage that can be done with each set of credentials. At a minimum, you should have two versions of the infrastructure deployment system: one for deploying the application code, which only has the minimal permissions necessary for deploying that application; and one for deploying infrastructure code, which has more access to the environments.
Use approval flows
It is important that human review is baked into each deployment. As covered in CI/CD workflows, it is difficult to build an automated test suite that builds enough confidence in your infrastructure code to do the right thing. This is important, as failed infrastructure deployments could be catastrophic to your business, and there is no concept of rollback with infrastructure deployment tools. This means that you will almost always want to have some form of approval workflow for your infrastructure CI/CD pipeline so that you can review what is about to be deployed. Most generic CI/CD platforms support approval workflows. For example, CircleCI supports approval steps in its workflow engine, in addition to restricted contexts to limit who can approve the workflow.
Lock down VCS systems
It is a good practice to define and store the deployment pipeline as code in the same repo that it is used. For example,
you should define the CI/CD deployment pipeline for your infrastructure code in the modules and live repositories.
However, this means that anyone with access to those repositories could modify the pipeline, even on feature
branches. This can be exploited to skip any approval process you have defined in the pipeline by creating a new branch
that overwrites the pipeline configuration.
This is not a concern if only admin users had access to the infrastructure code. Typically, however, many operations teams want contributions to the infrastructure code from developers as well, and having any developer have the ability to deploy arbitrary infrastructure to production without any review can be undesirable. To mitigate these concerns, you should lock down your VCS systems:
- Only deploy from protected branches
-
In most git hosting platforms, there is a concept of protected branches (see GitHub docs for example). Protected branches allow you to implement policies for controlling what code can be merged in. For most platforms, you can protect a branch such that: (a) it can never be force pushed, (b) it can never be merged to or commit to from the cli, (c) merges require status checks to pass, (d) merges require approval from N reviewers. By only building CI pipelines from protected branches, you can add checks and balances to ensure a review of potentially harmful infrastructure actions.
- Consider a forking based workflow for pull requests
-
When exposing your repository to a wider audience for contribution, you can consider implementing a forking based workflow. In this model, you only allow your trusted admins to have access to the main infrastructure repo, but anyone on the team can read and fork the code. When non-admins want to implement changes, instead of branching from the repo, they will fork the repo, implement changes on their fork, and then open a PR from the fork. The advantage of this approach is that many CI platforms do not automatically run builds from a fork for security reasons. Instead, admins manually trigger a build by pushing the forked branch to an internal branch. While this is an inconvenience to devs as you won’t automatically see the
plan, it prevents unwanted access to secrets by modifying the CI pipeline to log internal environment variables or show infrastructure secrets using external data sources.
Summary of mitigations
With this production design in mind, let’s take a look at how each of the design decisions addresses the concerns of the threat model:
- Minimal access to target environments
-
All the infrastructure is deployed from within the accounts using a serverless platform. This means that attackers that gain access to the underlying AWS secrets used by the CI environments will at most have the ability to run deployments against a predefined set of code. This means that external attackers who do not have access to the source code will at most be able to: (a) deploy code that has already been deployed before, (b) see the plan of the infrastructure between two points of time. They will not be able to write arbitrary infrastructure code to read DB secrets, for example. The IAM policies are set up such that the IAM user for CI only has access to trigger predefined events. They do not have access to arbitrarily invoke the ECS task, as that could potentially expose arbitrary deployments by modifying the command property (e.g., use a command to
echosome infrastructure code and runterraform).-
Note that there is still a risk of rolling back the existing infrastructure by attempting to deploy a previous version. See below for potential ways to mitigate this type of attack.
-
Similarly, this alone does not mitigate threats from internal attackers who have access to the source code, as a potential attacker with access to the source code can write arbitrary code to destroy or lookup arbitrary infrastructure in the target environment. See below for potential ways to mitigate this type of attack.
-
- Minimal options for deployment
-
The Lambda function exposes a minimal interface for triggering deployments. Attackers will only be able to trigger a deployment against a known repo and known git refs (branches, tags, etc). To further limit the scope, the lambda function can be restricted to only allow references to repositories that matches a predefined regular expression. Terraform Enterprise exposes similar configuration parameters to restrict what deployments can be triggered. This prevents attackers from creating an open source repo with malicious code that they subsequently deploy by pointing the deploy runner to it.
- Restricted refs for
apply -
Since many CI systems depend on the pipeline being managed as code in the same repository, internal attackers can easily circumvent approval flows by modifying the CI configuration on a test branch. This means that potential attackers can run an
applyto destroy the environment or open backdoors by running infrastructure code from test branches without having the code approved. To mitigate this, the Lambda function allows specifying a list of git refs (branches, tags, etc) as the source ofapplyandapply-all. If you limit the source ofapplyto only protected branches (see below), it prevents attackers from having the ability to runapplyunless it has been reviewed. - CI server does not need access to the source code
-
Since the deployments are being done remotely in separate infrastructure, the actual CI server does not need to make any modifications to the code for the deployment. You can limit the CI server to read only access to the underlying repository, limiting the damage from a potential breach of the CI server.
These mitigations alone will not prevent all attacks defined in the threat model. For example, an internal
attacker with access to the source code can still do damage to the target environments by merging in code that removes
all the infrastructure resources, thereby destroying all infrastructure when the apply command is run. Or, they could
expose secrets by writing infrastructure code that will leak the secrets in the logs via a local-exec provisioner.
However, the reality is that any CI/CD solution can likely be compromised if an attacker has full access to your source code.
For these types of threats, your best bet is to implement various policies and controls on the source control repository and build configurations:
- Use approval flows
-
In addition to providing a moment to pause and inspect the exact infrastructure changes that are about to be deployed, approval workflows in the CI server can mitigate attacks such that attackers will need enough privileges on the CI server to approve builds in order to actually modify infrastructure. This can mitigate potential attacks where the attacker has access to the CI server to trigger arbitrary builds manually (e.g., to run a previous job that is deploying an older version to roll back the infrastructure), but not enough access to approve the job. Note that this will not mitigate potential threats from internal attackers who have enough permissions to approve builds.
- Lock down VCS systems
-
As mentioned in the previous section, it is important that you implement various controls on the VCS repositories. Once you implement a CI/CD pipeline, access to source code translates to access to your infrastructure environments, so you will want to reflect the same kind of security controls you implement on your environments in your VCS repositories.
- Avoid logging secrets
-
Our threat model assumes that attackers can get access to the CI servers, which means they will have access to the deployment logs. This will include detailed outputs from a
terraform planorapply. While it is impossible to prevent terraform from leaking secrets into the state, it is possible to avoid terraform from logging sensitive information. Make use of PGP encryption functions or encrypted environment variables / config files (in the case of service deployments) to ensure sensitive data does not show up in the plan output. Additionally, tag sensitive outputs with thesensitivekeyword so that terraform will mask the outputs.
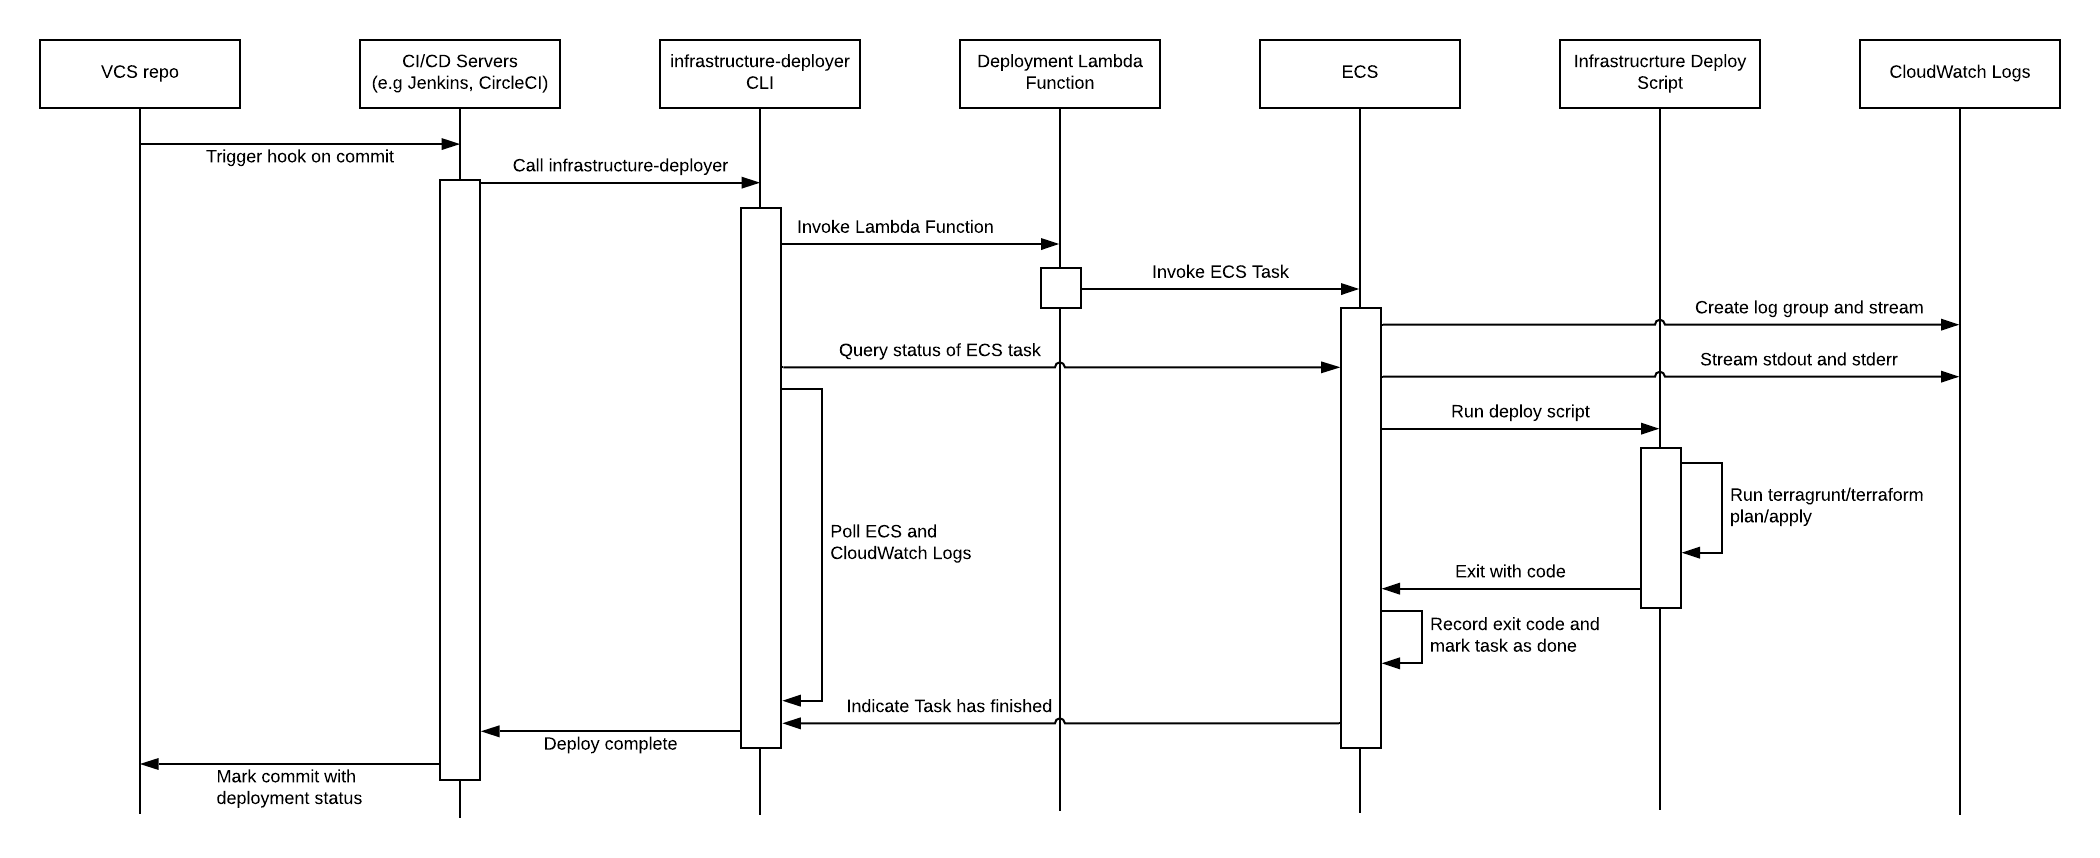
Summary of deployment sequence
To put it all together, the following sequence diagram shows how all the various components work together:
Deployment walkthrough
Let’s now walk through the step-by-step process of how to create a production-grade CI/CD pipeline for your infrastructure code, fully defined and managed as code, using the Gruntwork Infrastructure as Code Library and CircleCI as the CI server. Although this guide uses CircleCI, the configuration can be adapted with any CI platform.
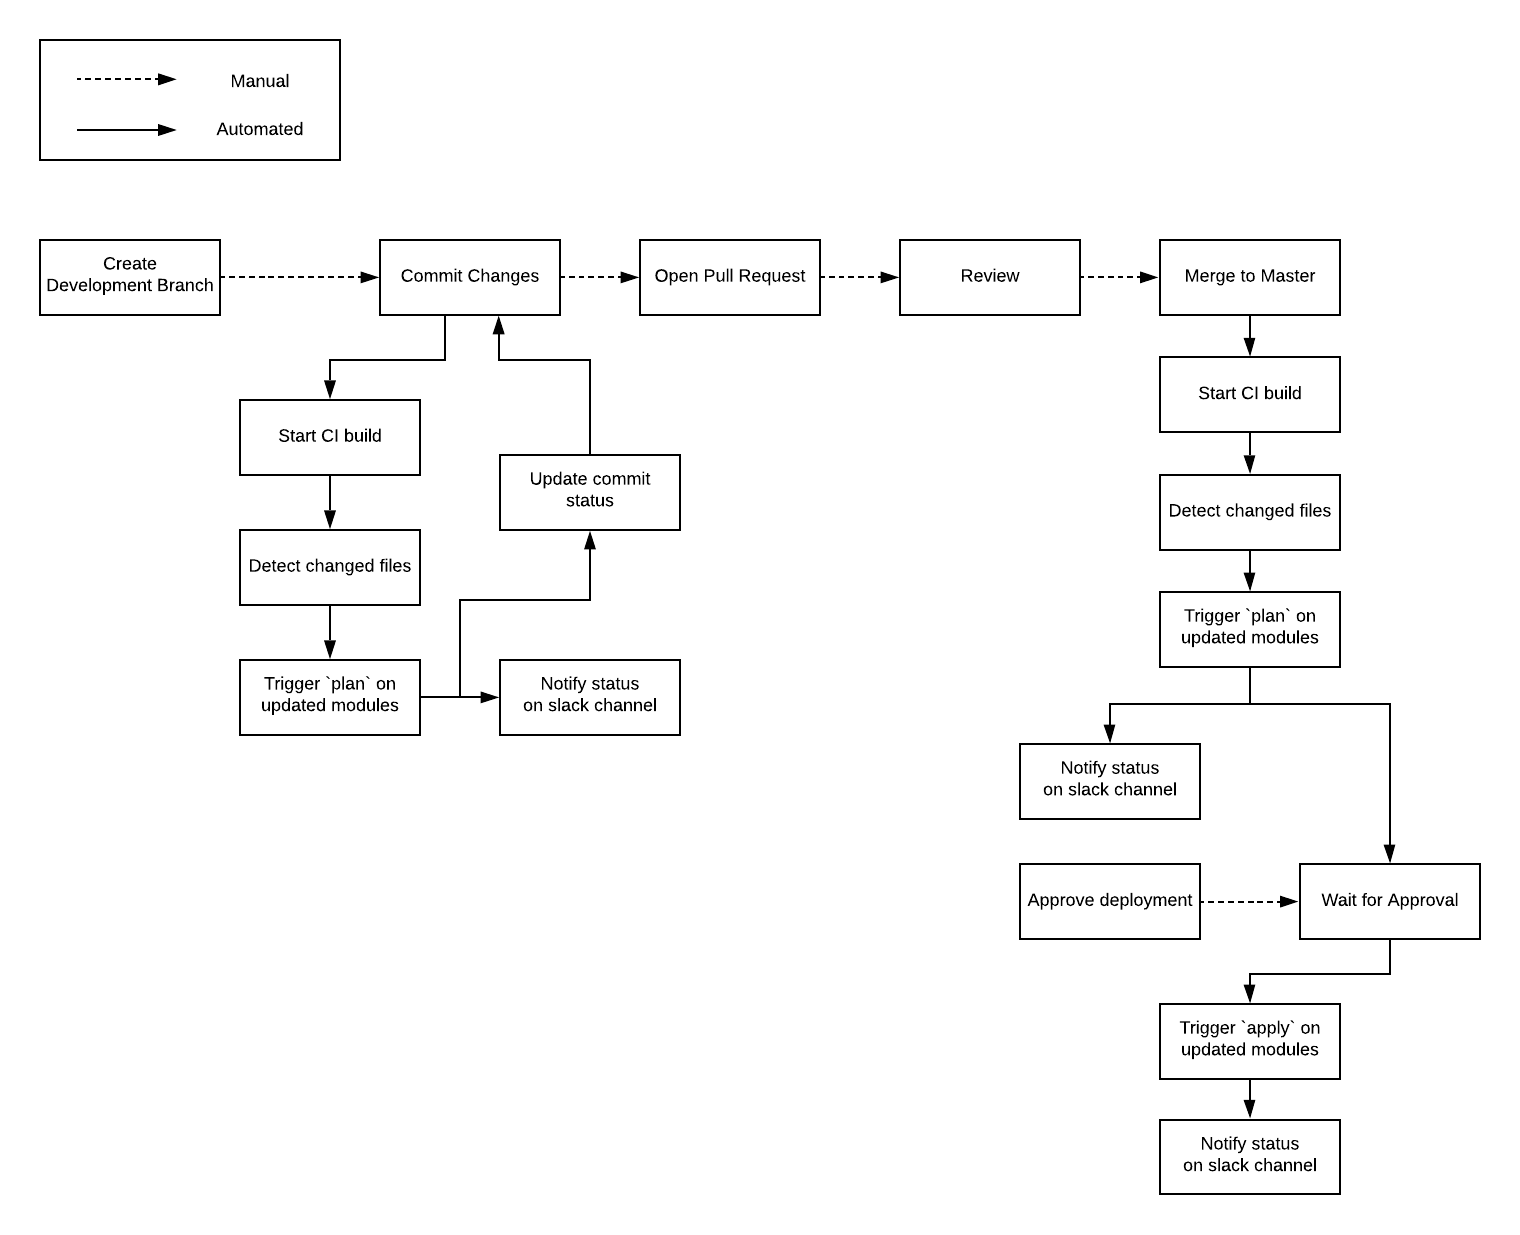
We will implement the following workflow for live infrastructure:
Pre-requisites
This walkthrough has the following pre-requisites:
- Gruntwork Infrastructure as Code Library
-
This guide uses code from the Gruntwork Infrastructure as Code Library, as it implements most of the production-grade design for you out of the box. Make sure to read How to use the Gruntwork Infrastructure as Code Library.
ImportantYou must be a Gruntwork subscriber to access the Gruntwork Infrastructure as Code Library. - Terraform
-
This guide uses Terraform to define and manage all the infrastructure as code. If you’re not familiar with Terraform, check out A Comprehensive Guide to Terraform, A Crash Course on Terraform, and How to Use the Gruntwork Infrastructure as Code Library
- CircleCI
-
This guide uses CircleCI as the CI platform. Although the approach is compatible with any CI platform, a basic understanding of the CircleCI configuration will be useful for translating the configuration format to other platforms. You can take a look at the official getting started guide to get a basic understanding of CircleCI and their configuration format.
- AWS accounts
-
This guide deploys infrastructure into one or more AWS accounts. Check out the Production Grade AWS Account Structure guide for instructions. You will also need to be able to authenticate to these accounts on the CLI: check out A Comprehensive Guide to Authenticating to AWS on the Command Line for instructions.
- Repository structure
-
This guide assumes your infrastructure code is organized in a manner similar to that covered in the Using Terraform Modules section of the How to Use the Gruntwork Infrastructure as Code Library guide. This means that you should have two repositories for your infrastructure code,
infrastructure-modulesandinfrastructure-live. Make sure that theinfrastructure-liverepository is locked down as recommended in Lock down VCS systems. This guide will assume thatmasteris the protected branch where infrastructure is deployed from.
|
Note
|
This guide will use Terragrunt and its associated file and folder structure to deploy Terraform modules. Please note that Terragrunt is NOT required for using Terraform modules from the Gruntwork Infrastructure as Code Library. Check out How to Use the Gruntwork Infrastructure as Code Library for instructions on alternative options, such as how to Deploy using plain Terraform. |
Deploy a VPC
The first step is to deploy a VPC. Follow the instructions in
How to deploy a production-grade VPC on AWS to use
module-vpc to create a VPC setup that looks like this:
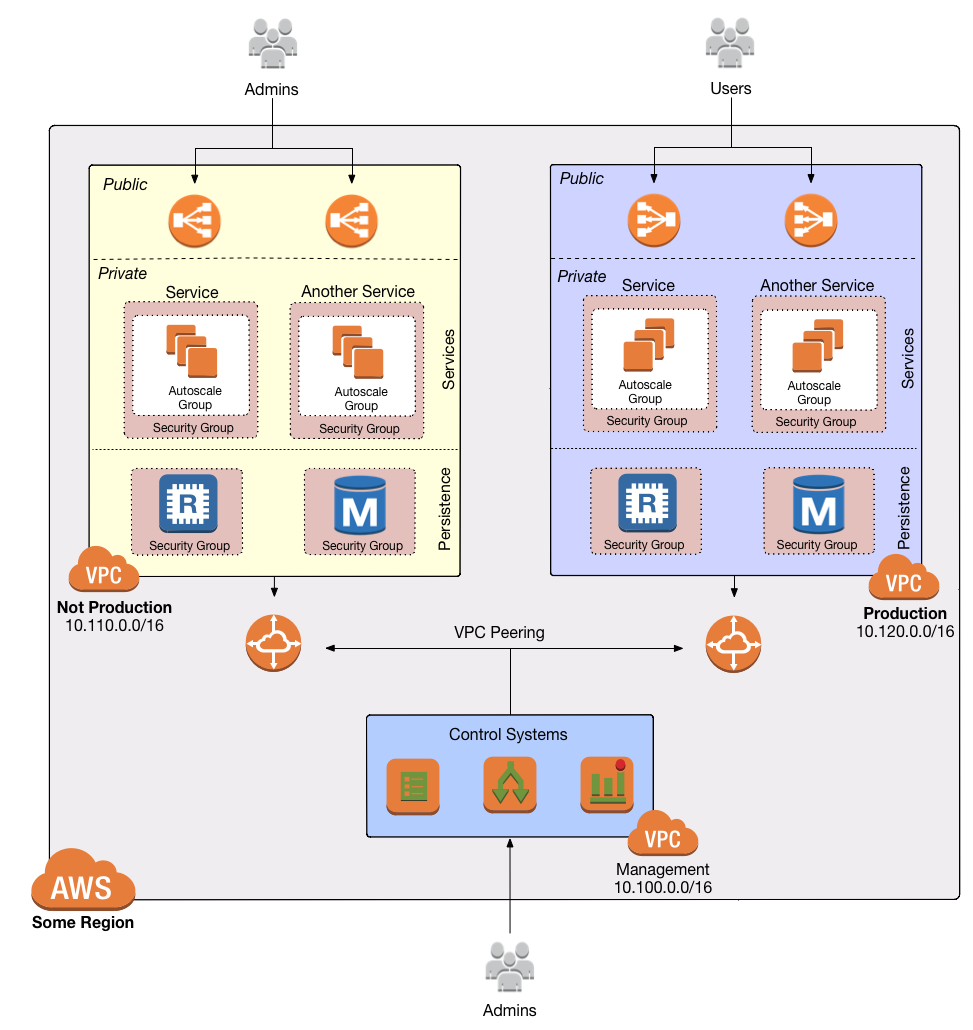
We will use the Mgmt VPC to deploy our infrastructure deployment CD platform, since the infrastructure deployment platform is a management infrastructure that is designed to deploy to multiple environments.
After following this guide, you should have a vpc-mgmt wrapper module in your infrastructure-modules repo:
infrastructure-modules
  └ networking
    └ vpc-mgmt
      └ main.tf
      └ outputs.tf
      └ variables.tf
You should also have a corresponding live configuration in your infrastructure-live repo to deploy the VPC. For
example, for your production environment, there should be a folder called production in the infrastructure-live repo
that looks as follows:
infrastructure-live
  └ production
    └ terragrunt.hcl
    └ us-east-2
      └ prod
        └ networking
          └ vpc-mgmt
            └ terragrunt.hcl
Deploy the ECS Deploy Runner
|
Important
|
This guide is currently only compatible with ECS deploy runner version v0.27.x. We are working on a
series of updates to the Gruntwork CI/CD pipeline spread out across multiple versions. Once complete, we will update
this guide to the latest version. In the meantime, use v0.27.2 for a stable deployment process.
|
For this guide, we will use
Gruntwork’s ECS Deploy
Runner stack as our infrastructure deployment CD platform. We will deploy the stack into the private subnet of our
mgmt VPC using the ecs-deploy-runner
module in module-ci.
To deploy the ECS Deploy Runner, we will follow four steps:
Create Secrets Manager Entries
The ECS deploy runner needs access to your git repositories that contain the infrastructure code in order to be able to deploy them. To allow access to the infrastructure code, you will need to provide it with an SSH key for a machine user that has access to the infrastructure repos. We will use AWS Secrets Manager to securely share the secrets with the deploy runner.
-
Create a machine user on your version control platform.
-
Create a new SSH key pair on the command line using
ssh-keygen:ssh-keygen -t rsa -b 4096 -C "MACHINE_USER_EMAIL"Make sure to set a different path to store the key (to avoid overwriting any existing key). Also avoid setting a passphrase on the key.
-
Upload the SSH key pair to the machine user. See the following docs for the major VCS platforms:
-
Create an AWS Secrets Manager entry with the contents of the private key. In the following example, we use the aws CLI to create the entry in
us-east-2, sourcing the contents from the SSH private key file~/.ssh/machine_user:cat ~/.ssh/machine_user \ | xargs -0 aws secretsmanager create-secret --region us-east-2 --name "SSHPrivateKeyForECSDeployRunner" --secret-stringWhen you run this command, you should see a JSON output with metadata about the created secret:
{
    "ARN": "arn:aws:secretsmanager:us-east-2:000000000000:secret:SSHPrivateKeyForECSDeployRunner-SOME_RANDOM_STRING",
    "Name": "SSHPrivateKeyForECSDeployRunner",
    "VersionId": "21cda90e-84e0-4976-8914-7954cb6151bd"
}
Record the ARN. You will need this later when setting up the terraform module.
Create ECR repo
The ECS Deploy Runner uses an ECS Task to run the infrastructure deployment. In order to run the ECS task, we need a Docker image that contains all the necessary software for the deployment, as well as an ECR repository to store that Docker image. We will start by creating the ECR repo.
Create a new module called ecr-repo in infrastructure-modules:
infrastructure-modules
  └ cicd
    └ ecr-repo
      └ main.tf
      └ outputs.tf
      └ variables.tf
  └ networking
    └ vpc-mgmt
      └ main.tf
      └ outputs.tf
      └ variables.tf
Inside of main.tf, configure the ECR repository:
resource "aws_ecr_repository" "repo" {
  name                 = var.name

  image_scanning_configuration {
    scan_on_push = true
  }
}
This defines a new ECR repository with a name configured by an input variable and indicates that images should be scanned automatically on push.
Add the corresponding name variable to variables.tf:
variable "name" {
  description = "The name of the ECR repository to be created."
  type        = string
}
Also make sure that the repository URL is exposed in outputs.tf, as we will need it later when deploying the ECS
Deploy Runner:
output "url" {
  description = "The Docker URL for the created ECR repository. This can be used as the push URL for containers."
  value       = aws_ecr_repository.repo.repository_url
}
At this point, you’ll want to test your code. See Manual tests for Terraform code and Automated tests for Terraform code for instructions.
Once your ecr-repo module is working the way you want, submit a pull request, get your changes merged into the
master branch, and create a new versioned release by using a Git tag. For example, to create a v0.5.0 release:
git tag -a "v0.5.0" -m "Added module for creating ECR repositories"
git push --follow-tags
Now that we have a module for managing an ECR repo, head over to your infrastructure-live repo and add a
terragrunt.hcl file for creating the ECR repo for the ECS deploy runner:
infrastructure-live
  └ production
    └ terragrunt.hcl
    └ us-east-2
      └ prod
        └ cicd
          └ ecr-repo
            └ terragrunt.hcl
        └ networking
          └ vpc-mgmt
            └ terragrunt.hcl
# Pull in the backend and provider configurations from a root terragrunt.hcl file that you include in each child terragrunt.hcl:
include {
  path = find_in_parent_folders()
}

# Set the source to an immutable released version of the infrastructure module being deployed:
terraform {
  source = "git@github.com:<YOUR_ORG>/infrastructure-modules.git//cicd/ecr-repo?ref=v0.5.0"
}

# Configure input values for the specific environment being deployed:
inputs = {
  name = "ecs-deploy-runner"
}
And run terragrunt apply to deploy the changes:
cd infrastructure-live/production/us-east-2/prod/cicd/ecr-repo
terragrunt apply
Make sure to note the repository URL. You can store it in an environment variable for easy reference when building the Docker image:
cd infrastructure-live/production/us-east-2/prod/cicd/ecr-repo
export ECR_REPO_URL=$(terragrunt output url)
Create Docker Image
Once we have the ECR repository to house Docker images, we need to create the Docker image for the infrastructure
deploy script. This Docker image should contain everything you need to deploy your infrastructure, such as terraform and
terragrunt. In addition, the Docker image should include the
infrastructure-deploy-script.
This is a python script that does the following:
-
Clone the repository containing the infrastructure code using git.
-
Change the working directory to the desired path passed in the parameters.
-
Run
terraformorterragruntwithplanorapplydepending on the passed in parameters, streaming the output tostdoutandstderr. -
Exit with the appropriate exit code depending on if the underlying command succeeded or failed.
You can run any Docker image with any script in the ECS Deploy Runner. That is, you can setup a custom Docker and expose custom scripts that can be invoked remotely on the stack. To integrate the container with the ECS deploy runner, it must meet the following requirements:
-
Define a trigger directory where scripts that can be invoked by the ECS Deploy Runner Lambda function are contained. You should limit the scripts that can be run within the ECS tasks to avoid escape hatches to run arbitrary code due to its powerful IAM permissions. The ECS Deploy Runner will be configured using an entrypoint script to ensure that only scripts defined in the trigger directory can be invoked.
-
The entrypoint must be set to the
deploy-runnerentrypoint command provided in the module-ci repository. This is a small go binary that enforces the configured trigger directory of the Docker container by making sure that the script requested to invoke actually resides in the trigger directory. See the Dockerfile for the deploy-runner container for an example of how to install the entrypoint script.
For convenience, Gruntwork provides a standard deploy runner container and configuration that includes everything you need for a typical Infrastructure as Code pipeline: Terraform, Terragrunt, Packer, Docker, etc. You can read more about what is included in the standard container in the documentation.
For this guide, we will deploy the standard deploy runner provided by Gruntwork.
To build the standard deploy runner containers, clone the module-ci repository to a temporary directory and build the
Dockerfile in the
modules/ecs-deploy-runner/docker/deploy-runner
folder:
git clone git@github.com:gruntwork-io/module-ci.git
cd module-ci
git checkout v0.27.2
cd modules/ecs-deploy-runner/docker/deploy-runner
# Make sure you have set the environment variable GITHUB_OAUTH_TOKEN with a GitHub personal access token that has access
# to the Gruntwork repositories
docker build --build-arg GITHUB_OAUTH_TOKEN --tag "$ECR_REPO_URL:v1" .
Then, push the Docker image to the ECR repository so that it is available to ECS:
# Authenticate docker so that you can access the ECR Repository
eval "$(aws ecr get-login --region "us-east-2" --no-include-email)"
docker push "$ECR_REPO_URL:v1"
Deploy ECS Deploy Runner stack
Once we have the ECR repo with an available Docker image, it is time to configure the ECS task and Lambda function
invoker. We will deploy both using the
ecs-deploy-runner module in
module-ci.
Create a new module called ecs-deploy-runner in infrastructure-modules:
infrastructure-modules
  └ cicd
    └ ecs-deploy-runner
      └ main.tf
      └ variables.tf
    └ ecr-repo
      └ main.tf
      └ outputs.tf
      └ variables.tf
  └ networking
    └ vpc-mgmt
      └ main.tf
      └ outputs.tf
      └ variables.tf
Inside of main.tf, configure the ECS Deploy Runner:
module "ecs_deploy_runner" {
  source = "git::git@github.com:gruntwork-io/module-ci.git//modules/ecs-deploy-runner?ref=v0.27.2"

  name             = var.name
  container_images = module.standard_config.container_images

  vpc_id         = var.vpc_id
  vpc_subnet_ids = var.private_subnet_ids
}

module "standard_config" {
  source = "git::git@github.com:gruntwork-io/module-ci.git//modules/ecs-deploy-runner-standard-configuration?ref=v0.27.2"

  terraform_planner = {
    container_image                  = var.terraform_planner_config.container_image
    infrastructure_live_repositories = var.terraform_planner_config.infrastructure_live_repositories
    secrets_manager_env_vars = merge(
      {
        DEPLOY_SCRIPT_SSH_PRIVATE_KEY = var.terraform_planner_config.repo_access_ssh_key_secrets_manager_arn
      },
      var.terraform_planner_config.secrets_manager_env_vars,
    )
    environment_vars = var.terraform_planner_config.env_vars
  }

  terraform_applier = {
    container_image                         = var.terraform_applier_config.container_image
    infrastructure_live_repositories        = var.terraform_applier_config.infrastructure_live_repositories
    allowed_apply_git_refs                  = var.terraform_applier_config.allowed_apply_git_refs
    repo_access_ssh_key_secrets_manager_arn = var.terraform_applier_config.repo_access_ssh_key_secrets_manager_arn
    secrets_manager_env_vars = merge(
      {
        DEPLOY_SCRIPT_SSH_PRIVATE_KEY = var.terraform_applier_config.repo_access_ssh_key_secrets_manager_arn
      },
      var.terraform_applier_config.secrets_manager_env_vars,
    )
    environment_vars = var.terraform_applier_config.env_vars

    # This guide is focused on infrastructure CI/CD and this feature is not used as part of infrastructure CI/CD
    # pipelines. We will cover this in our guide on how to configure application CI/CD workflows using Gruntwork
    # Pipelines.
    allowed_update_variable_names = []
    machine_user_git_info = {
      name  = ""
      email = ""
    }
  }

  # This guide is focused on infrastructure CI/CD, and so we will shut off the capabilities to build docker images and
  # AMIs in the ECS deploy runner. We will cover the docker_image_builder and ami_builder configurations in our guide on
  # how to configure application CI/CD workflows using Gruntwork Pipelines.
  docker_image_builder = null
  ami_builder          = null
}

# ---------------------------------------------------------------------------------------------------------------------
# ATTACH AWS PERMISSIONS TO ECS TASKS
# ---------------------------------------------------------------------------------------------------------------------

locals {
  configure_terraform_planner_iam_policy    = length(var.terraform_planner_config.iam_policy) > 0
  configure_terraform_applier_iam_policy    = length(var.terraform_applier_config.iam_policy) > 0
}

resource "aws_iam_role_policy" "terraform_planner" {
  count  = local.configure_terraform_planner_iam_policy ? 1 : 0
  name   = "access-to-services"
  role   = module.ecs_deploy_runner.ecs_task_iam_roles["terraform-planner"].name
  policy = data.aws_iam_policy_document.terraform_planner[0].json
}

data "aws_iam_policy_document" "terraform_planner" {
  count = local.configure_terraform_planner_iam_policy ? 1 : 0
  dynamic "statement" {
    for_each = var.terraform_planner_config.iam_policy
    content {
      sid       = statement.key
      effect    = statement.value.effect
      actions   = statement.value.actions
      resources = statement.value.resources
    }
  }
}

resource "aws_iam_role_policy" "terraform_applier" {
  count  = local.configure_terraform_applier_iam_policy ? 1 : 0
  name   = "access-to-services"
  role   = module.ecs_deploy_runner.ecs_task_iam_roles["terraform-applier"].name
  policy = data.aws_iam_policy_document.terraform_applier[0].json
}

data "aws_iam_policy_document" "terraform_applier" {
  count = local.configure_terraform_applier_iam_policy ? 1 : 0
  dynamic "statement" {
    for_each = var.terraform_applier_config.iam_policy
    content {
      sid       = statement.key
      effect    = statement.value.effect
      actions   = statement.value.actions
      resources = statement.value.resources
    }
  }
}

# ---------------------------------------------------------------------------------------------------------------------
# CREATE IAM POLICY WITH PERMISSIONS TO INVOKE THE ECS DEPLOY RUNNER VIA THE LAMBDA FUNCTION AND ATTACH TO USERS
# ---------------------------------------------------------------------------------------------------------------------

module "invoke_policy" {
  source = "git::git@github.com:gruntwork-io/module-ci.git//modules/ecs-deploy-runner-invoke-iam-policy?ref=v0.23.4"

  name                                      = "invoke-${var.name}"
  deploy_runner_invoker_lambda_function_arn = module.ecs_deploy_runner.invoker_function_arn
  deploy_runner_ecs_cluster_arn             = module.ecs_deploy_runner.ecs_cluster_arn
  deploy_runner_cloudwatch_log_group_name   = module.ecs_deploy_runner.cloudwatch_log_group_name
}

resource "aws_iam_role_policy_attachment" "attach_invoke_to_roles" {
  for_each   = length(var.iam_roles) > 0 ? { for k in var.iam_roles : k => k } : {}
  role       = each.key
  policy_arn = module.invoke_policy.arn
}
This module call does the following:
-
Create an ECS cluster that can be used to run ECS Fargate tasks
-
Configure two separate ECS Task Definition: one for running plan, and one for running apply (
var.terraform_planner_configandvar.terraform_applier_config). -
Configure the ECS Task to expose the secrets in the Secrets Manager entry with the ARN as environment variables (the attribute
repo_access_ssh_key_secrets_manager_arn). -
Deploy a Lambda function that is configured to invoke the ECS task to run on Fargate in the provided VPC and subnet (
var.vpc_idandvar.private_subnet_ids). The information provided interraform_planner_configandterraform_applier_configis used to restrict the interface so that it can only be triggered to deploy code from allowed sources (e.g., theinfrastructure_live_repositoriesattribute is used to only allowplanandapplyto run from code in those repositories). -
Grant permissions to invoke the Invoker Lambda function to the given list of IAM users.
-
Grant permissions to access the provided AWS services to the ECS Task. Note that each task has their own set of permissions.
Add the corresponding input variables to variables.tf:
variable "vpc_id" {
  description = "ID of the VPC where the ECS task and Lambda function should run."
  type        = string
}

variable "private_subnet_ids" {
  description = "List of IDs of private subnets that can be used for running the ECS task and Lambda function."
  type        = list(string)
}

variable "terraform_planner_config" {
  description = "Configuration options for the terraform-planner container of the ECS deploy runner stack. This container will be used for running infrastructure plan (including validate) actions in the CI/CD pipeline with Terraform / Terragrunt. Set to `null` to disable this container."
  type = object({
    # Docker repo and image tag to use as the container image for the ami builder. This should be based on the
    # Dockerfile in module-ci/modules/ecs-deploy-runner/docker/deploy-runner.
    container_image = object({
      docker_image = string
      docker_tag   = string
    })

    # An object defining the IAM policy statements to attach to the IAM role associated with the ECS task for the
    # terraform planner. Accepts a map of objects, where the map keys are sids for IAM policy statements, and the object
    # fields are the resources, actions, and the effect (\"Allow\" or \"Deny\") of the statement.
    # Note that you do not need to explicitly grant read access to the secrets manager entries set on the other
    # variables (repo_access_ssh_key_secrets_manager_arn and secrets_manager_env_vars).
    # iam_policy = {
    #   S3Access = {
    #     actions = ["s3:*"]
    #     resources = ["arn:aws:s3:::mybucket"]
    #     effect = "Allow"
    #   },
    #   EC2Access = {
    #     actions = ["ec2:*"],
    #     resources = ["*"]
    #     effect = "Allow"
    #   }
    # }
    iam_policy = map(object({
      resources = list(string)
      actions   = list(string)
      effect    = string
    }))

    # List of git repositories containing infrastructure live configuration (top level terraform or terragrunt
    # configuration to deploy infrastructure) that the deploy runner is allowed to run plan on. These should be the SSH
    # git URL of the repository (e.g., git@github.com:gruntwork-io/module-ci.git).
    # NOTE: when only a single repository is provided, this will automatically be included as a hardcoded option.
    infrastructure_live_repositories = list(string)

    # The ARN of a secrets manager entry containing the raw contents of a SSH private key to use when accessing the
    # infrastructure live repository.
    repo_access_ssh_key_secrets_manager_arn = string

    # ARNs of AWS Secrets Manager entries that you would like to expose to the terraform/terragrunt process as
    # environment variables. For example,
    # secrets_manager_env_vars = {
    #   GITHUB_OAUTH_TOKEN = "ARN_OF_PAT"
    # }
    # Will inject the secret value stored in the secrets manager entry ARN_OF_PAT as the env var `GITHUB_OAUTH_TOKEN`
    # in the container that can then be accessed through terraform/terragrunt.
    secrets_manager_env_vars = map(string)

    # Map of environment variable names to values share with the container during runtime.
    # Do NOT use this for sensitive variables! Use secrets_manager_env_vars for secrets.
    env_vars = map(string)
  })
}

variable "terraform_applier_config" {
  description = "Configuration options for the terraform-applier container of the ECS deploy runner stack. This container will be used for running infrastructure deployment actions (including automated variable updates) in the CI/CD pipeline with Terraform / Terragrunt. Set to `null` to disable this container."
  type = object({
    # Docker repo and image tag to use as the container image for the ami builder. This should be based on the
    # Dockerfile in module-ci/modules/ecs-deploy-runner/docker/deploy-runner.
    container_image = object({
      docker_image = string
      docker_tag   = string
    })

    # An object defining the IAM policy statements to attach to the IAM role associated with the ECS task for the
    # terraform applier. Accepts a map of objects, where the map keys are sids for IAM policy statements, and the object
    # fields are the resources, actions, and the effect (\"Allow\" or \"Deny\") of the statement.
    # Note that you do not need to explicitly grant read access to the secrets manager entries set on the other
    # variables (repo_access_ssh_key_secrets_manager_arn and secrets_manager_env_vars).
    # iam_policy = {
    #   S3Access = {
    #     actions = ["s3:*"]
    #     resources = ["arn:aws:s3:::mybucket"]
    #     effect = "Allow"
    #   },
    #   EC2Access = {
    #     actions = ["ec2:*"],
    #     resources = ["*"]
    #     effect = "Allow"
    #   }
    # }
    iam_policy = map(object({
      resources = list(string)
      actions   = list(string)
      effect    = string
    }))

    # List of Git repository containing infrastructure live configuration (top level terraform or terragrunt
    # configuration to deploy infrastructure) that the deploy runner is allowed to deploy. These should be the SSH git
    # URL of the repository (e.g., git@github.com:gruntwork-io/module-ci.git).
    # NOTE: when only a single repository is provided, this will automatically be included as a hardcoded option.
    infrastructure_live_repositories = list(string)

    # A list of Git Refs (branch or tag) that are approved for running apply on. Any git ref that does not match this
    # list will not be allowed to run `apply` or `apply-all`. This is useful for protecting against internal threats
    # where users have access to the CI script and bypass the approval flow by commiting a new CI flow on their branch.
    # Set to null to allow all refs to apply.
    allowed_apply_git_refs = list(string)

    # The ARN of a secrets manager entry containing the raw contents of a SSH private key to use when accessing remote
    # repository containing the live infrastructure configuration. This SSH key should be for a machine user that has write
    # access to the code when using with terraform-update-variable.
    repo_access_ssh_key_secrets_manager_arn = string

    # ARNs of AWS Secrets Manager entries that you would like to expose to the terraform/terragrunt process as
    # environment variables. For example,
    # secrets_manager_env_vars = {
    #   GITHUB_OAUTH_TOKEN = "ARN_OF_PAT"
    # }
    # Will inject the secret value stored in the secrets manager entry ARN_OF_PAT as the env var `GITHUB_OAUTH_TOKEN`
    # in the container that can then be accessed through terraform/terragrunt.
    secrets_manager_env_vars = map(string)

    # Map of environment variable names to values share with the container during runtime.
    # Do NOT use this for sensitive variables! Use secrets_manager_env_vars for secrets.
    env_vars = map(string)
  })
}

variable "name" {
  description = "Name of this instance of the deploy runner stack. Used to namespace all resources."
  type        = string
  default     = "ecs-deploy-runner"
}

variable "iam_roles" {
  description = "List of AWS IAM roles that should be given access to invoke the deploy runner."
  type        = list(string)
  default     = []
}
Since all the lookups for the ECS Deploy Runner can be done by name, it is not necessary for this module to expose any outputs.
Once you test your code and the ecs-deploy-runner module is working the way you want, submit a
pull request, get your changes merged into the master branch, and create a new versioned release by using a Git tag.
Next, head over to your infrastructure-live repo to deploy the
stack to your environments. Add a new terragrunt.hcl file that calls the module. We will use Terragrunt dependency
blocks to get the outputs of our dependencies to pass them to the module:
|
Important
|
Below is a sample terragrunt.hcl file that you can use, but it is incomplete. You will need to update all
the TODOs and set the appropriate IAM permissions for the containers (the iam_policy attribute) to deploy your
infrastructure.
|
|
Important
|
It is tempting to grant admin permissions to both the planner and applier ECS tasks. In production it is
strongly recommended to take the effort to identify the least privileges the Deploy Runner needs to accomplish plan
and apply separately. plan runs on every branch, so you don’t have the typical "protected branches" permissions
during the plan action. Given that Terraform has many escape hatches that allow you to run arbitrary code even during
plan, it is important to ensure that you don’t give powerful permissions to the terraform-planner task.
|
infrastructure-live
  └ production
    └ terragrunt.hcl
    └ us-east-2
      └ prod
        └ cicd
          └ ecr-repo
            └ terragrunt.hcl
          └ ecs-deploy-runner
            └ terragrunt.hcl
        └ networking
          └ vpc-mgmt
            └ terragrunt.hcl
# Pull in the backend and provider configurations from a root terragrunt.hcl file that you include in each child terragrunt.hcl:
include {
  path = find_in_parent_folders()
}

# Set the source to an immutable released version of the infrastructure module being deployed:
terraform {
  source = "git@github.com:<YOUR_ORG>/infrastructure-modules.git//cicd/ecs-deploy-runner?ref=v0.5.0"
}

# Look up the VPC and ECR repository information using dependency blocks:
dependency "vpc" {
  config_path = "${get_terragrunt_dir()}/../../networking/vpc-mgmt"
}

dependency "ecr" {
  config_path = "${get_terragrunt_dir()}/../ecr-repo"
}

# Extract common references.
# TODO: Fill these in.
locals {
  # Name of the S3 bucket where the terraform state is stored.
  state_bucket = TODO
  # Name of the dynamodb table used to store lock records for accessing terraform state.
  state_lock_table = TODO
  # SSH Git URL of the infrastructure-live repository.
  infrastructure_live_git_url = TODO (example: git@github.com:<YOUR_ORG>/infrastructure-live.git)
  # ARN of the AWS Secrets Manager entry that contains the SSH private key.
  repo_access_ssh_key_secrets_manager_arn = TODO
}

# Configure input values for the specific environment being deployed:
inputs = {
  vpc_id             = dependency.vpc.outputs.vpc_id
  private_subnet_ids = dependency.vpc.outputs.private_subnet_ids

  terraform_planner_config = {
    container_image = {
      docker_image = dependency.ecr.outputs.url
      docker_tag   = "v1"
    }

    infrastructure_live_repositories        = [local.infrastructure_live_git_url]
    secrets_manager_env_vars                = {}
    env_vars                                = {}
    repo_access_ssh_key_secrets_manager_arn = local.repo_access_ssh_key_secrets_manager_arn

    # Include read only access for the services that you use. Here we include typical read only permissions needed for
    # deploying EC2 clusters.
    iam_policy = {
      ReadOnlyAccess = {
        effect = "Allow"
        actions = [
          "autoscaling:Describe*",
          "ec2:Describe*",
          "iam:Get*",
          "iam:List*",
          "iam:PassRole",
          "s3:Get*",
          "s3:List*",
        ]
        resources = ["*"]
      }

      # The following permissions are needed to read the remote state resources
      S3StateBucketAccess = {
        effect  = "Allow"
        actions = ["s3:*"]
        resources = [
          "arn:aws:s3:::${local.state_bucket}",
          "arn:aws:s3:::${local.state_bucket}/*",
        ]
      }
      DynamoDBLocksTableAccess = {
        effect  = "Allow"
        actions = ["dynamodb:*"]
        resources = [
          "arn:aws:dynamodb:*:*:table/${local.state_lock_table}"
        ]
      }
    }
  }

  terraform_applier_config = {
    container_image = {
      docker_image = dependency.ecr.outputs.url
      docker_tag   = "v1"
    }

    infrastructure_live_repositories        = [local.infrastructure_live_git_url]
    allowed_apply_git_refs                  = ["master"]
    secrets_manager_env_vars                = {}
    env_vars                                = {}
    repo_access_ssh_key_secrets_manager_arn = local.repo_access_ssh_key_secrets_manager_arn

    # Include access for the services that you use. Here we include typical permissions needed for deploying EC2
    # clusters.
    iam_policy = {
      DeployAccess = {
        effect    = "Allow"
        actions   = [
          "autoscaling:*",
          "ec2:*",
          "iam:*",
          "s3:*",
        ]
        resources = ["*"]
      }
      DynamoDBLocksTableAccess = {
        effect  = "Allow"
        actions = ["dynamodb:*"]
        resources = [
          "arn:aws:dynamodb:*:*:table/${local.state_lock_table}"
        ]
      }
    }
  }

  # Set this to the AWS IAM role that your machine user will assume.
  iam_roles = ["allow-auto-deploy-from-other-accounts"]
}
And run terragrunt apply to deploy the changes:
cd infrastructure-live/production/us-east-2/prod/cicd/ecs-deploy-runner
terragrunt apply
Repeat for each environment that you want to support the ECS Deploy Runner stack.
Try out the ECS Deploy Runner
At this point, you can see if the ECS Deploy Runner can be used to deploy your infrastructure. To test, use the infrastructure-deployer CLI.
To use the infrastructure-deployer CLI, use gruntwork-install to install a pre-compiled version for your system:
gruntwork-install --binary-name "infrastructure-deployer" --repo "https://github.com/gruntwork-io/module-ci" --tag "v0.27.2"Then, invoke the infrastructure-deployer against the master branch of your live infrastructure to run a plan on
the vpc-mgmt module (don’t forget to assume the role):
# NOTE: you should assume the IAM role allow-auto-deploy-from-other-accounts before running this step
infrastructure-deployer --aws-region "us-east-2" -- \
  terraform-planner infrastructure-deploy-script \
  --ref "master" \
  --binary "terragrunt" \
  --command "plan" \
  --deploy-path "production/us-east-2/prod/networking/vpc-mgmt"
If everything is set up correctly, you should see a stream of logs that indicate a terragrunt plan running on the
vpc-mgmt module.
Note that we don’t specify the infrastructure-live repository in the command. The ECS Deploy Runner will automatically
select the provided infrastructure-live repository when
var.terraform_planner_config.infrastructure_live_repositories and
var.terraform_applier_config.infrastructure_live_repositories is a list with a single item.
You can see all the containers and scripts that you can invoke using the infrastructure-deployer by running the
--describe-containers command:
infrastructure-deployer --describe-containers --aws-region us-west-2
Running this command will provide output similar to below:
INFO[2020-08-17T10:00:44-05:00] The Lambda function arn:aws:lambda:ca-central-1:738755648600:function:7kr4n5-ecs-deploy-runner-gmvitx-invoker supports the following containers (container is in bold):  name=infrastructure-deployer
INFO[2020-08-17T10:00:44-05:00]   terraform-applier
INFO[2020-08-17T10:00:44-05:00]         infrastructure-deploy-script
INFO[2020-08-17T10:00:44-05:00]         terraform-update-variable
INFO[2020-08-17T10:00:44-05:00]   terraform-planner
INFO[2020-08-17T10:00:44-05:00]         infrastructure-deploy-script
Define pipeline as code
|
Note
|
This guide will use CircleCI as the CI server, but it is NOT required for using the ECS Deploy Runner stack. You can configure any other CI server in a similar fashion to invoke deployments against the ECS Deploy Runner. |
Now that we have a working ECS Deploy Runner stack, the final step is to configure our CI/CD pipeline in our CI server of choice. For this guide, we will configure CircleCI to implement the workflow described at the beginning of this section.
Create the CircleCI configuration folder in your infrastructure-live repo:
infrastructure-live
  └ .circleci
    └ config.yml
    └ deploy.sh
    └ install.sh
  └ production
    └ terragrunt.hcl
    └ us-east-2
      └ prod
        └ cicd
          └ ecr-repo
            └ terragrunt.hcl
          └ ecs-deploy-runner
            └ terragrunt.hcl
        └ networking
          └ vpc-mgmt
            └ terragrunt.hcl
The scripts deploy.sh and install.sh are helper scripts to make the CircleCI configuration more readable. Here are
the contents of the scripts:
#!/bin/bash
#
# Script used by CircleCI to install the necessary helpers for the CI/CD pipeline
#
# Required environment variables:
# - GRUNTWORK_INSTALLER_VERSION : The version of the gruntwork-installer helper utility used to install scripts from the
#                                 Gruntwork IaC Library.
# - MODULE_CI_VERSION : The version of the module-ci repository to use when installing the terraform helpers and
#                       infrastructure-deployer CLI.
# - MODULE_SECURITY_VERSION : The version of the module-security repository to use when installing the aws-auth utility.
#

set -e

function run {
  local -r gruntwork_installer_version="$1"
  local -r module_ci_version="$2"
  local -r module_security_version="$3"

  curl -Ls https://raw.githubusercontent.com/gruntwork-io/gruntwork-installer/master/bootstrap-gruntwork-installer.sh \
    | bash /dev/stdin --version "$gruntwork_installer_version"
  gruntwork-install --repo "https://github.com/gruntwork-io/module-ci" \
    --binary-name "infrastructure-deployer" \
    --tag "$module_ci_version"
  gruntwork-install --repo "https://github.com/gruntwork-io/module-ci" \
    --module-name "terraform-helpers" \
    --tag "$module_ci_version"
  gruntwork-install --repo "https://github.com/gruntwork-io/module-security" \
    --module-name "aws-auth" \
    --tag "$module_security_version"
}

run "${GRUNTWORK_INSTALLER_VERSION}" "${MODULE_CI_VERSION}" "${MODULE_SECURITY_VERSION}"#!/bin/bash
#
# Script used by CircleCI to trigger deployments via the infrastructure-deployer CLI utility.
#
# Required positional arguments, in order:
# - REGION : The AWS Region where the ECS Deploy Runner exists.
# - SOURCE_REF : The starting point for identifying all the changes. The diff between SOURCE_REF and REF will be
# evaluated to determine all the changed files.
# - REF : The end point for identifying all the changes. The diff between SOURCE_REF and REF will be evaluated to
# determine all the changed files.
# - COMMAND : The command to run. Should be one of plan or apply.
#
set -e
# A function that uses aws-auth to assume the IAM role for invoking the ECS Deploy Runner.
function assume_role_for_environment {
local -r environment="$1"
# NOTE: Make sure to set the respective ACCOUNT_ID to the AWS account ID for each of the environments.
if [[ "$environment" == "production" ]]; then
aws-auth --role-arn "arn:aws:iam::<PRODUCTION_ACCOUNT_ID>:role/allow-auto-deploy-from-other-accounts"
elif [[ "$environment" == "staging" ]]; then
aws-auth --role-arn "arn:aws:iam::<STAGING_ACCOUNT_ID>:role/allow-auto-deploy-from-other-accounts"
else
echo "ERROR: Unknown environment $environment. Can not assume role."
exit 1
fi
}
# Function that invoke the ECS Deploy Runner using the infrastructure-deployer CLI. This will also make sure to assume
# the correct IAM role based on the deploy path.
function invoke_infrastructure_deployer {
local -r region="$1"
local -r ref="$2"
local -r command="$3"
local -r deploy_path="$4"
local assume_role_exports
if [[ $deploy_path =~ ^([^/]+)/.+$ ]]; then
assume_role_exports="$(assume_role_for_environment "${BASH_REMATCH[1]}")"
else
echo "ERROR: Could not extract environment from deployment path $deploy_path."
exit 1
fi
local container
if [[ "$command" == "plan" ]] || [[ "$command" == "plan-all" ]] || [[ "$command" == "validate" ]] || [[ "$command" == "validate-all" ]]; then
container="terraform-planner"
else
container="terraform-applier"
fi
(eval "$assume_role_exports" && \
infrastructure-deployer --aws-region "$region" -- "$container" infrastructure-deploy-script --ref "$ref" --binary "terragrunt" --command "$command" --deploy-path "$deploy_path")
}
function run {
local -r region="$1"
local -r source_ref="$2"
local -r ref="$3"
local -r command="$4"
# We must export the functions so that they can be invoked through xargs
export -f invoke_infrastructure_deployer
export -f assume_role_for_environment
# Use git-updated-folders to find all the terragrunt modules that changed, and pipe that through to the
# infrastructure-deployer.
# NOTE: the tee in the middle of the pipeline is used so we can see the detected folders that were updated in the
# logs. The last step is a check to see if there was any output from the previous command, which will be empty if no
# modules were updated.
git-updated-folders --source-ref "$source_ref" --terragrunt \
| tee /dev/tty \
| xargs -I{} --no-run-if-empty \
bash -c "invoke_infrastructure_deployer \"$region\" \"$ref\" \"$command\" {}" \
|& bash -c "grep . || echo 'No terragrunt modules were updated. Skipping plan.'"
}
run "$@"We will call out to these scripts in the CI pipeline to setup our environment for the deployments. With the scripts defined, let’s start building out our CircleCI config. We will start by defining the workflows, which acts as the basis of our pipeline:
version: 2.1

workflows:
  continuous-deploy:
    jobs:
      - plan

      - notify:
          requires:
            - plan
          filters:
            branches:
              only: master

      - hold:
          type: approval
          requires:
            - notify
          filters:
            branches:
              only: master

      - deploy:
          requires:
            - hold
          filters:
            branches:
              only: master
Our workflow consists of four steps:
-
plan: Runterragrunt planon all the files that changed. This is run on commits to all branches. -
notify: Notify on slack that there is an approval available for review. This should only run onmaster(our deployment branch). The rest of the pipeline will also only be restricted to commits onmaster. -
hold: The approval stage. We will hold all deployments for approval after running plan, but before proceeding to runningterragrunt applyso that an admin has a chance to review the exact changes that are about to be rolled out. -
deploy: Runterragrunt applyon all the files that changed. This should only happen after approval.
Next, we will update our config to start defining the jobs. Since all the jobs will have common elements, we will define a few aliases in the config to reuse common components.
The first is the runtime environment of each job:
# Global constants for the jobs. This includes:
# - Using machine executor
# - Tools versions
defaults: &defaults
  machine:
    image: "ubuntu-1604:201903-01"
  environment:
    GRUNTWORK_INSTALLER_VERSION: v0.0.22
    MODULE_CI_VERSION: v0.27.2
    MODULE_SECURITY_VERSION: v0.24.1
    REGION: us-east-2
We will also want to figure out a friendly name for the deployment. CircleCI gives us a few environment variables that
are related to the commit that has triggered the build, but for notification purposes we would like to know whether the
build is a tag, branch, or SHA. The following routine updates the runtime with the environment variable
CIRCLE_FRIENDLY_REF which tells us whether the change was a tag, branch, or bare commit:
# This common step is used to determine the user friendly Git Ref name of the build, either the branch or tag.
set_friendly_git_ref: &set_friendly_git_ref
  run:
    name: set friendly git ref name
    command: |
      if [[ ! -z "$CIRCLE_TAG" ]]; then
        echo 'export CIRCLE_FRIENDLY_REF="$CIRCLE_TAG"' >> $BASH_ENV
      elif [[ ! -z "$CIRCLE_BRANCH" ]]; then
        echo 'export CIRCLE_FRIENDLY_REF="$CIRCLE_BRANCH"' >> $BASH_ENV
      else
        echo 'export CIRCLE_FRIENDLY_REF="$CIRCLE_SHA1"' >> $BASH_ENV
      fi
We also need to know what the base comparison point is for finding updated modules. We will set this as the environment
variable SOURCE_REF in the runtime environment:
# This is used to determine what to use as the base comparison point for determining what modules to deploy. The logic
# is as follows:
#   - If we are on the master branch, the comparison is only the current commit.
#   - If we are not on master, the comparison is to the current state of the master branch.
set_source_ref: &set_source_ref
  run:
    name: set source ref
    command: |
      if [[ "$CIRCLE_BRANCH" == "master" ]]; then
        echo 'export SOURCE_REF=HEAD^' >> $BASH_ENV
      else
        # We have to use origin/master because the checkout routine in CircleCI sets the local master to HEAD.
        echo 'export SOURCE_REF=origin/master' >> $BASH_ENV
      fi
Finally, we need to import functionality to notify on Slack. We will use the official Slack Orb from CircleCI:
orbs:
  slack: circleci/slack@3.4.2
Once we have the common elements defined as aliases, we can start defining each of the jobs. We will start with the
plan job:
  plan:
    <<: *defaults
    steps:
      - <<: *set_friendly_git_ref
      - <<: *set_source_ref
      - checkout
      - run:
          name: install utilities
          command: ./.circleci/install.sh
      - run:
          name: run plan
          command: ./.circleci/deploy.sh "$REGION" "$SOURCE_REF" "$CIRCLE_SHA1" plan
      - slack/status:
          channel: workflow-approvals
          success_message: "PLAN from $CIRCLE_FRIENDLY_REF ($CIRCLE_SHA1) successful. Click 'Visit Job' to see output."
          failure_message: "PLAN from $CIRCLE_FRIENDLY_REF ($CIRCLE_SHA1) failed. Click 'Visit Job' to see output."
This job will do the following:
-
Set common environment variables for knowing a friendly name for the git ref that triggered the change and the source ref for the changes.
-
Checkout the code in the repository.
-
Call
install.shwhich will install gruntwork utilities necessary for invoking a deployment. -
Call
deploy.shwhich will use thegit-updated-foldersandinfrastructure-deployerutilities to run plan on the updated modules. -
Notify in the
workflow-approvalsslack channel whether the plan was successful or had failed.
Next, we will define the deploy job, which will closely resemble the plan job:
  deploy:
    <<: *defaults
    steps:
      - <<: *set_friendly_git_ref
      - <<: *set_source_ref
      - slack/notify:
          channel: workflow-approvals
          message: "A deployment was approved by $CIRCLE_USERNAME for $CIRCLE_FRIENDLY_REF ($CIRCLE_SHA1). Click 'Visit Job' to see output."
      - checkout
      - run:
          name: install utilities
          command: ./.circleci/install.sh
      - run:
          name: run apply
          command: ./.circleci/deploy.sh "$REGION" "$SOURCE_REF" "$CIRCLE_BRANCH" apply
      - slack/status:
          channel: workflow-approvals
          success_message: "APPLY from $CIRCLE_FRIENDLY_REF ($CIRCLE_SHA1) was successful. Click 'Visit Job' to see output."
          failure_message: "APPLY from $CIRCLE_FRIENDLY_REF ($CIRCLE_SHA1) failed. Click 'Visit Job' to see output."
This is very similar to the plan job, with two differences:
-
Before invoking the deployment, send a message to the
workflow-approvalsslack channel indicating that a deployment had started in response to an approval event. -
Call
applyinstead ofplan.
Finally, we define the jobs for the approval notifications:
  notify:
    <<: *defaults
    steps:
      - <<: *set_friendly_git_ref
      - slack/approval:
          channel: workflow-approvals
          message: "A deployment for $CIRCLE_FRIENDLY_REF ($CIRCLE_SHA1) is pending approval. Click 'Visit Workflow' to approve."
This job will send a message to the workflow-approvals slack channel that there is a deployment that is pending
approval.
For convenience, here is the full configuration in its entirety, with a few components reorganized for readability:
version: 2.1

workflows:
  continuous-deploy:
    jobs:
      - plan

      - notify:
          requires:
            - plan
          filters:
            branches:
              only: master

      - hold:
          type: approval
          requires:
            - notify
          filters:
            branches:
              only: master

      - deploy:
          requires:
            - hold
          filters:
            branches:
              only: master

orbs:
  slack: circleci/slack@3.4.2

# Global constants for the jobs. This includes:
# - Using machine executor
# - Tools versions
defaults: &defaults
  machine:
    image: "ubuntu-1604:201903-01"
  environment:
    GRUNTWORK_INSTALLER_VERSION: v0.0.22
    MODULE_CI_VERSION: v0.27.2
    MODULE_SECURITY_VERSION: v0.24.1
    REGION: us-east-2

# This common step is used to determine the user friendly Git Ref name of the build, either the branch or tag.
set_friendly_git_ref: &set_friendly_git_ref
  run:
    name: set friendly git ref name
    command: |
      if [[ ! -z "$CIRCLE_TAG" ]]; then
        echo 'export CIRCLE_FRIENDLY_REF="$CIRCLE_TAG"' >> $BASH_ENV
      elif [[ ! -z "$CIRCLE_BRANCH" ]]; then
        echo 'export CIRCLE_FRIENDLY_REF="$CIRCLE_BRANCH"' >> $BASH_ENV
      else
        echo 'export CIRCLE_FRIENDLY_REF="$CIRCLE_SHA1"' >> $BASH_ENV
      fi

# This is used to determine what to use as the base comparison point for determining what modules to deploy. The logic
# is as follows:
#   - If we are on the master branch, the comparison is only the current commit.
#   - If we are not on master, the comparison is to the current state of the master branch.
set_source_ref: &set_source_ref
  run:
    name: set source ref
    command: |
      if [[ "$CIRCLE_BRANCH" == "master" ]]; then
        echo 'export SOURCE_REF=HEAD^' >> $BASH_ENV
      else
        # We have to use origin/master because the checkout routine in CircleCI sets the local master to HEAD.
        echo 'export SOURCE_REF=origin/master' >> $BASH_ENV
      fi

jobs:
  plan:
    <<: *defaults
    steps:
      - <<: *set_friendly_git_ref
      - <<: *set_source_ref
      - checkout
      - run:
          name: install utilities
          command: ./.circleci/install.sh
      - run:
          name: run plan
          command: ./.circleci/deploy.sh "$REGION" "$SOURCE_REF" "$CIRCLE_SHA1" plan
      - slack/status:
          channel: workflow-approvals
          success_message: "PLAN from $CIRCLE_FRIENDLY_REF ($CIRCLE_SHA1) successful. Click 'Visit Job' to see output."
          failure_message: "PLAN from $CIRCLE_FRIENDLY_REF ($CIRCLE_SHA1) failed. Click 'Visit Job' to see output."
  deploy:
    <<: *defaults
    steps:
      - <<: *set_friendly_git_ref
      - <<: *set_source_ref
      - slack/notify:
          channel: workflow-approvals
          message: "A deployment was approved by $CIRCLE_USERNAME for $CIRCLE_FRIENDLY_REF ($CIRCLE_SHA1). Click 'Visit Job' to see output."
      - checkout
      - run:
          name: install utilities
          command: ./.circleci/install.sh
      - run:
          name: run apply
          command: ./.circleci/deploy.sh "$REGION" "$SOURCE_REF" "$CIRCLE_BRANCH" apply
      - slack/status:
          channel: workflow-approvals
          success_message: "APPLY from $CIRCLE_FRIENDLY_REF ($CIRCLE_SHA1) was successful. Click 'Visit Job' to see output."
          failure_message: "APPLY from $CIRCLE_FRIENDLY_REF ($CIRCLE_SHA1) failed. Click 'Visit Job' to see output."
  notify:
    <<: *defaults
    steps:
      - <<: *set_friendly_git_ref
      - slack/approval:
          channel: workflow-approvals
          message: "A deployment for $CIRCLE_FRIENDLY_REF ($CIRCLE_SHA1) is pending approval. Click 'Visit Workflow' to approve."
Configure CI Server
Once we have our pipeline defined as code in our repository, we can hook it up to our CI server to start building.
Configure CircleCI to start building the infrastructure-live repo by adding the project to your org.
To add the infrastructure-live repo:
-
Login to CircleCI as the machine user. If you don’t have an account for the machine user, sign up using the GitHub account of the machine user.
-
Go to the projects page for your org and click the Add Projects button.
-
Look for the
infrastructure-liverepo in the list, and click the Set Up Project button next to the repo. -
Click the Start Building button to trigger the first build. Note that this build is expected to fail since we haven’t configured the required environment variables.
Next, we need to configure the environment variables for the build:
-
Click the gear icon in the top right for the job to configure the job.
-
Add a User Key in the Checkout SSH keys settings for the build.
-
Click Environment Variables and add the following variables to the build:
-
AWS_ACCESS_KEY_IDandAWS_SECRET_ACCESS_KEY: The AWS access key pair for the machine user to access your AWS account. This should be a user in the security account with the ability to assume the auto deploy role in each of the environments that you wish to configure CI/CD for. -
GITHUB_OAUTH_TOKEN: A personal access token for the machine user with access to Gruntwork Infrastructure as Code Library. -
SLACK_WEBHOOK: A webhook for posting messages to your Slack org. You can refer to the official Slack documentation for instructions on how to configure a webhook for your Slack org.
Once you have these configurations set, you should be able to start deploying your infrastructure in reaction to git events!
Next steps
Now that you have a CI/CD pipeline for your infrastructure code, test it out by doing one of the following;
-
Add a new component to
infrastructure-liveand see how it flows through the pipeline. -
Make a change to one of the existing components that you have already deployed and see how it flows through the pipeline.

Comments